


A mortise and tenon joint is one of the strongest and most useful joints in woodworking. But there's no single best way to cut the mortise. Depending on the project, the tools in your shop, and how many joints you need to make, you can cut an accurate mortise with hand tools, a drill press, a plunge router, or even a table saw.
In this episode of the Woodsmith Shop, Chris demonstrates four reliable ways to cut a mortise and explains where each method makes sense. You'll see how to chop a traditional mortise by hand, speed up the process with a drill press, create smooth and repeatable mortises with a router, and use a clever table saw technique for large through mortises.
Each technique has advantages. If you're making one or two joints, a sharp chisel may be all you need. For a project with a dozen mortises, a drill press or router can save considerable time. And for large through mortises, building the mortise into the workpiece at the table saw can be surprisingly simple and accurate.
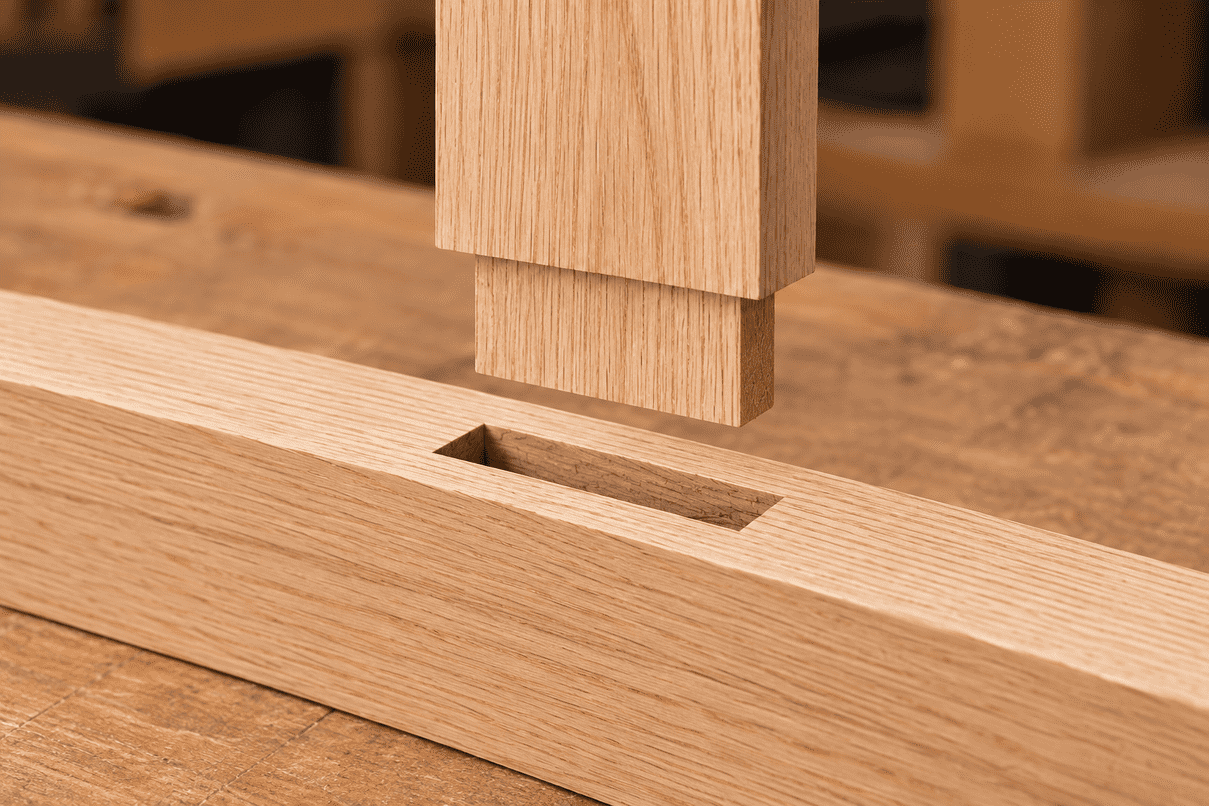
What Is a Mortise?
A mortise is a rectangular or square-sided opening cut into a workpiece to receive a matching tenon. Together, the two parts form a mortise and tenon joint.
The mortise controls much of the fit of the finished joint. Ideally, the tenon cheeks should make smooth, even contact with the walls of the mortise without requiring excessive force to assemble the joint.
Too loose, and you lose some of that close-fitting contact. Too tight, and you risk damaging the joint or preventing the tenon shoulders from seating fully against the mortised workpiece.
That's why accuracy matters regardless of which mortising method you choose.
1. How to Cut a Mortise by Hand
Cutting a mortise with chisels and a mallet is the traditional approach, and it's still an excellent option when you only have a few mortises to make.
You don't need a specialized mortising machine or complicated setup. You do, however, need sharp chisels.
Chris uses two chisels for the process. A narrower chisel that's approximately the width of the mortise does most of the waste removal. A wider chisel is useful for cleaning and straightening the sides.
If you're cutting a lot of mortises, stop periodically to touch up the cutting edges. Sharp tools make the work easier and give you much greater control.
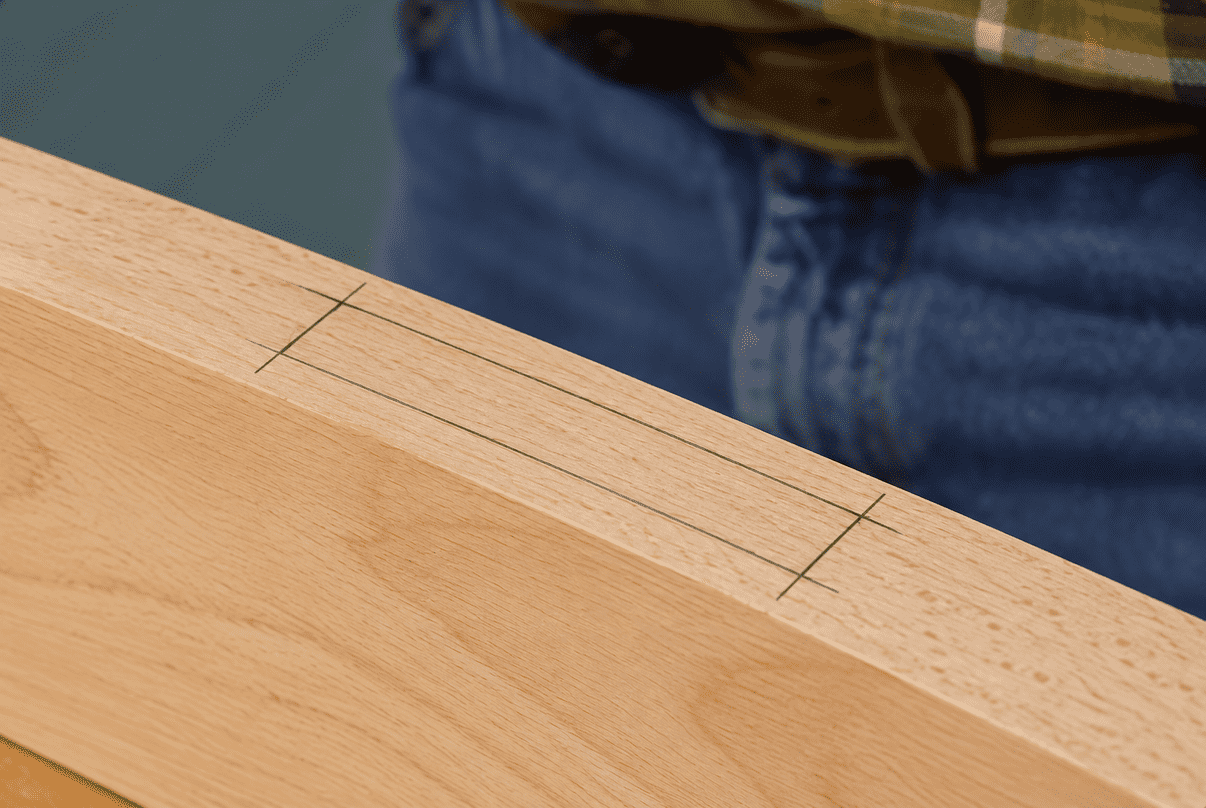
Lay Out the Mortise First
Start by carefully laying out the width and length of the mortise.
Before removing the waste, use the chisel to establish the ends and sides of the mortise. These initial cuts create crisp boundaries that help prevent the surrounding wood from chipping as you begin chopping away the waste.
It's also useful to have a sample tenon on hand. You can use it to check the fit as you work and as a reference for determining the required mortise depth.
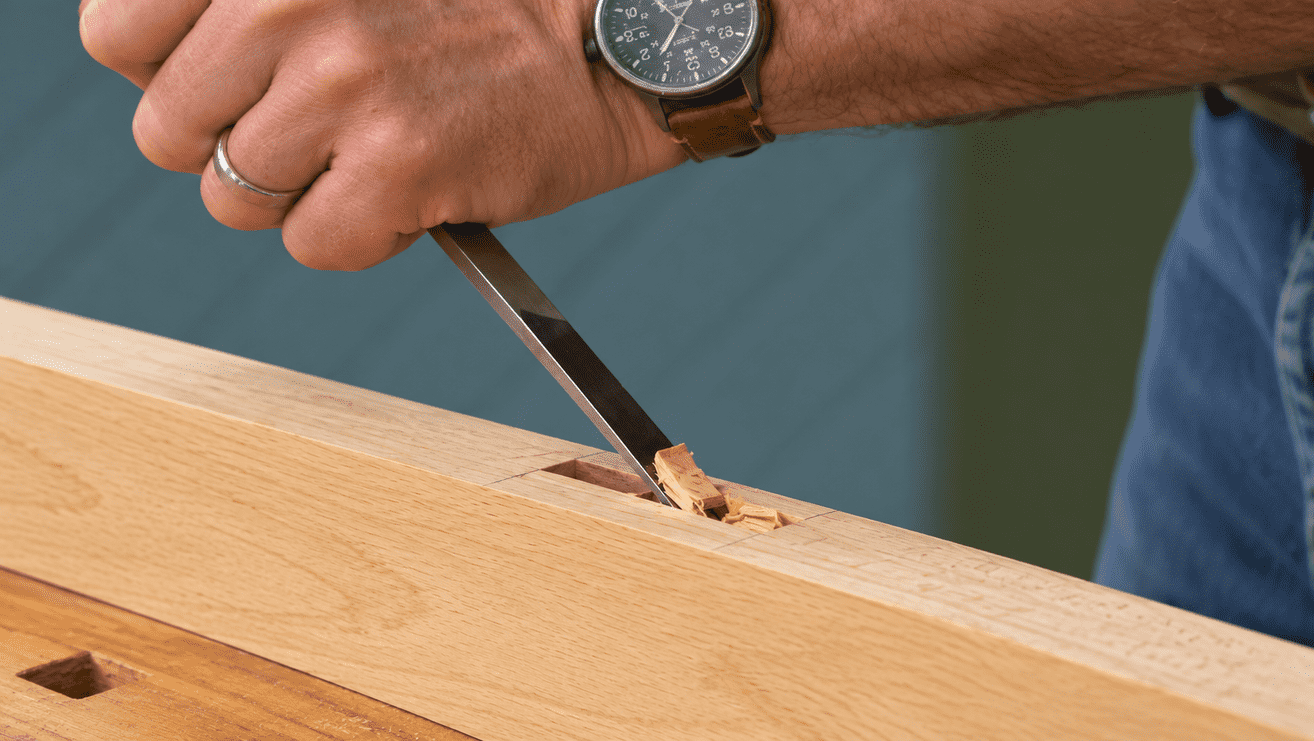
Chop Out the Mortise in Stages
With the outline established, use the narrow chisel to begin removing the waste.
Chris works back and forth along the mortise with a series of chops, gradually stepping the chisel deeper into the workpiece.
Don't try to reach the full depth immediately.
As the mortise gets deeper, removing the chips becomes more difficult. You may need to make additional cuts before levering out the waste.
Continue alternating between chopping and clearing the waste as you work your way toward the final depth.
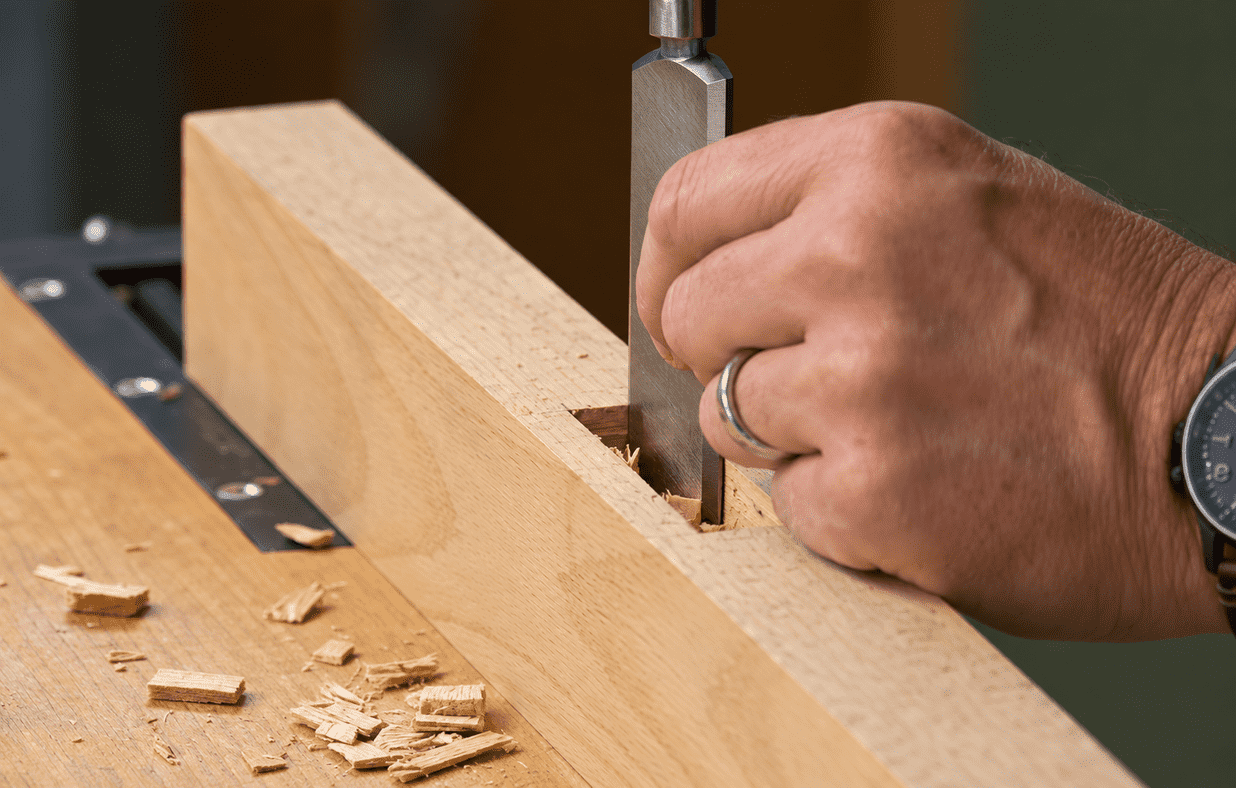
Clean Up the Mortise Walls
As the mortise gets close to its finished size, switch to the wider chisel to clean and straighten the sides.
Check the fit periodically with your sample tenon.
You're looking for good, even contact between the tenon cheeks and mortise walls. The tenon should slide into the mortise without excessive resistance and seat completely against the joint's shoulders.
This method takes more time than the power-tool alternatives, but for a small number of mortises, it's hard to beat the simplicity of a couple of sharp chisels and a mallet.
2. How to Cut a Mortise with a Drill Press
If you need to make a dozen mortises, all that chopping can get old pretty quickly.
A drill press provides a simple way to speed up the process while still relying on chisels for the final fitting.
Instead of chopping out all the waste by hand, you use the drill press to remove most of the material first. Then you return to the bench and clean up what's left.
Use a Forstner Bit to Remove the Waste
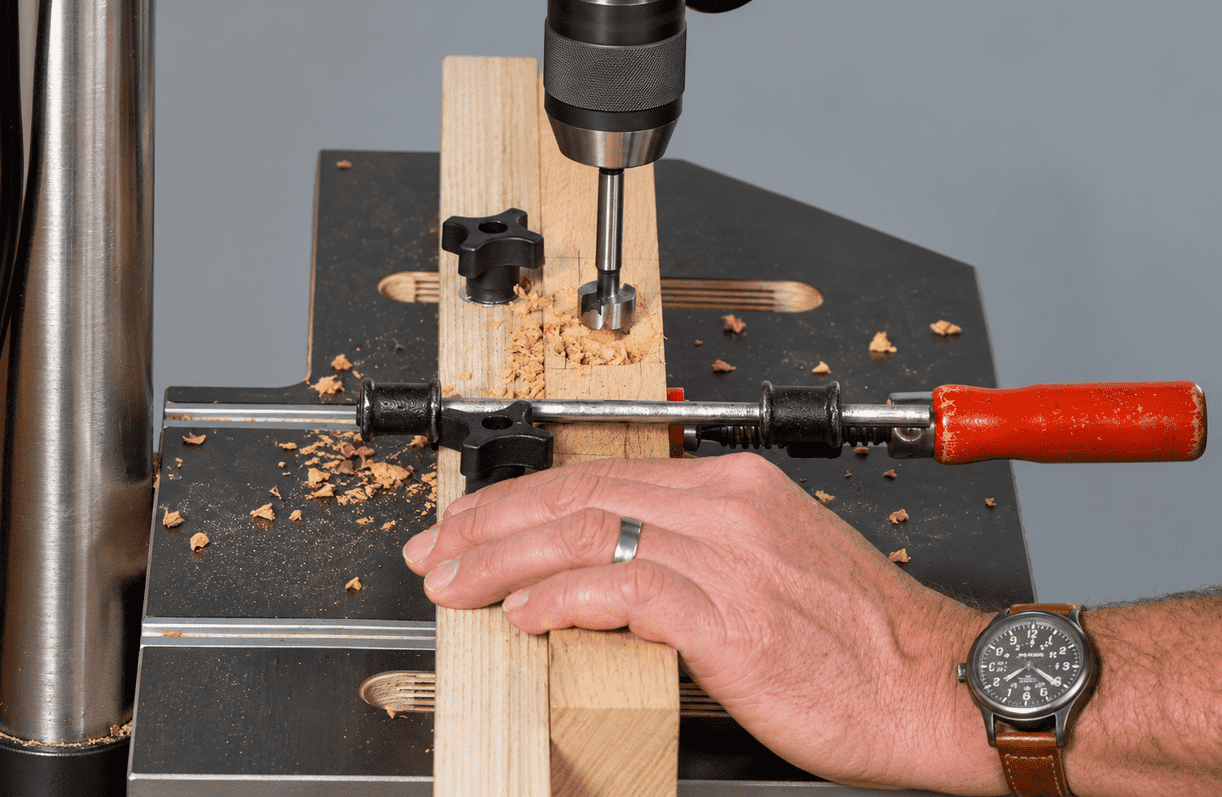
Chris prefers a Forstner bit that's slightly smaller than the width of the mortise.
One advantage of a Forstner bit is its ability to make overlapping holes without being pulled as readily into the previous hole. That makes it well suited to boring away the waste inside a long mortise.
Set up the drill press so the row of holes stays within your layout lines, establish the required depth, and work your way from one end of the mortise to the other.
A brad-point bit can also work if you don't have the appropriate Forstner bit. Just pay close attention to the bit and make sure it doesn't wander or drift into an adjacent hole.
Square the Mortise with Chisels
The drill press does the heavy work, but it won't leave you with a finished rectangular mortise.
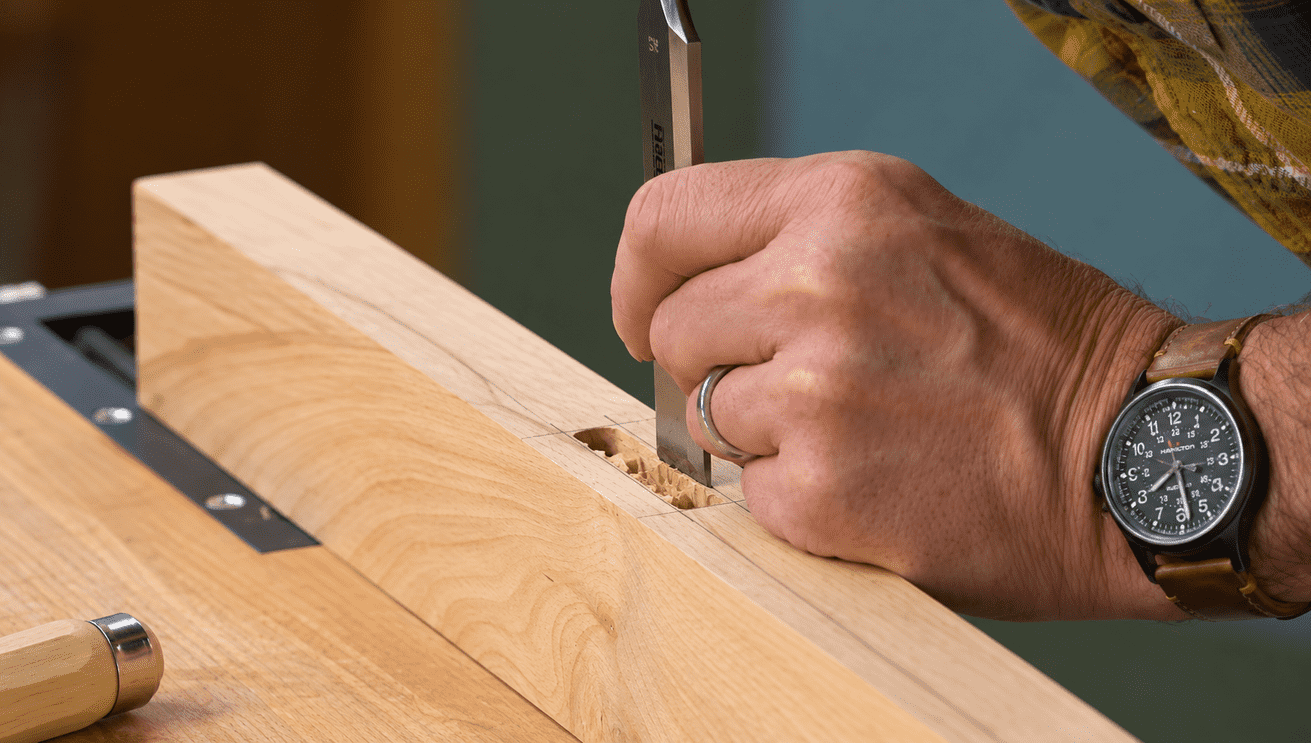
After boring away the majority of the waste, return to your chisels.
Use the narrower chisel to square the rounded ends of the mortise. Then use a wider chisel to remove the ridges left along the sides and straighten the mortise walls.
The result combines the efficiency of a power tool with the accuracy and control of hand tools.
For a project requiring several traditional mortises, this drill-press-and-chisel method is one of the most practical approaches.
RELATED: How to Cut a Mortise with Drill Press & Chisels
3. How to Cut a Mortise with a Plunge Router
A plunge router takes the power-tool approach another step further.
Instead of simply removing most of the waste and finishing the mortise by hand, a router can create smooth, straight mortise walls that require very little cleanup.
For this method, Chris uses a plunge router equipped with a spiral upcut bit.
Why Use a Spiral Upcut Bit for Mortising?
A spiral upcut bit is particularly useful when routing deep slots such as mortises.
Its cutting action helps pull chips up and out of the mortise rather than allowing them to collect around the bit. A sharp spiral bit can remove material efficiently while leaving smooth sides behind.
Woodsmith uses spiral upcut bits for mortising in several of its router-jig techniques for the same reasons.
Cut a Mortise with a Router Edge Guide
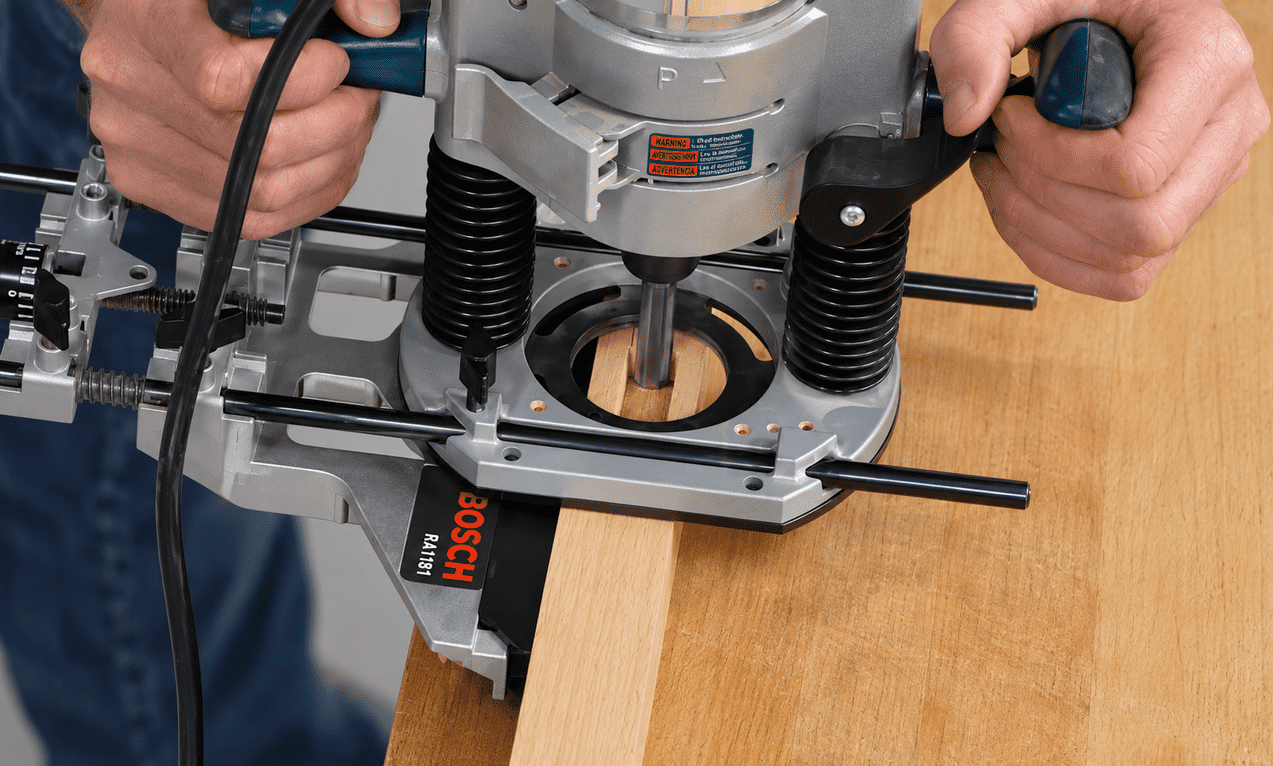
The simplest router setup uses the edge guide that comes with many plunge routers. After adjusting the guide to position the bit over the mortise, hold the fence firmly against the workpiece while making the cut.
The setup is simple and easy to adjust.
The tradeoff is that you are responsible for keeping the fence tight against the workpiece throughout the cut. Allow it to wander, and the router bit will wander with it.
Take the mortise to its final depth in several passes rather than trying to remove all the material at once.
What About the Rounded Ends?
A router bit naturally leaves a mortise with rounded ends.
There are two perfectly workable ways to handle them.
You can use a chisel to square the ends of the mortise. Or you can leave the mortise alone and slightly round the corners of the tenon with a rasp, file, or knife until it fits.
Either approach can produce a strong, accurately fitted mortise and tenon joint.
Upgrade to a Shop-Made Router Mortising Jig
If you want to make the router method more controlled and repeatable, a router mortising jig is a worthwhile upgrade.
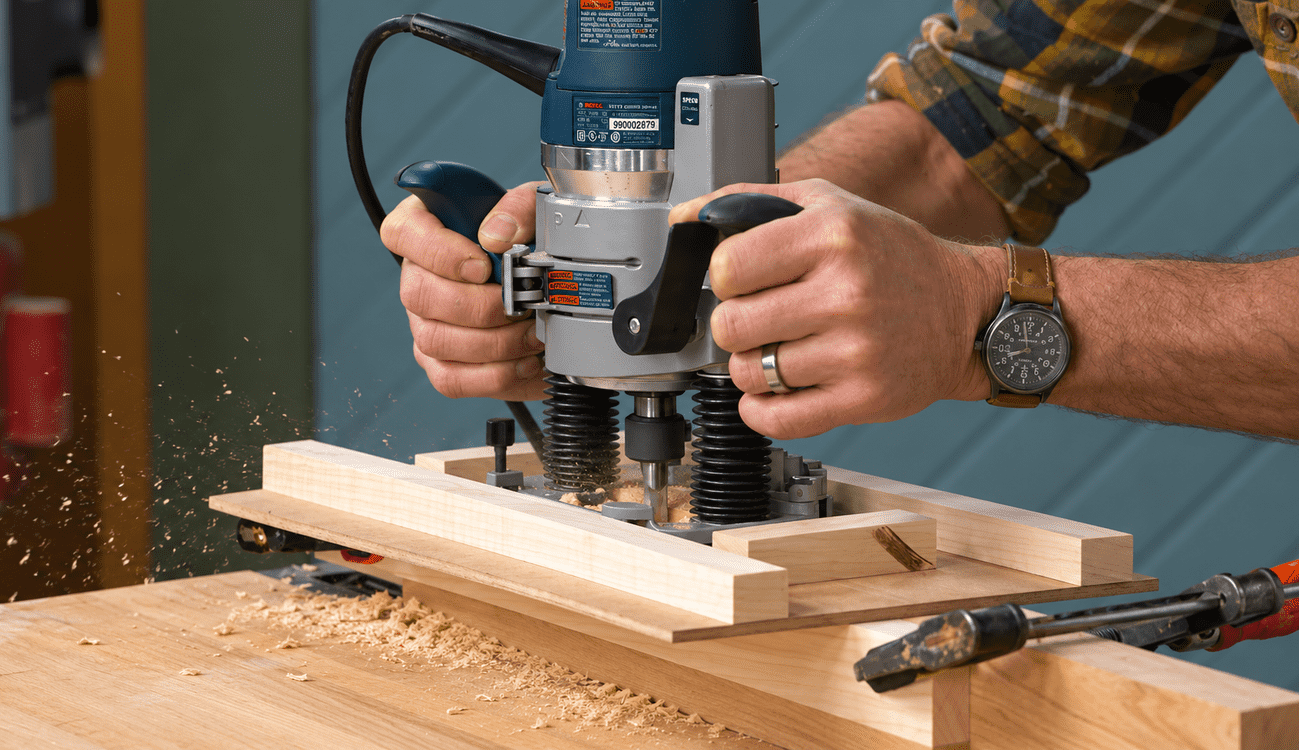
The simple jig Chris demonstrates doesn't require a complicated build. It's made from scraps and can be put together quickly.
Two cleats fit snugly around the workpiece, automatically keeping the jig centered. The oversized base provides a broad surface to support the router, which is especially useful when you're mortising near the end of a narrow rail where a router would otherwise have a tendency to tip.
Guides on top control the router, while stops establish positive starting and stopping points for the mortise.
Once everything is set, you don't have to concentrate on simultaneously centering the router, following layout lines, and controlling the cut. The jig does much of that work for you.
Woodsmith has used this same basic principle in several router mortising jigs: constrain the router or jig against the workpiece, establish the mortise position, and use stops to control its length.
For projects requiring a number of matching mortises, that repeatability is a major advantage.
RELATED: Build a Simple Plunge Router Mortising Jig
RELATED: Cut Perfect Mortises with a Precision Plunge Router Mortising Jig
4. How to Cut a Through Mortise on the Table Saw
The fourth technique is quite different.
Instead of removing waste from a solid workpiece, you build the mortise into the workpiece.
This method is especially useful for large through mortise and tenon joints, such as those you might find on a trestle table, bench, or workbench.
Chopping a large through mortise by hand can require a considerable amount of work. You could also rout it, but the table saw offers another accurate solution.
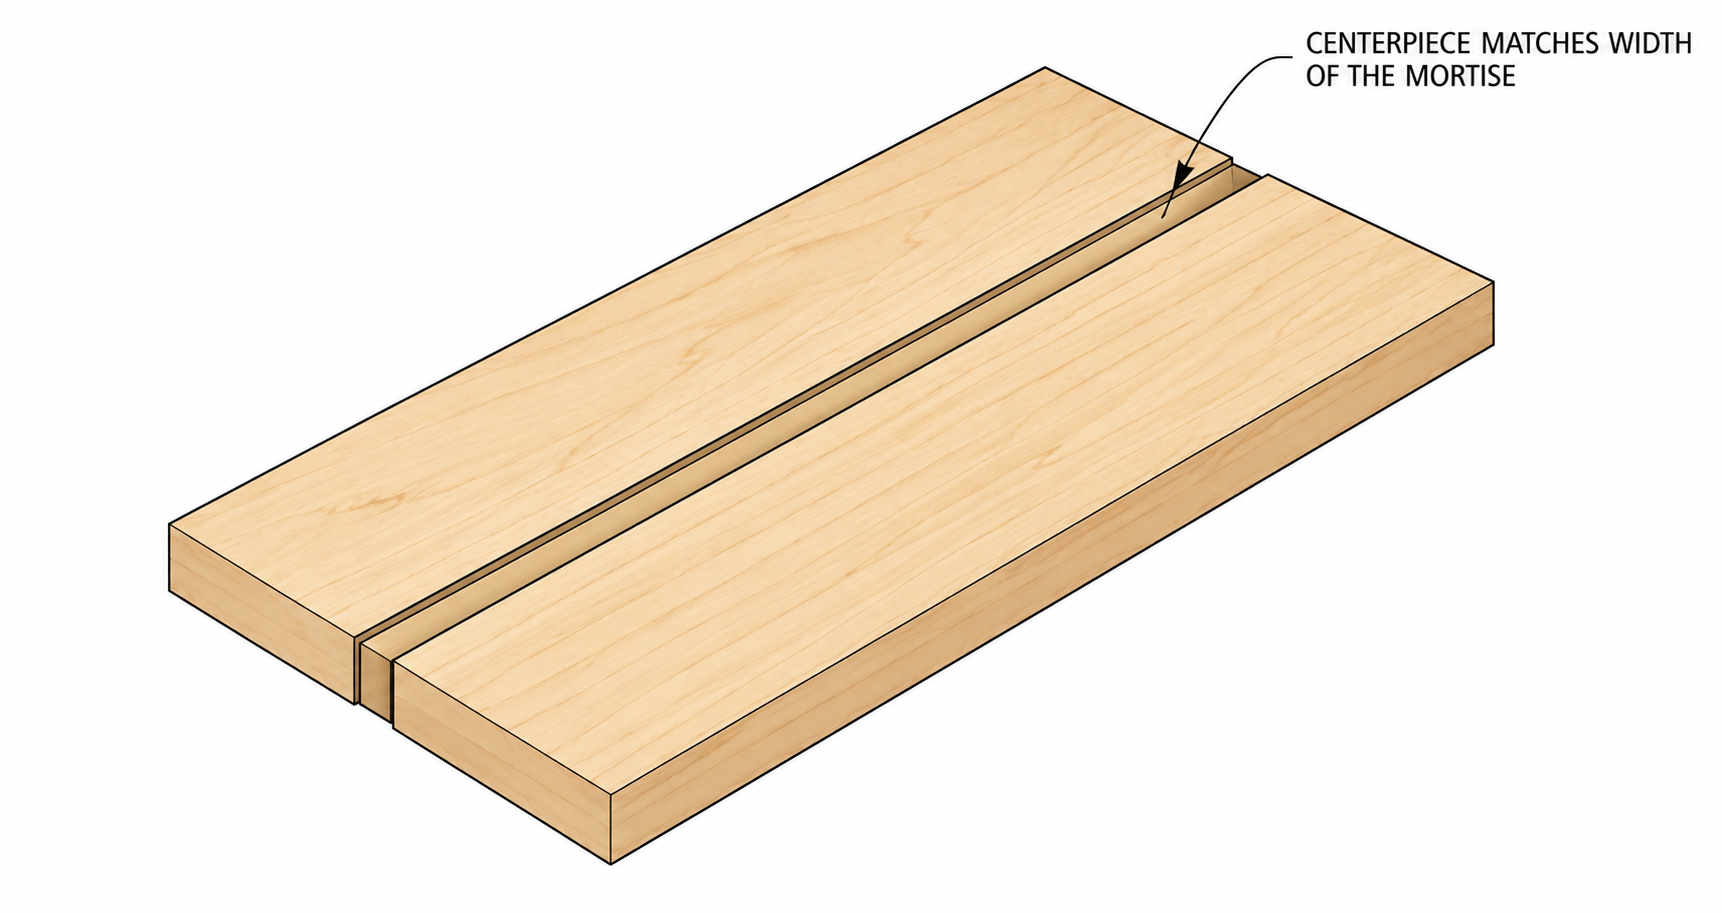
Divide the Workpiece into Three Pieces
Start with an oversize blank and carefully lay out the mortise.
At the table saw, make two cuts along the outside edges of the mortise. This divides the original blank into three pieces.
The center section should correspond to the width of the tenon.
It's important to keep the three pieces in their original orientation. When they're glued back together, maintaining the grain alignment will help disguise the glue joints.
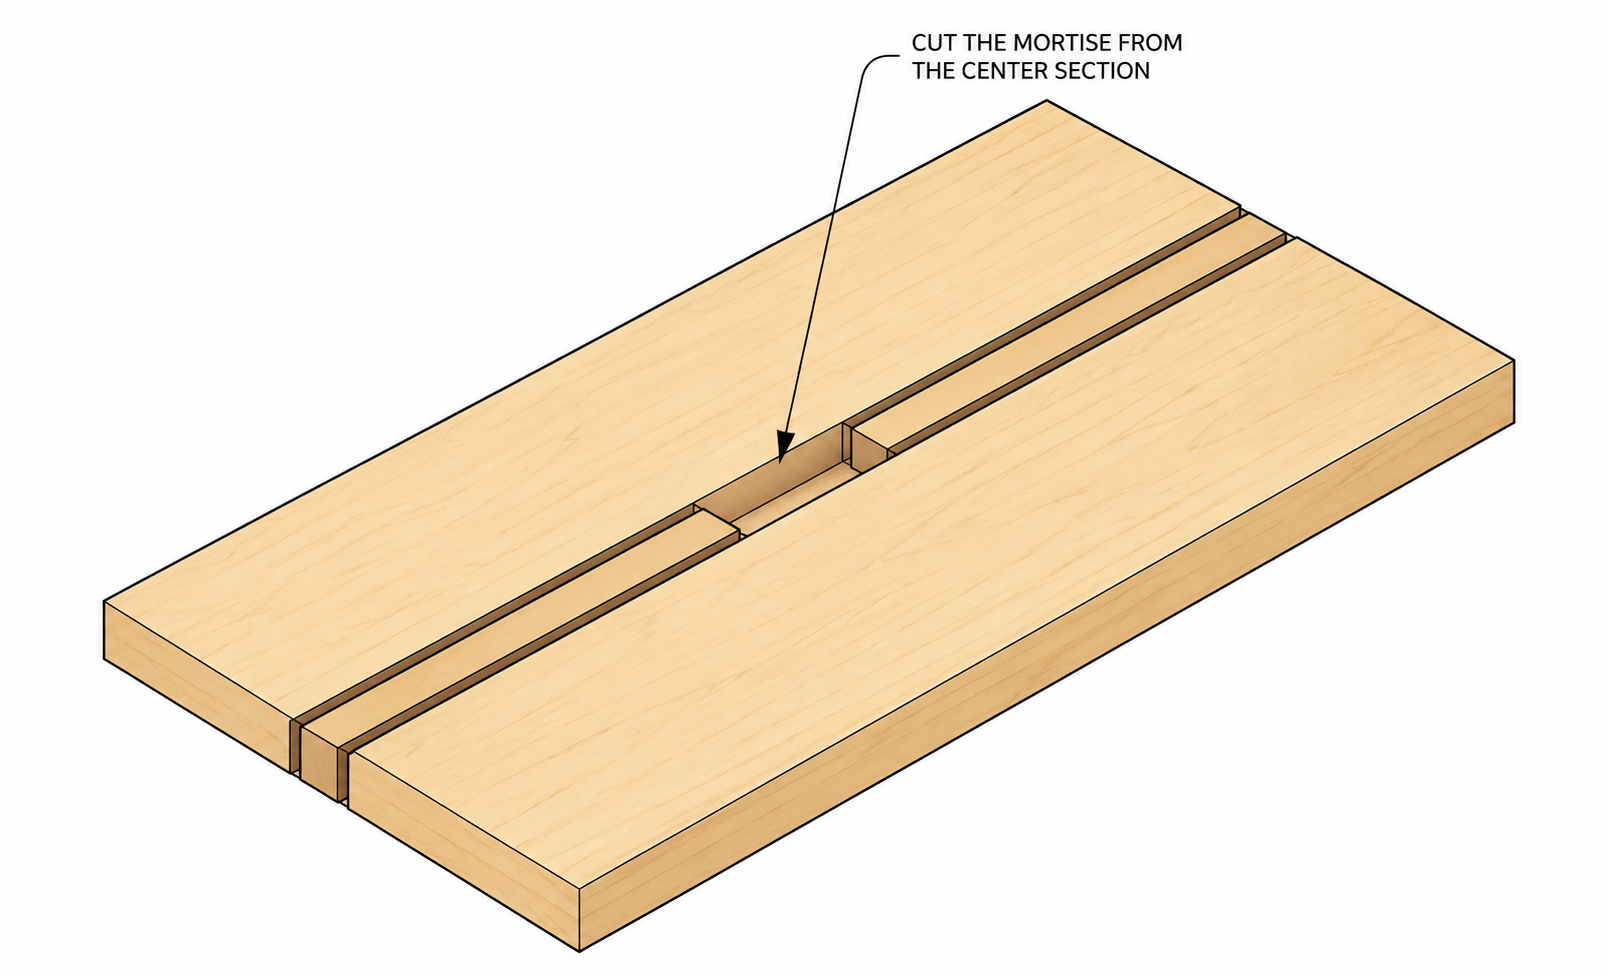
Cut the Mortise from the Center Section
Take the center piece back to the table saw and remove the material between the mortise layout lines.
Because you're working with an individual piece rather than trying to remove material from the center of a solid blank, creating a clean, square-sided opening becomes much easier.
Once the waste is removed, the three pieces are ready to go back together.
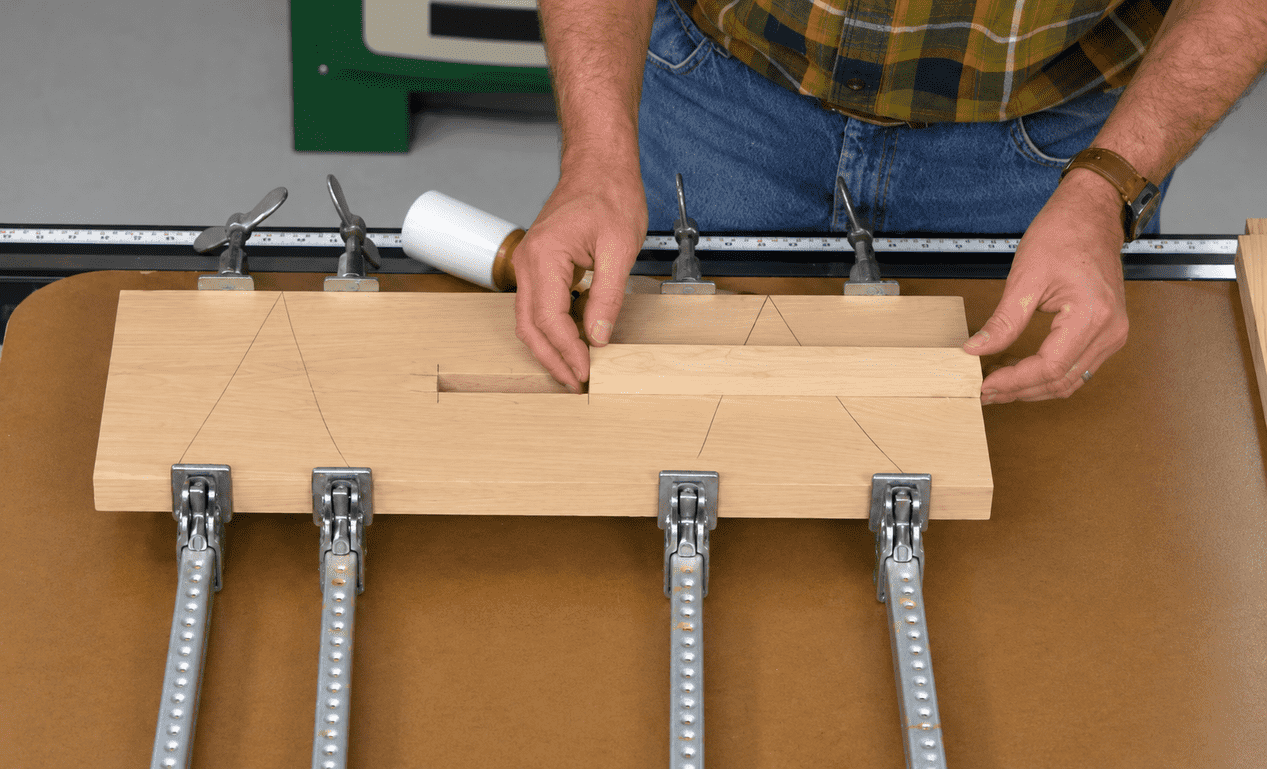
Reassemble the Workpiece
Glue the pieces back together while carefully aligning the grain and your original layout marks.
You don't want glue squeeze-out accumulating inside the mortise, so use the glue sparingly and concentrate it on the mating edges of the filler pieces.
A spacer made to match the tenon can be inserted into the mortise during glue-up. This helps maintain the correct opening and prevents the pieces from shifting under clamping pressure.
Apply a little paraffin wax to the spacer first so you don't accidentally glue it permanently into your new mortise.
After the glue dries, remove the spacer and clean up the blank.
What appears to be a mortise cut into a solid workpiece is actually an accurately sized opening that was built into the blank during glue-up.
For large through mortises, it's an ingenious way to avoid removing a large amount of waste with chisels or a router.
RELATED: How to Cut Through Mortises on the Table Saw
Which Is the Best Way to Cut a Mortise?
There's no single mortising method that's right for every project.
Hand tools make sense when you're cutting one or two mortises, enjoy traditional woodworking, or simply don't want to set up a machine.
A drill press and chisels are a good middle ground. The drill press quickly removes the bulk of the waste, while chisels give you control over the final fit.
A plunge router is fast and leaves exceptionally smooth mortise walls. Add a router mortising jig and it becomes especially useful for projects requiring several identical joints.
The table saw method is more specialized, but it's a clever solution for large through mortises in built-up legs, posts, and other substantial workpieces.
And there's another method worth considering when mortises are a regular part of your woodworking: a hollow-chisel mortising machine. It combines a square hollow chisel with an auger to remove waste and form the mortise in one operation.
RELATED: How to Use a Hollow-Chisel Mortiser

How Tight Should a Mortise and Tenon Joint Be?
Regardless of how you cut the mortise, the final fit matters more than the method.
A tenon shouldn't need to be hammered aggressively into place. At the same time, it shouldn't rattle around inside the mortise.
You're looking for smooth, even contact between the tenon cheeks and the mortise walls while still allowing the joint to slide together without excessive force.
Most importantly, the tenon needs to seat completely so its shoulders close tightly against the mortised workpiece.
That's why keeping a sample tenon nearby while you're making the mortise can be so useful. It lets you check your progress before removing too much material.
Tips for Cutting Better Mortises
START WITH ACCURATE LAYOUT. Whichever technique you choose, accurate layout comes first. Clearly mark the mortise length, width, and location before removing any material.
WORK TO THE TENON. Whenever possible, have your tenon or a sample tenon available while cutting the mortise. It's a much better reference than relying exclusively on measurements.
KEEP THE CHISELS SHARP. Even power-tool mortising usually involves some chisel work. A sharp chisel gives you much greater control when squaring corners, cleaning walls, and making small adjustments to the fit.
REMOVE WASTE GRADUALLY. Whether you're chopping with a chisel or routing with a spiral bit, don't try to reach full depth immediately. Removing material in stages gives you better control and puts less stress on the tool.
CHECK THE FIT BEFORE YOU GLUE UP. Dry-fit the joint before reaching for the glue. The tenon should seat completely with good contact along the cheeks and tight-fitting shoulders.
More Ways to Master Mortise and Tenon Joinery
Once you understand the basic mortise, there's a whole family of joints and techniques you can use in furniture construction.
A standard blind mortise and tenon is only the beginning. Depending on the project, you might choose a haunched mortise and tenon, through tenon, twin tenon, split tenon, pinned tenon, drawbored joint, or loose-wedge tusk tenon.
That's one reason mortise and tenon joinery has remained so useful to furniture makers: the basic joint can be adapted to solve many different woodworking problems.
KEEP LEARNING:
Choosing the Right Mortise and Tenon Joint
How to Make a Haunched Mortise and Tenon
Pinned Mortise and Tenon Joinery
Loose-Wedge and Tusk Tenon Joints
How to Set Up a Hollow-Chisel Mortising Machine


