


A haunched mortise and tenon joint is a traditional woodworking joint that's especially well suited to building strong frame-and-panel doors with solid-wood panels. It combines the strength of a standard mortise and tenon with a short extension, or haunch, that fills the panel groove at the end of the joint.

That small detail solves an important problem in frame-and-panel construction.
Unlike plywood, a solid-wood panel needs room to expand and contract with seasonal changes in humidity. Because the panel can't simply be glued into the surrounding frame for added strength, the rails and stiles need strong joinery of their own. That's where the haunched mortise and tenon shines.
Better yet, the joint isn't much more difficult to make than a standard mortise and tenon. The key is to cut the panel groove first and use it as a reference for laying out and cutting the mortise, tenon, and haunch.
What Is a Haunched Mortise and Tenon?
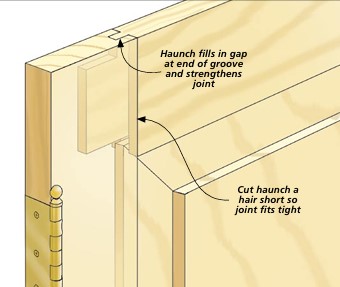
A haunched mortise and tenon is a variation of a traditional mortise-and-tenon joint. The main tenon fits into a mortise as usual, but a short stepped section — the haunch — is left along one edge of the tenon.
In a frame-and-panel door, this haunch fills the panel groove where the rail meets the stile.
Without the haunch, a groove cut along the full length of the stile would remain visible at the end of the joint. You could avoid this by cutting stopped grooves or filling the openings later, but a haunched tenon provides a cleaner solution.
It allows the panel grooves to be cut continuously along the rails and stiles while still creating a strong, traditional mortise-and-tenon connection.
The haunch also adds lateral stiffness to the door frame.
Why Use a Haunched Tenon for Frame-and-Panel Doors?
The type of panel you're using helps determine whether a haunched mortise and tenon is worth the additional work.
Plywood Panels
Plywood is dimensionally stable, so a plywood panel can usually be glued into the grooves surrounding a frame-and-panel door.
Once glued in place, the panel becomes part of the structure of the door and helps keep the assembly rigid.
For this type of construction, a simpler stub tenon and groove joint is often strong enough. It's quick to make and works well because the glued-in plywood panel reinforces the frame.
Solid-Wood Panels
A solid-wood panel is different.
Solid wood expands and contracts across its width as humidity changes. For this reason, a solid-wood panel generally needs to float inside the frame rather than being glued into the grooves.
That means the panel can't be relied on to strengthen the door. Instead, the strength and rigidity of the assembly have to come primarily from the joints connecting the rails and stiles.
A traditional mortise and tenon provides that strength, while the added haunch neatly fills the end of the panel groove.
This combination makes the haunched mortise and tenon an excellent choice for traditional solid-wood frame-and-panel doors.
How to Make a Haunched Mortise and Tenon
Making a haunched mortise and tenon is similar to making a standard mortise and tenon. There's simply an additional step for creating the haunch.
The order of operations makes the process easier:
Cut the panel grooves first, make the mortises second, cut the tenons to fit, and then form the haunches.
Cutting the groove first is important because it provides a built-in reference for several of the operations that follow.
Step 1: Cut the Panel Grooves
Start by cutting a centered groove along the inside edge of each rail and stile. These grooves will eventually hold the panel.
I like to use a dado blade at the table saw for this operation.
Cutting the grooves before making the mortise and tenon gives you more than just a place for the panel. The walls of the groove establish the position and width of the mortise and provide useful reference surfaces when setting up the tools for the remaining operations.

Cut the Mortise
As with most mortise-and-tenon joinery, I prefer to make the mortise first and then cut the tenon to fit it.
There's nothing unusual about cutting the mortise for this joint. One straightforward approach is to remove most of the waste with a Forstner bit at the drill press and then square the mortise with a chisel.
Step 2: Set Up the Drill Press
The panel groove makes positioning the mortise easier.
Use the walls of the groove as a reference when positioning the drill press fence. This helps keep the mortise aligned with the groove and centered on the thickness of the workpiece.
Set the depth stop on the drill press for the required mortise depth and drill out the bulk of the waste.

Square the Mortise
After drilling, clean up the mortise with a sharp chisel.
Here again, the panel groove works to your advantage. Its side walls provide a clear reference for positioning the chisel and help keep the sides of the mortise straight and square.
Work carefully to the finished dimensions rather than trying to remove all the remaining waste in a single pass.
Cut the Tenon to Fit the Mortise
With the mortise complete, you can cut the mating tenon.
I like to use a dado blade at the table saw. And because you've already cut the panel groove, setting the blade height is straightforward.
Step 3: Set the Dado Blade Height
Place one of the grooved frame pieces beside the dado blade and raise the blade until the tips of the teeth align with the lower edge of the panel groove.
This establishes the depth of cut needed to form the tenon cheeks.

Step 4: Establish the Tenon Shoulder
Position the rail against the miter gauge and use the rip fence as a stop to establish the tenon shoulder.
Make the shoulder cut on one face first.
Take care when using the rip fence as a stop in a crosscut-style operation: the setup should provide clearance so the workpiece isn't trapped between the blade and fence during the cut.

Step 5: Remove the Tenon Waste
Once the shoulder is established, remove the remaining waste with a series of passes across the dado blade.
Then turn the workpiece over and repeat the process to form the opposite cheek.
The goal is a tenon that slides into the mortise with a snug fit without requiring excessive force.

How to Make the Haunch
Once the tenon cheeks are complete, the final operation is what turns an ordinary mortise and tenon into a haunched mortise and tenon.
Normally, you would remove the waste along the edge of the tenon all the way back to the shoulder.
Instead, stop short.
Leave a short extension at the shoulder that fits into the panel groove. This extension is the haunch.
Step 6: Size the Haunch to Fit the Groove
Ideally, the haunch should nearly match the depth of the panel groove.
But there's a small detail that can improve the fit of the finished joint: Make the haunch about 1⁄64" shorter than the depth of the groove.
That tiny amount of clearance prevents the end of the haunch from bottoming out in the groove before the main tenon shoulders seat firmly against the stile.
The important surfaces are the visible shoulders of the joint. You want those shoulders to pull tightly against the mating workpiece without interference from the haunch.

Why the Haunch Makes a Difference
The haunch may seem like a minor addition to a standard mortise and tenon, but it solves several problems at once.
It allows you to cut the panel grooves continuously rather than stopping them before each joint. It fills the groove at the end of the assembled joint. It also adds lateral stiffness to the door frame.
Most importantly, it allows you to combine strong mortise-and-tenon joinery with a floating solid-wood panel, giving the panel room for seasonal movement without sacrificing the strength of the door.
And because the groove itself helps establish the mortise and tenon, the joint isn't much more difficult to make than a conventional mortise and tenon.
For traditional frame-and-panel furniture, that little extra effort can produce a stronger joint, a cleaner assembly, and the kind of thoughtful construction detail that distinguishes well-made furniture.


