



How to Cut a Mortise with a Drill Press or Router
Among the many joints used in woodworking, the mortise and tenon is one of the most recognizable — and for good reason. It's strong, durable, and well suited to furniture that needs to withstand years of use.
From chair legs and table aprons to cabinet frames and doors, mortise and tenon joinery creates a dependable mechanical connection between two pieces of wood.
And while this joint has traditionally been made with hand tools, modern woodworking equipment makes cutting accurate mortises much easier.
You don't even need a dedicated mortising machine.
In this guide, I'll show you two practical ways to cut a mortise: using a drill press and chisels, or using a plunge router with a simple shop-made jig.
Both methods are approachable, require relatively little specialized equipment, and can produce strong, accurate joinery.
What Is a Mortise and Tenon Joint?
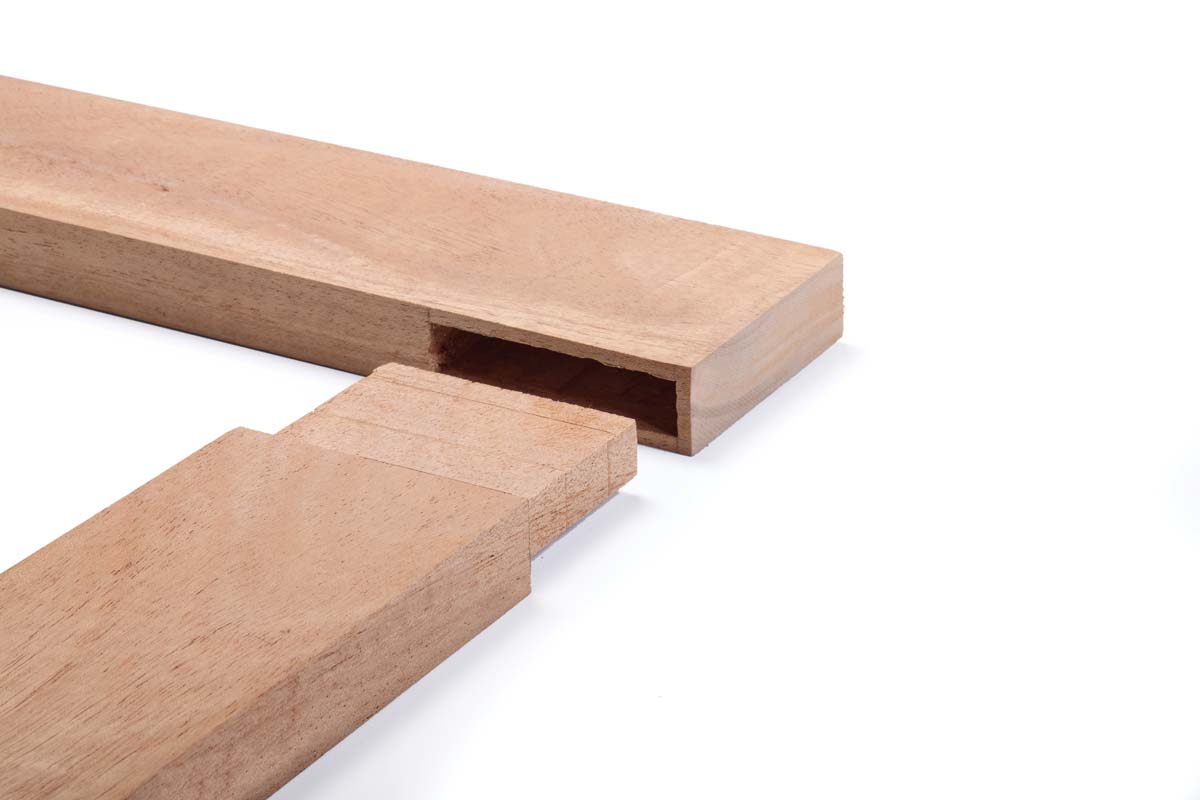
A mortise and tenon joint consists of two matching parts.
The mortise is a rectangular opening cut into one workpiece. The tenon is a projecting tongue on the mating workpiece that fits into the mortise.
When properly fitted and glued, the joint provides a large bonding surface and resists the forces that can pull furniture components apart.
The shoulders of the tenon also help conceal minor variations around the opening.
For a strong joint, though, the mortise should have straight walls, consistent depth, and a snug fit with the tenon.
There are several ways to create that opening.
Method 1: How to Cut a Mortise with a Drill Press
My preferred approach for many projects is to use the drill press to remove most of the waste, then finish the mortise with a chisel.
This method requires only common woodworking tools and provides good control over the size and location of the opening.
Step 1: Lay Out the Mortise
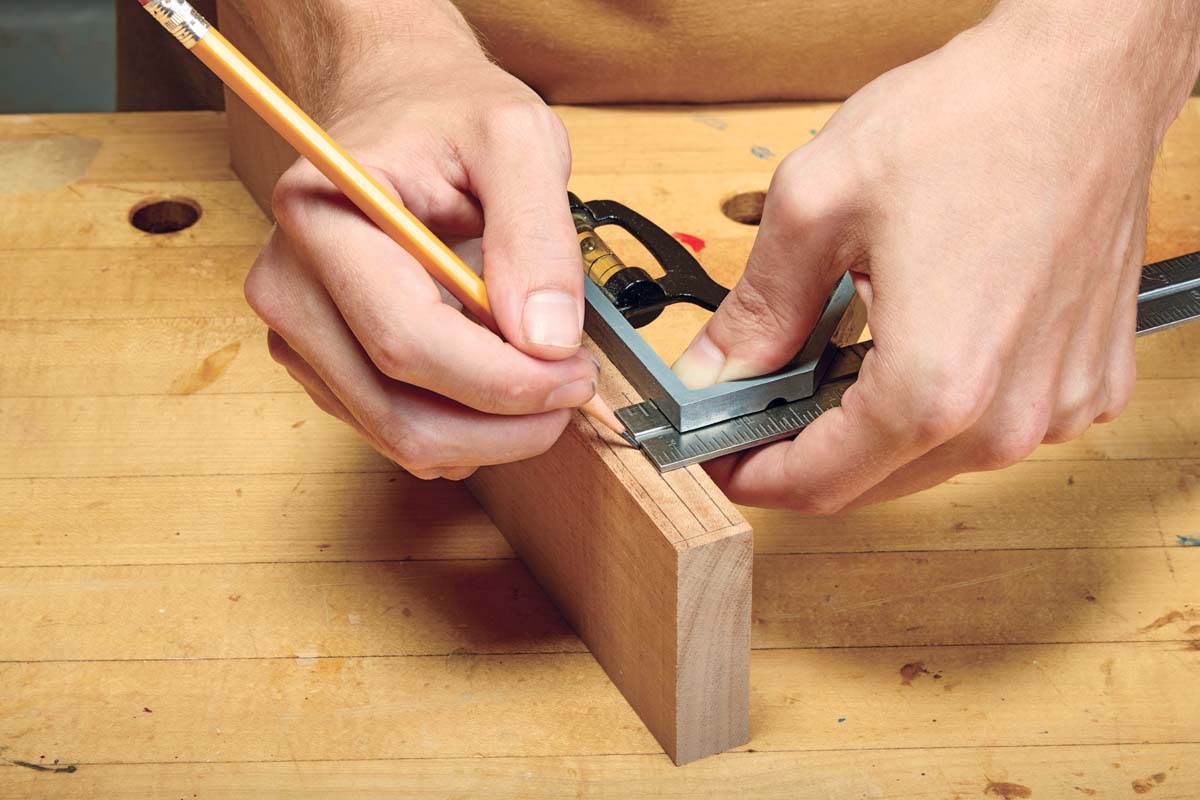
Begin by marking the location and dimensions of the mortise on your workpiece.
In addition to outlining the four sides, draw a centerline along the length of the mortise.
This line will help you position the drill bit accurately.
Next, use a marking knife to scribe along the layout lines.
The knife creates shallow kerfs that provide a precise reference when cleaning up the mortise with a chisel.
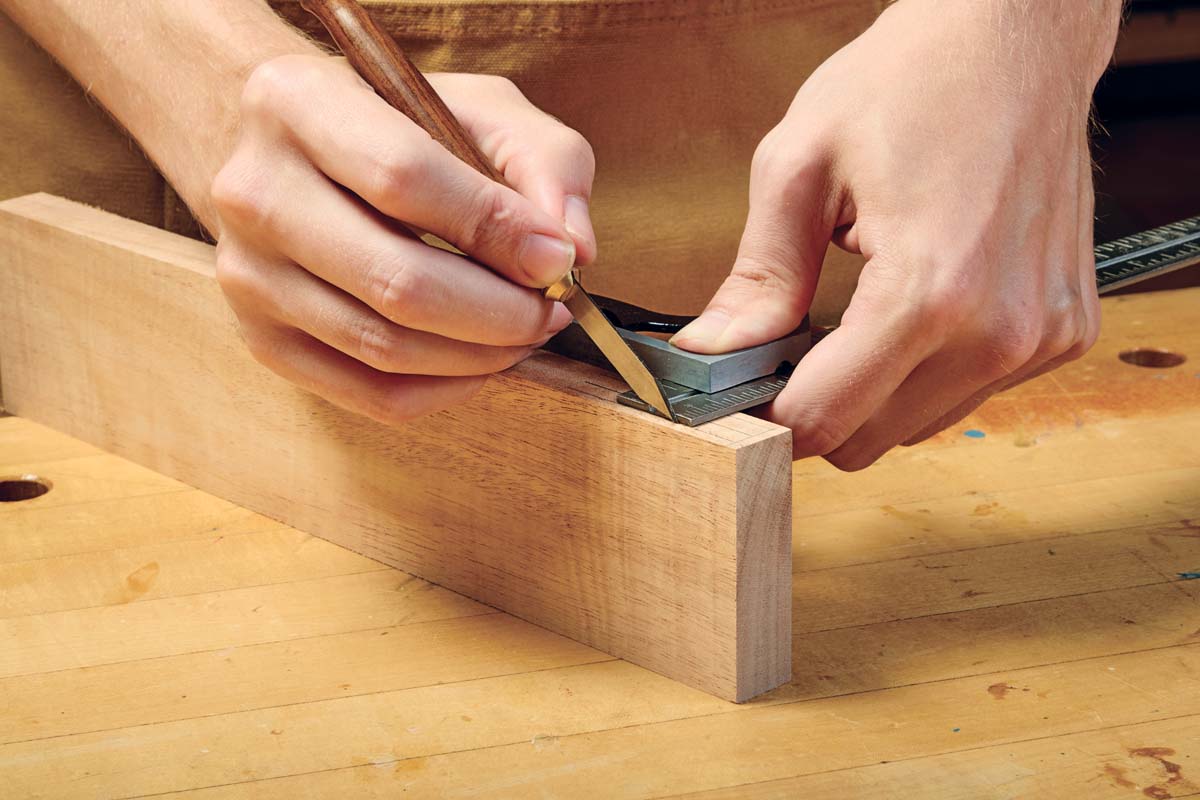
A sharp marking knife is especially helpful because the chisel can register against the scribed lines during the final cleanup.
Step 2: Choose a Brad-Point Drill Bit
A brad-point bit is a good choice for drilling mortises.
Its sharp center point makes it easier to position the bit directly on the mortise centerline.
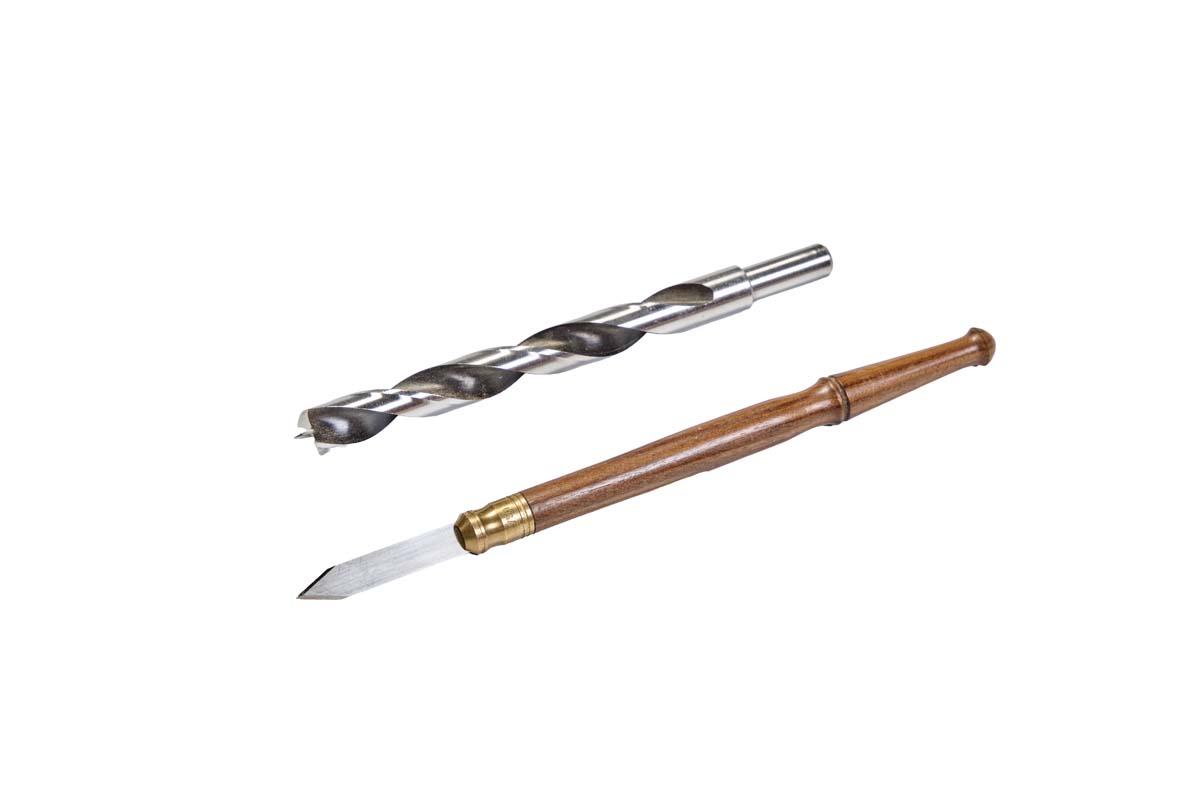
Select a bit that will remove most of the waste without cutting beyond the mortise layout lines.
The remaining material will be removed with a chisel.
Step 3: Set Up the Drill Press
Install a fence on the drill press table and adjust it so the center of the drill bit aligns with the mortise centerline.
Secure the workpiece against the fence.
If you're cutting multiple identical mortises, add stop blocks to establish the beginning and end of the drilling area.
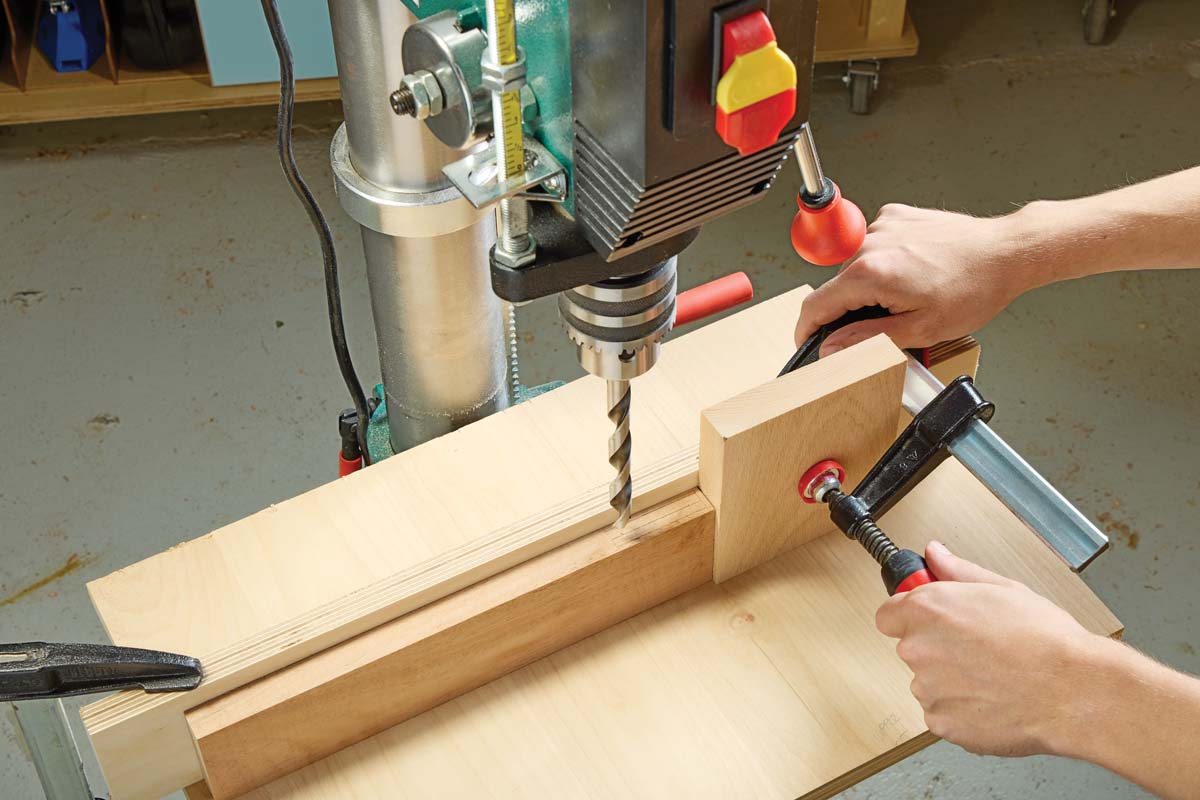
This setup makes it easier to maintain consistent placement from one workpiece to the next.
Set the drill press depth stop to establish the mortise depth.
Step 4: Drill a Series of Overlapping Holes
With the setup complete, begin drilling along the mortise centerline.
The goal is to create a series of overlapping holes that remove most of the waste.
 .
Pay attention to the spacing between holes.
The bit needs enough material to engage without being pulled sideways or deflecting into an adjacent opening.
Clear chips frequently so they don't pack into the mortise or cause the bit to bind.
Once you've removed the bulk of the material, the opening is ready for chisel cleanup.
Step 5: Square the Mortise with a Chisel
Secure the workpiece in a vise before cleaning up the mortise.
I like to position the workpiece so the vise supports the sides of the mortise while I'm working.
Use a sharp chisel to remove the remaining waste and straighten the walls.
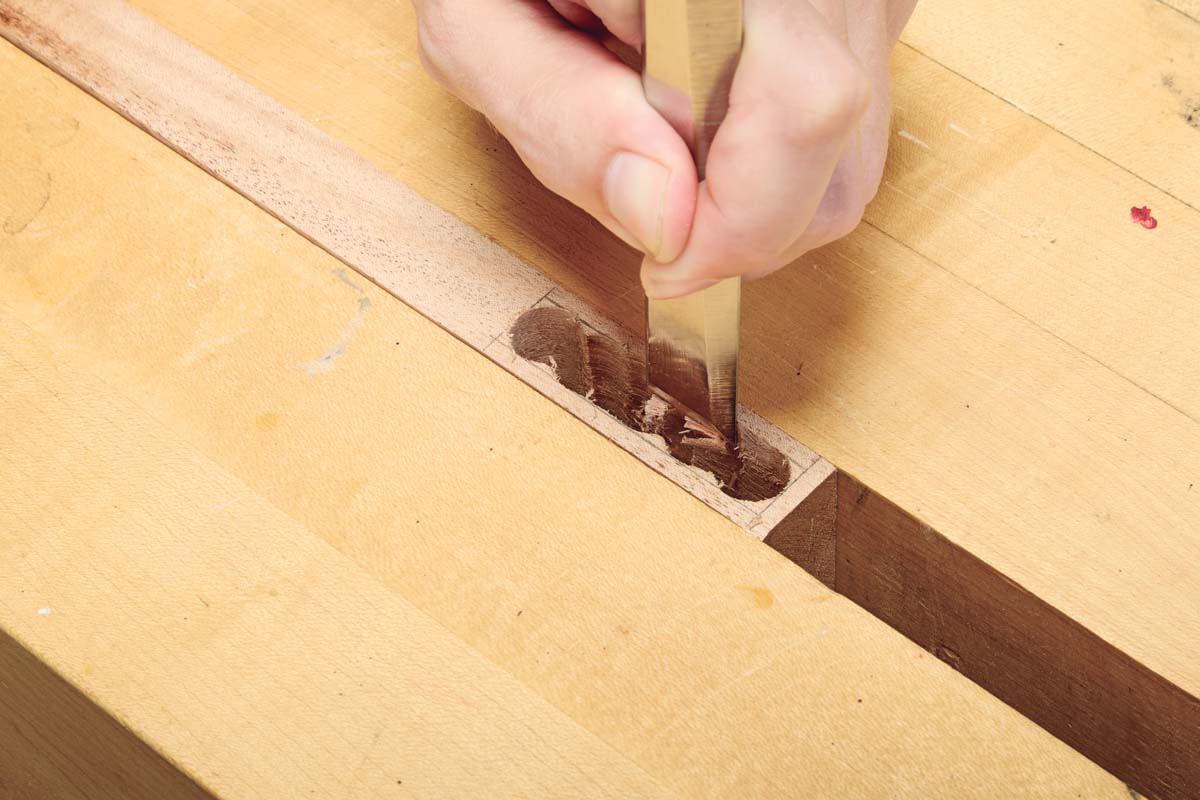
Work gradually, removing thin layers until you reach the scribed layout lines.
Remember that a chisel acts like a wedge. Trying to remove too much material at once can push against the mortise walls and damage the surrounding wood.
Take light cuts and check your progress frequently.
With a little practice, this method produces accurate mortises without complicated equipment.
Method 2: How to Cut a Mortise with a Router
A plunge router is another excellent tool for cutting mortises.
Although the setup takes a little more preparation, routing provides consistent results and makes it easy to repeat the same mortise in multiple workpieces.
The key is using a jig that guides the router accurately.
Step 1: Build a Simple Router Mortising Jig
There are many router mortising jigs available, but this version is about as straightforward as it gets.
The jig consists of five plywood pieces.
Two end blocks support the router base. Connecting strips define the opening that guides the router. A fifth piece serves as a clamping block to help secure the jig squarely to the workpiece.
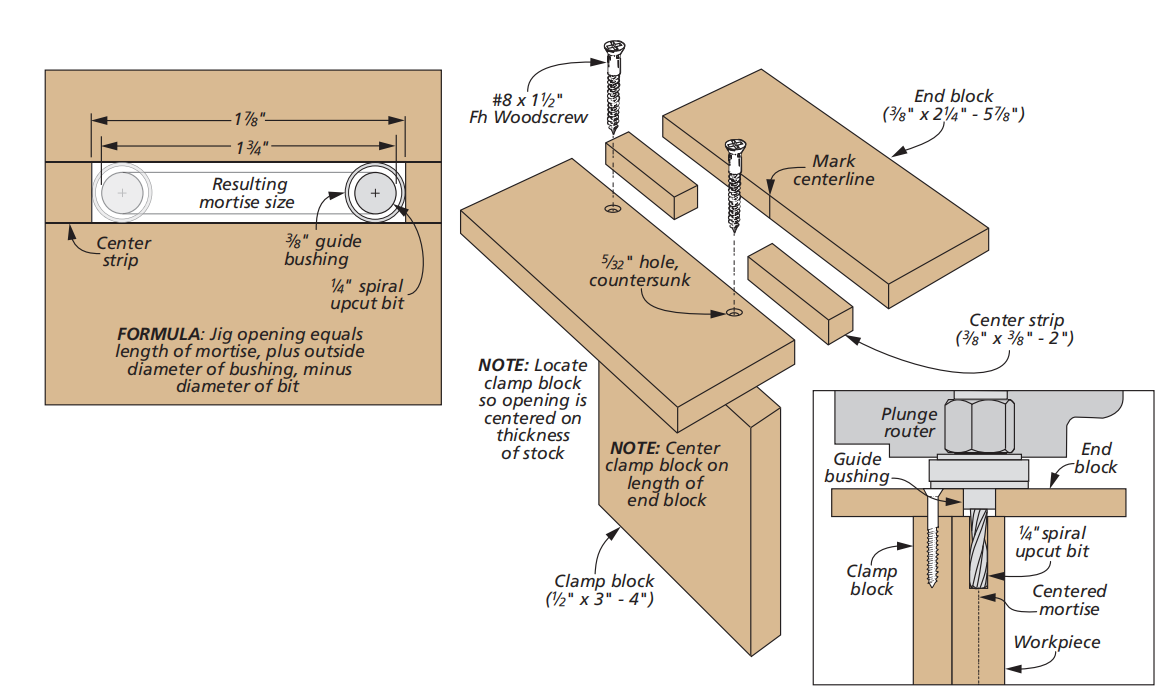
The dimensions of the jig opening depend on the size of the mortise, the router bit, and the guide bushing.
The jig can be customized to suit the joinery in your project.
Step 2: Choose a Router Bit and Guide Bushing
To use the jig, you'll need a plunge router equipped with a guide bushing and a suitable cutting bit.
A straight bit can cut the mortise, but I prefer a spiral upcut bit.
The spiral flutes help pull chips out of the opening as the bit cuts, reducing chip buildup.
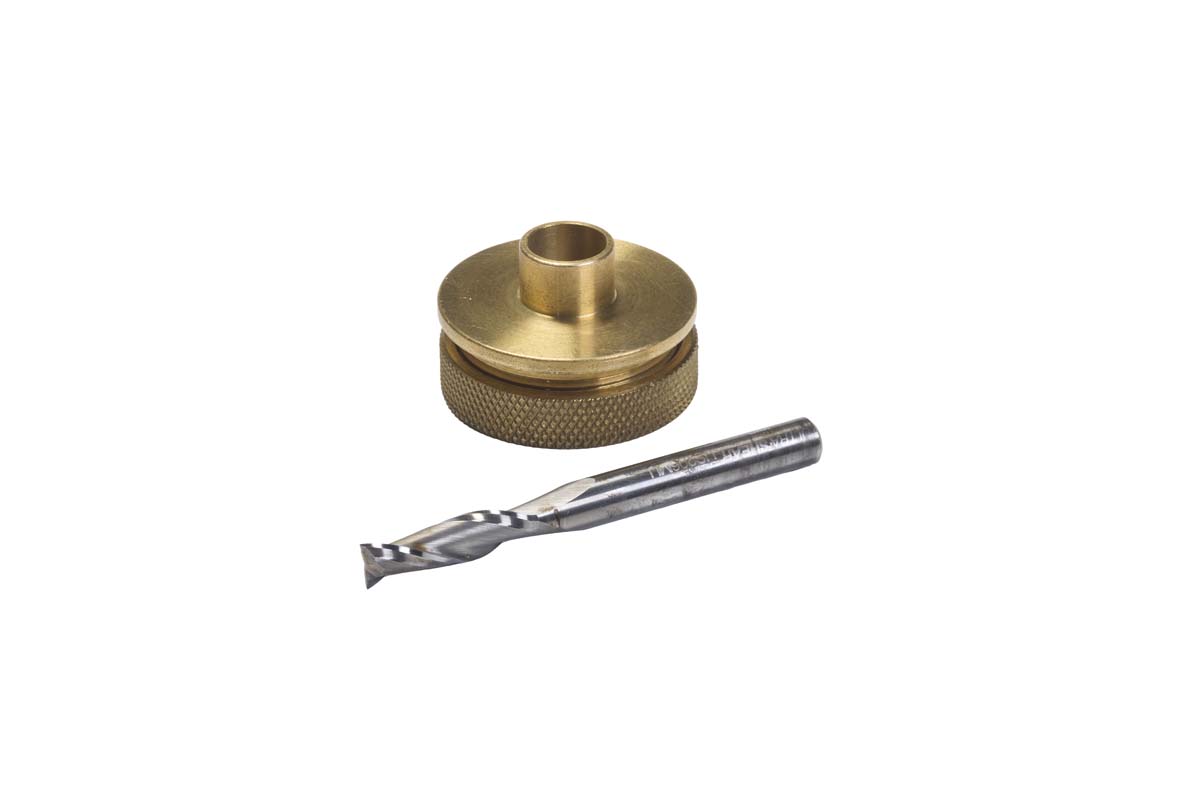
The guide bushing follows the inside edges of the jig opening while keeping the cutting bit a fixed distance from those edges.
This means the opening in the jig must be larger than the finished mortise.
Calculate the Guide Bushing Offset
The difference between the guide bushing diameter and the router bit diameter determines the required offset.
For example, if you're using a 3/8" guide bushing with a 1/4" router bit, the difference in diameter is 1/8".
That means the jig opening needs to be 1/8" longer and 1/8" wider than the finished mortise.
The bushing provides a 1/16" offset on each side.
This small detail is essential for getting the mortise dimensions right.
Step 3: Position and Secure the Jig
Mark the centerline of the mortise on the workpiece.
Then mark the center of the jig opening and align the two marks.
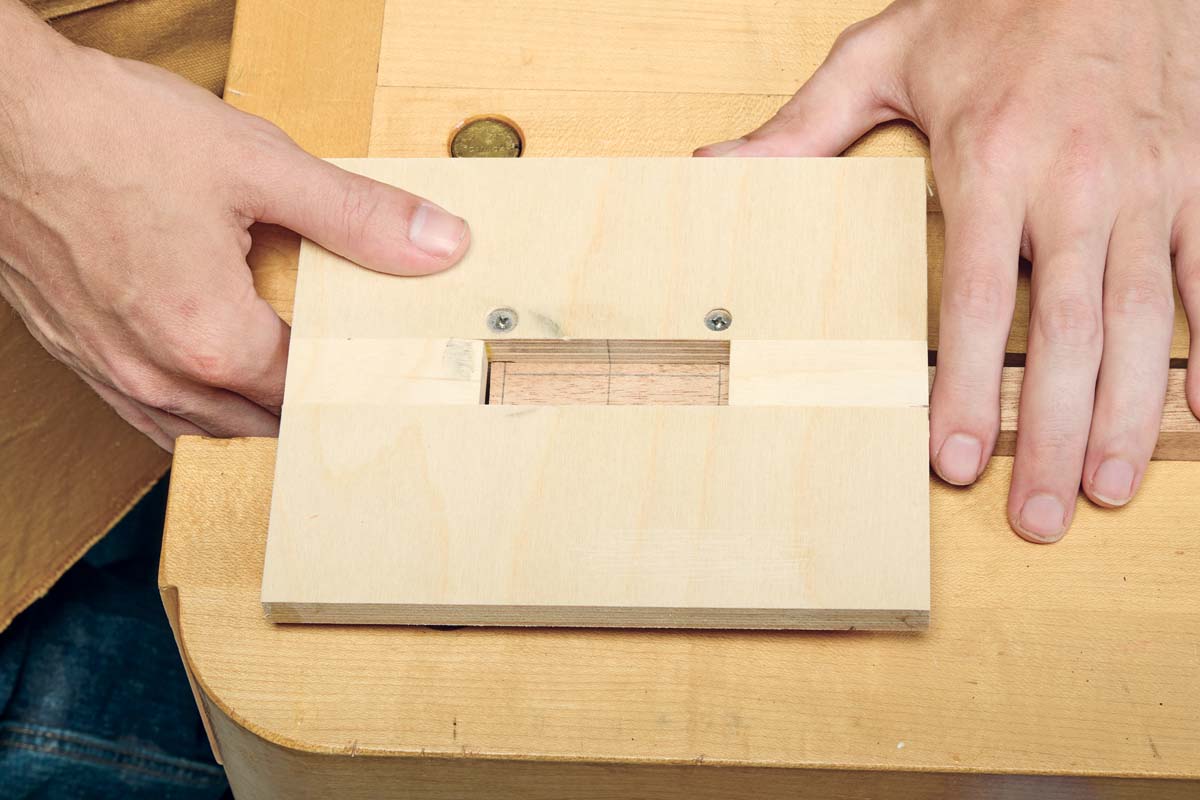
Secure the jig and workpiece firmly before routing.
The jig should remain square to the workpiece and should not shift during the cut.
Step 4: Rout the Mortise in Multiple Passes
With the jig secured, lower the router bit into the workpiece and follow the inside edges of the jig opening.
Rather than cutting the mortise to full depth in one pass, remove material gradually.
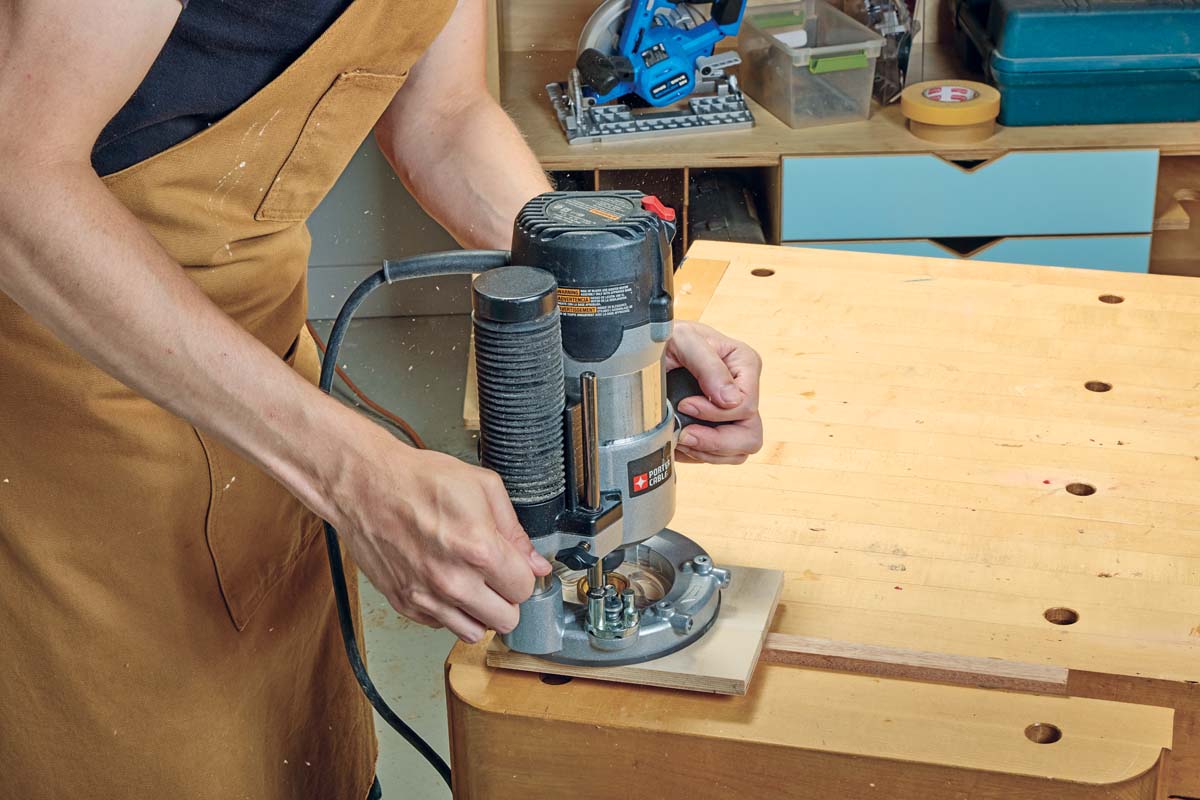
I typically set the router to remove about 1/8" to 1/4" of material per pass, depending on the bit and material.
After each pass, adjust the router's depth stop or turret to lower the bit for the next cut.
Continue until you reach the full mortise depth.
Taking multiple shallow passes reduces the load on the bit and helps maintain accuracy.
How to Square the Corners of a Mortise
A router leaves rounded corners because of the circular cutting bit.
For a traditional rectangular tenon, you'll need to square those corners with a chisel.
The same cleanup technique can also be used after drilling a mortise.
Cut Across the Grain First
Begin by severing the wood fibers across the grain at the end of the mortise.
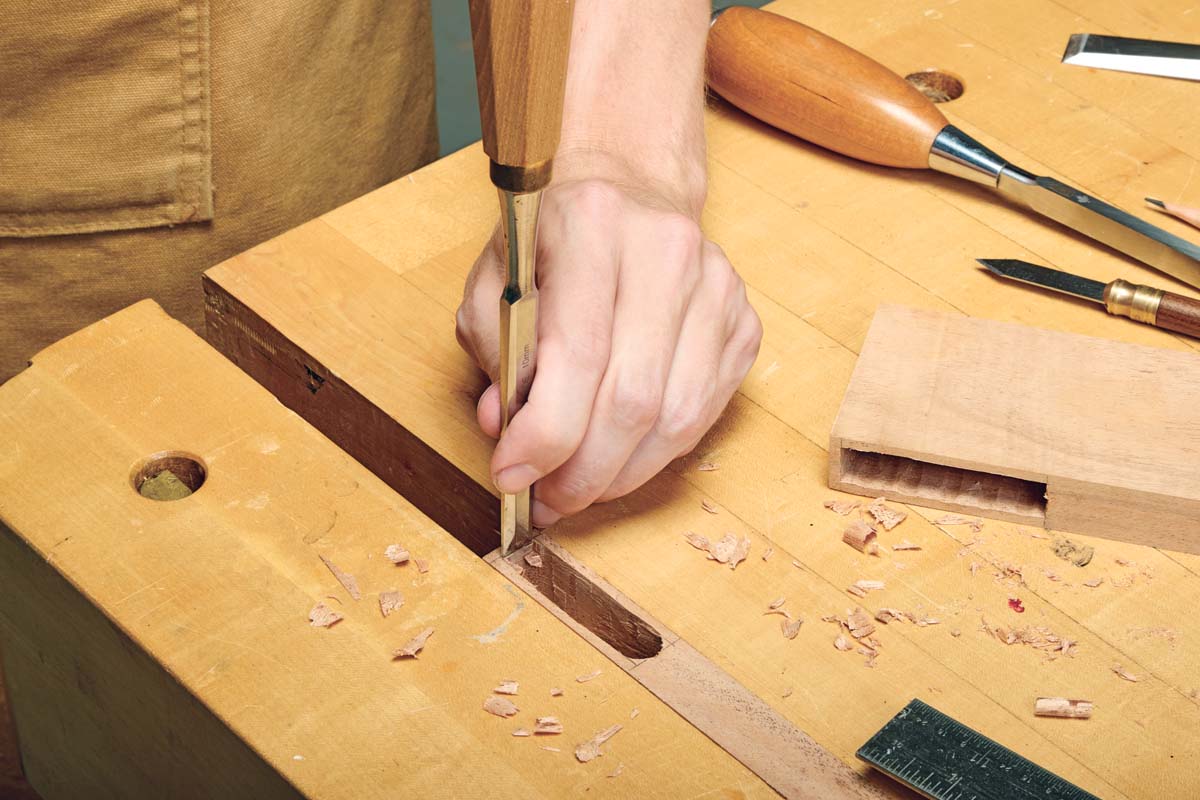
This helps reduce tearout when removing the remaining material.
Remove Waste with the Grain
Next, chop or pare with the grain to remove the waste from the corner.
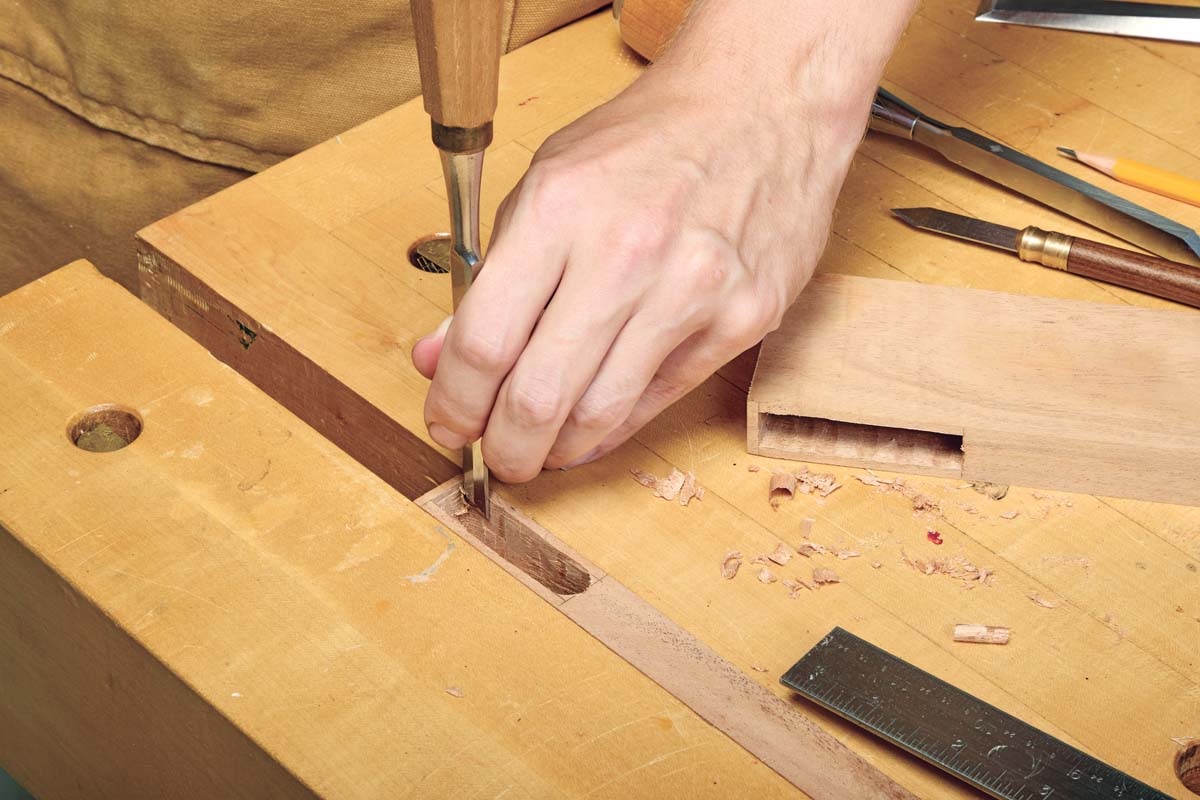
Work gradually toward the bottom of the mortise.
A few diagonal cuts may be necessary to remove the last bits of waste from the bottom corners.
Use the Right Chisel
It's helpful to keep several chisel sizes nearby.
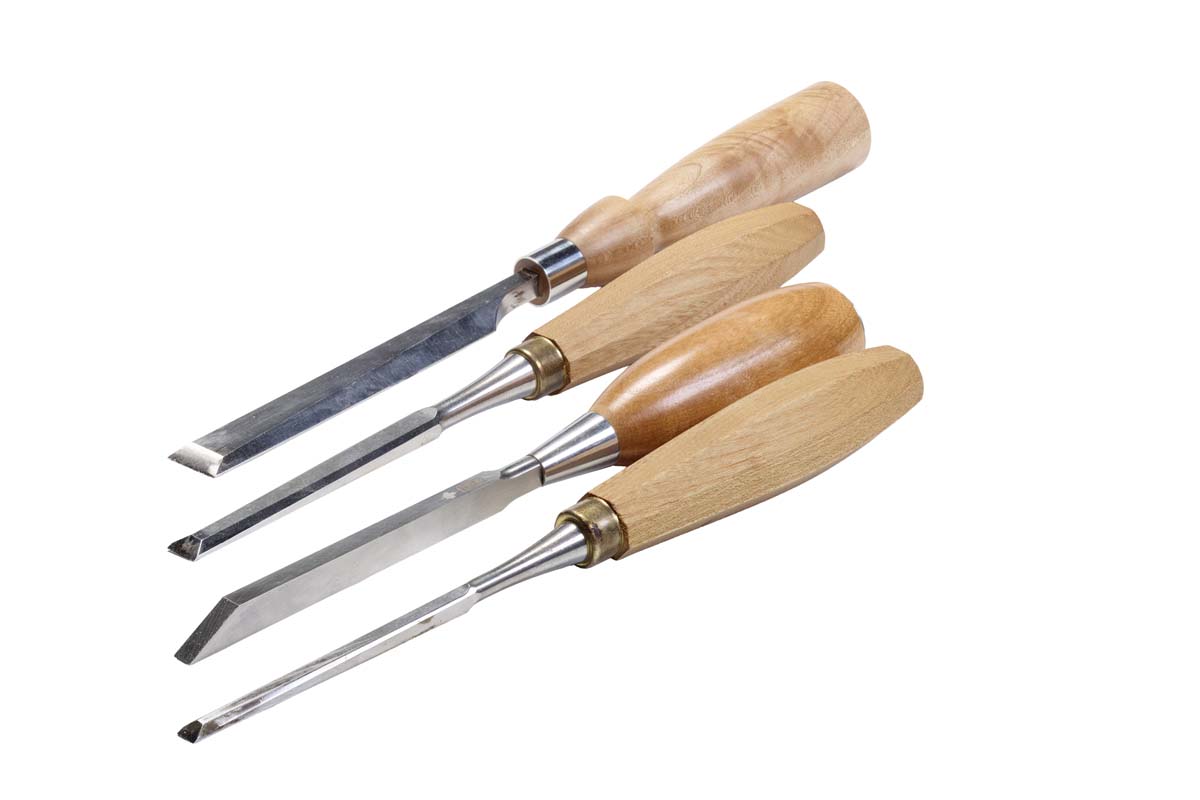
A wider chisel works well for straightening the long side walls, while a narrower chisel is useful at the ends.
A standard bench chisel will handle most cleanup work, but a mortising chisel can be helpful for heavier chopping.
Once the corners are square and the walls are straight, test the mortise with its mating tenon.
Loose Tenon Joinery: Another Way to Use Mortises
Traditional mortise and tenon joinery requires cutting a mortise in one workpiece and a matching tenon on the other.
But there's another option: loose tenon joinery.
Instead of forming a tenon on one of the mating pieces, you cut a mortise in both parts and connect them with a separate tenon.
This method works especially well with a router.
Step 1: Cut Matching Mortises
Start by positioning the two workpieces as they'll be assembled.
Mark the center of the joint on both pieces, then transfer the marks to the surfaces where the mortises will be cut.
Use the router jig to cut matching mortises in both parts.
Because the loose tenon can be shaped to match the rounded ends of the routed mortises, you won't need to square the corners.
Step 2: Make the Loose Tenons
Prepare a blank for the loose tenons by planing and ripping it to the required dimensions.
Next, round the edges of the blank at the router table.
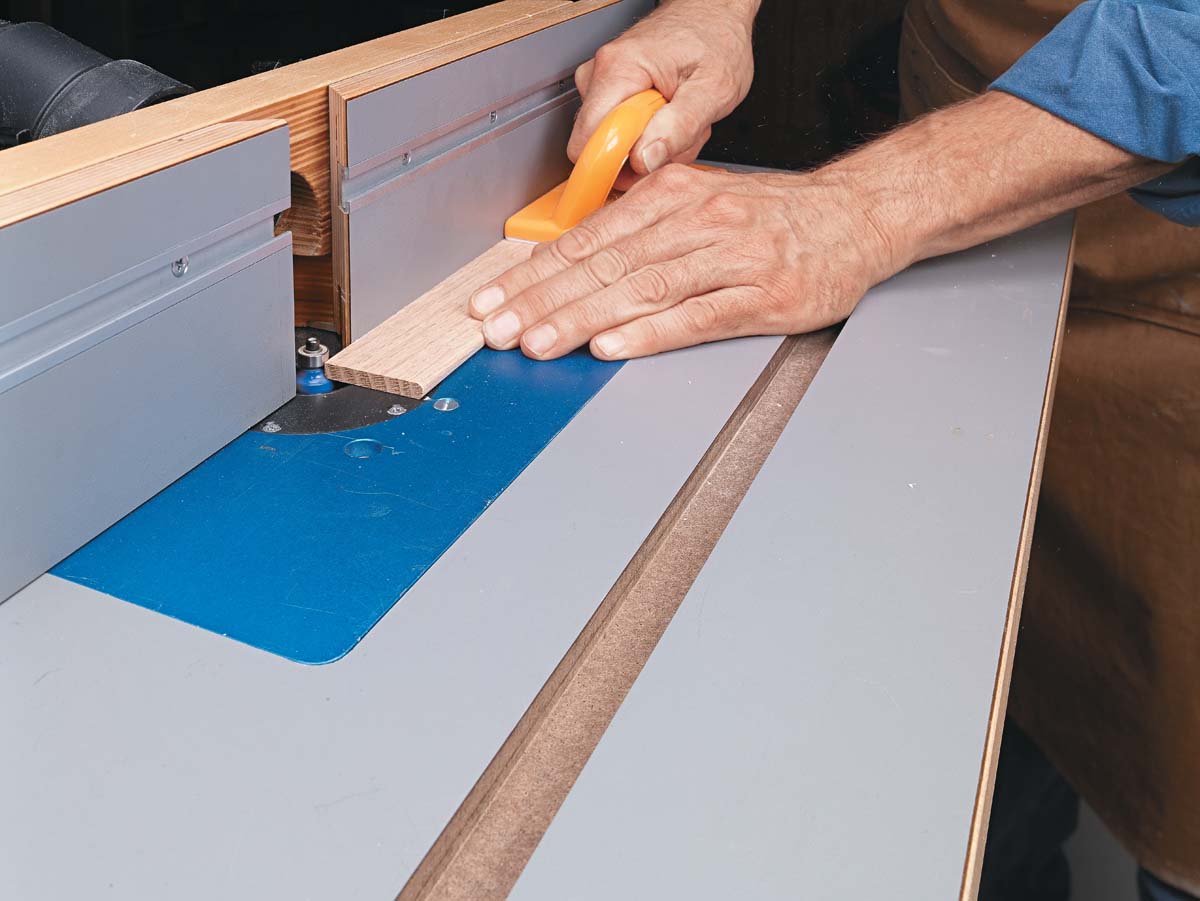
The roundover radius should be half the diameter of the router bit used to cut the mortises.
For example, a mortise cut with a 1/4" bit calls for a 1/8" radius on the matching tenon edges.
This creates a tenon that fits the rounded ends of the mortise.
Step 3: Cut the Tenons to Length
Once the blank has been shaped, cut the individual loose tenons to length at the table saw.
Use an auxiliary miter gauge fence to support the workpiece.
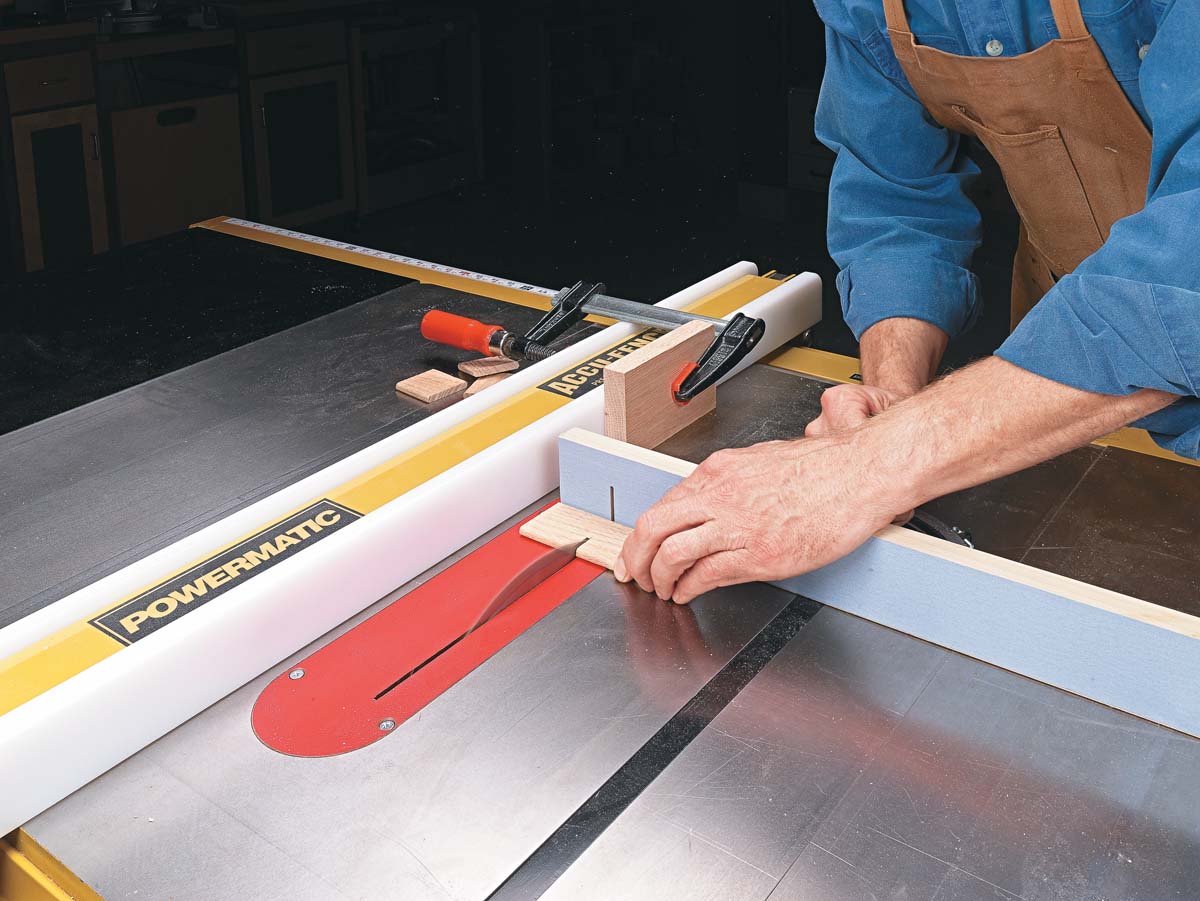
A stop block attached to the rip fence can establish the length, provided the blank clears the stop before reaching the blade so it cannot become trapped between the blade and fence.
The finished tenons should fit snugly in the mortises without requiring excessive force.
Drill Press vs. Router: Which Mortising Method Is Better?
Both methods can produce strong, accurate mortises, but each has its advantages.
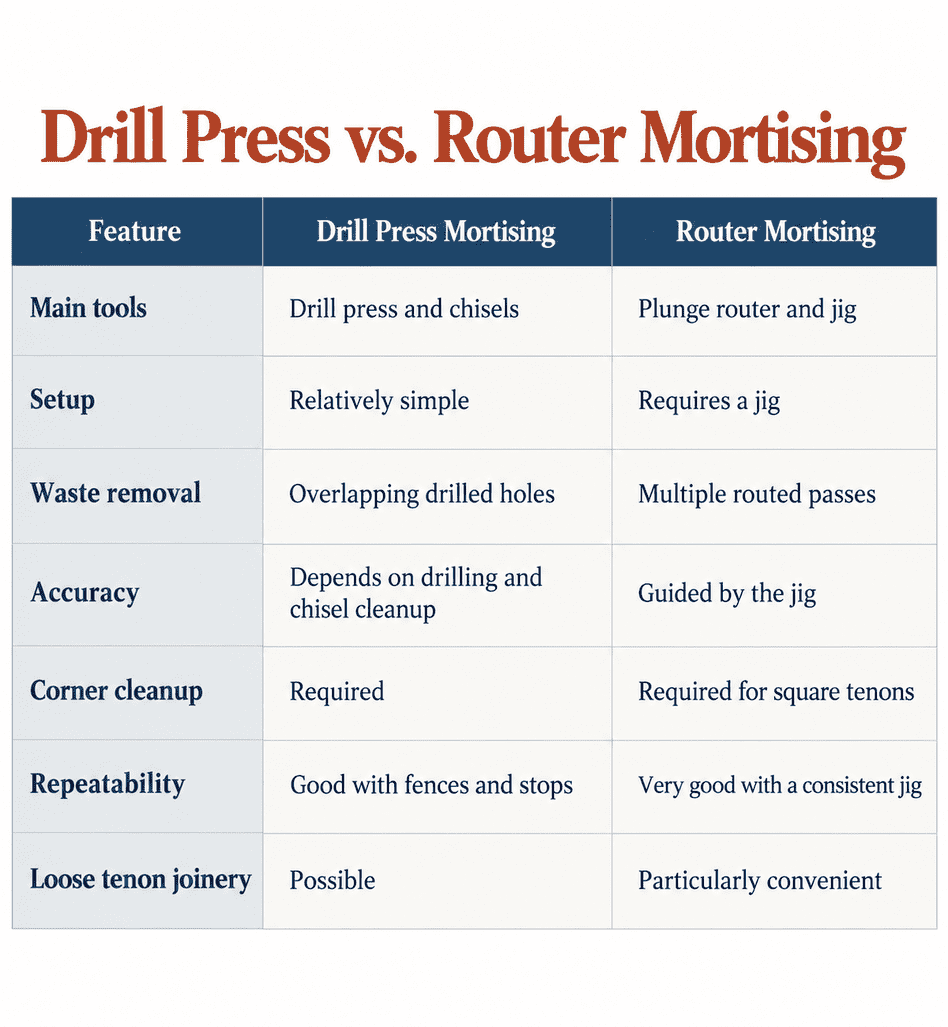
For occasional mortises, the drill press is a practical choice because it requires very little additional equipment.
For projects involving numerous identical mortises, a router jig offers consistent results and can make the process more efficient.
Tips for Cutting Accurate Mortises
Regardless of the method you choose, a few habits will help improve your joinery.
- Mark carefully. Accurate layout makes every subsequent step easier.
- Use sharp tools. Sharp drill bits, router bits, and chisels produce cleaner cuts.
- Secure the workpiece. Prevent movement during drilling, routing, and chiseling.
- Remove waste gradually. Light cuts reduce tool deflection and damage to the mortise walls.
- Check the depth. Consistent mortise depth helps ensure proper assembly.
- Test the fit. A snug, properly fitted tenon is more reliable than one that needs to be forced into place.
Mastering Mortise and Tenon Joinery
Mortise and tenon joinery has been a cornerstone of furniture making for centuries, and it's easy to understand why.
The joint is strong, versatile, and suitable for everything from small cabinet frames to substantial furniture assemblies.
Best of all, cutting a mortise doesn't have to be complicated.
With a drill press, a plunge router, and a few sharp chisels, you can create accurate mortises using tools you may already have in your shop.
Once you've mastered these two methods, you'll have the skills to tackle a wide variety of traditional and loose tenon woodworking joints.
Cutting Tenons on the Table Saw
A clean, accurate mortise is only half of a strong mortise and tenon joint. The matching tenon needs to fit snugly, with square shoulders that pull the joint together.
LEARN TO CUT TABLE SAW TENONS → Complete the Joint with a Perfect-Fitting Tenon

Learn practical table saw techniques for cutting consistent tenons and dialing in a precise fit for furniture and cabinet projects.


