


Long before woodworkers had modern, reliable woodworking glues, they needed a mechanical way to keep a mortise and tenon joint locked together. One of the simplest and most effective solutions was to drive a wooden pin through the assembled joint.
The technique is still useful today. A pinned mortise and tenon joint combines traditional joinery with a mechanical connection that helps secure the tenon inside the mortise. The exposed end of the pin can also become an attractive detail that highlights the craftsmanship of the joint.
Pinning a mortise and tenon isn't difficult, but the size and location of the pin, the fit of the hole, and the way the pin is installed all affect the finished joint. Here's how to do it successfully, along with a traditional variation called drawboring that uses the pin to pull the joint tightly together.

What Is a Pinned Mortise and Tenon Joint?
A pinned mortise and tenon starts with a traditional mortise and tenon joint. After the joint is assembled, a hole is drilled through the mortised workpiece and the tenon. A round wooden pin is then driven through the hole, mechanically locking the two parts together.
The concept couldn't be much simpler, but it's been used successfully in woodworking for centuries.
Today, most mortise and tenon joints are assembled with glue. Adding a pin provides another way to secure the joint and can be especially useful in traditional furniture and other projects where you want the joinery to become part of the design.
Why Pin a Mortise and Tenon Joint?
There are both structural and decorative reasons to pin a mortise and tenon.
A pin provides a mechanical connection through the mortise and tenon rather than relying entirely on glue. On some wide tenons, using pins can also allow for wood movement that might otherwise be restricted by gluing the entire joint.
But appearance can be just as important.
The exposed end grain of the wooden pin creates a small but noticeable detail on an otherwise flat surface. It also makes the construction of the project obvious — you can see exactly how the parts are joined.
How to Pin a Mortise and Tenon Joint
Start by making the mortise and tenon as you normally would and test the fit before adding the pins.
If you're gluing the joint as well as pinning it, I prefer to assemble and glue the mortise and tenon first. Once the glue has dried, you can lay out and drill the pin holes through the completed joint.
From there, the process comes down to choosing the right pin, locating it correctly, drilling a clean hole, and installing the pin.
Choose the Right Pin Diameter
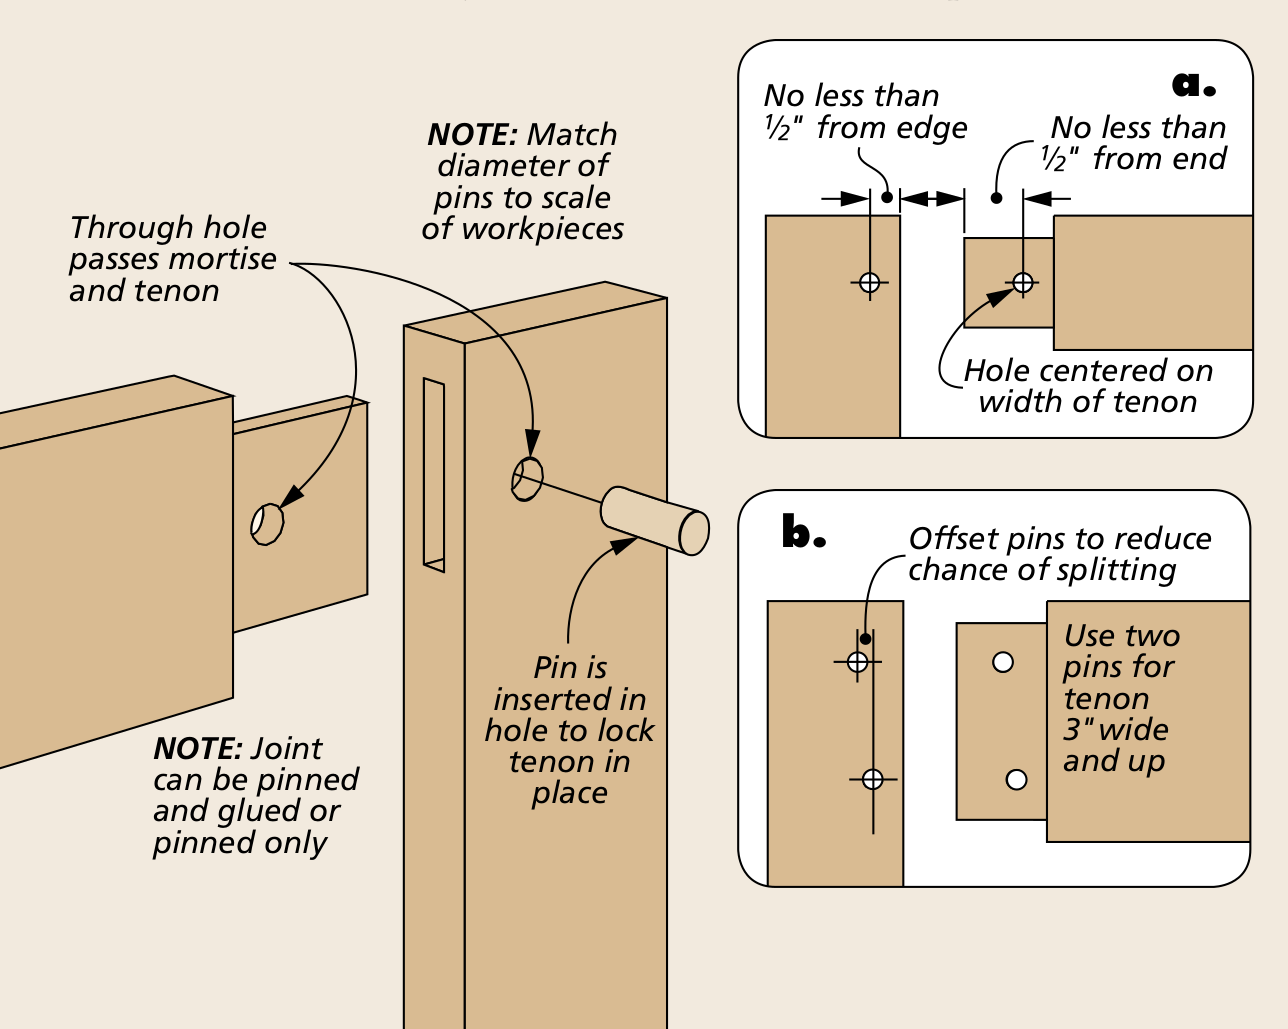
The first decision is the diameter of the wooden pin.
If the joint isn't glued, pin diameter should be matched to the structural demands of the joint. If the mortise and tenon is also glued, however, the visual proportion of the pin becomes an important consideration.
The pin should look appropriate for the size of the workpieces.
For small to moderately sized doors with narrow frames, a small pin is usually appropriate. For larger doors and table frames, a 3⁄8"-diameter pin may look more proportional. Heavy load-bearing construction, such as a workbench, may call for substantially larger pins.
The goal is to make the pin large enough for the joint while avoiding a pin that overwhelms the surrounding parts.
Locate the Pin for Strength
Where you place the pin is just as important as its diameter.
The pin needs enough material surrounding it to securely lock the tenon in place. Avoid drilling too close to the end or edges of the tenon.
Whenever possible, center the pin across the width of the tenon and keep it at least 1⁄2" from the end of the tenon.
You should also avoid placing the pin too close to the edge of the mortised workpiece. Doing so can weaken the surrounding wood and increase the chance of splitting. As a general guideline, keep the pin at least 1⁄2" from the joint line.
Use Two Pins for Wide Tenons
A wider tenon may benefit from two pins instead of one.
For tenons around 3" wide or greater, I generally use two pins. Rather than placing both pins on the same centerline, they can be staggered slightly.
Staggering the pins reduces the chance of creating a weak line across the mortised workpiece. It can also make the finished joint more visually interesting.
Stopped vs. Through Pin Holes
Pin holes can either pass completely through the joint or stop partway through the mortised workpiece. Which approach works best depends largely on the project.
Through Pin Holes
A through hole is often the simplest choice for frame construction, such as a door.
The hole passes through one face of the mortised piece, through the tenon, and out the opposite face. The pin is driven completely through the assembly and trimmed flush on both sides.
This makes drilling and installing the pin straightforward.
Stopped Pin Holes
A stopped hole works well when the mortised part is considerably thicker than the tenoned part.
A good example is the rail-to-leg joint on a table. Because the leg is thicker than the apron or rail, the pin can extend well into the inside face of the mortise without passing completely through the leg.
This provides plenty of engagement while leaving one face of the workpiece uninterrupted.
How to Drill the Pin Holes
Because the ends of the pins will often remain visible, clean, accurately sized holes are important.
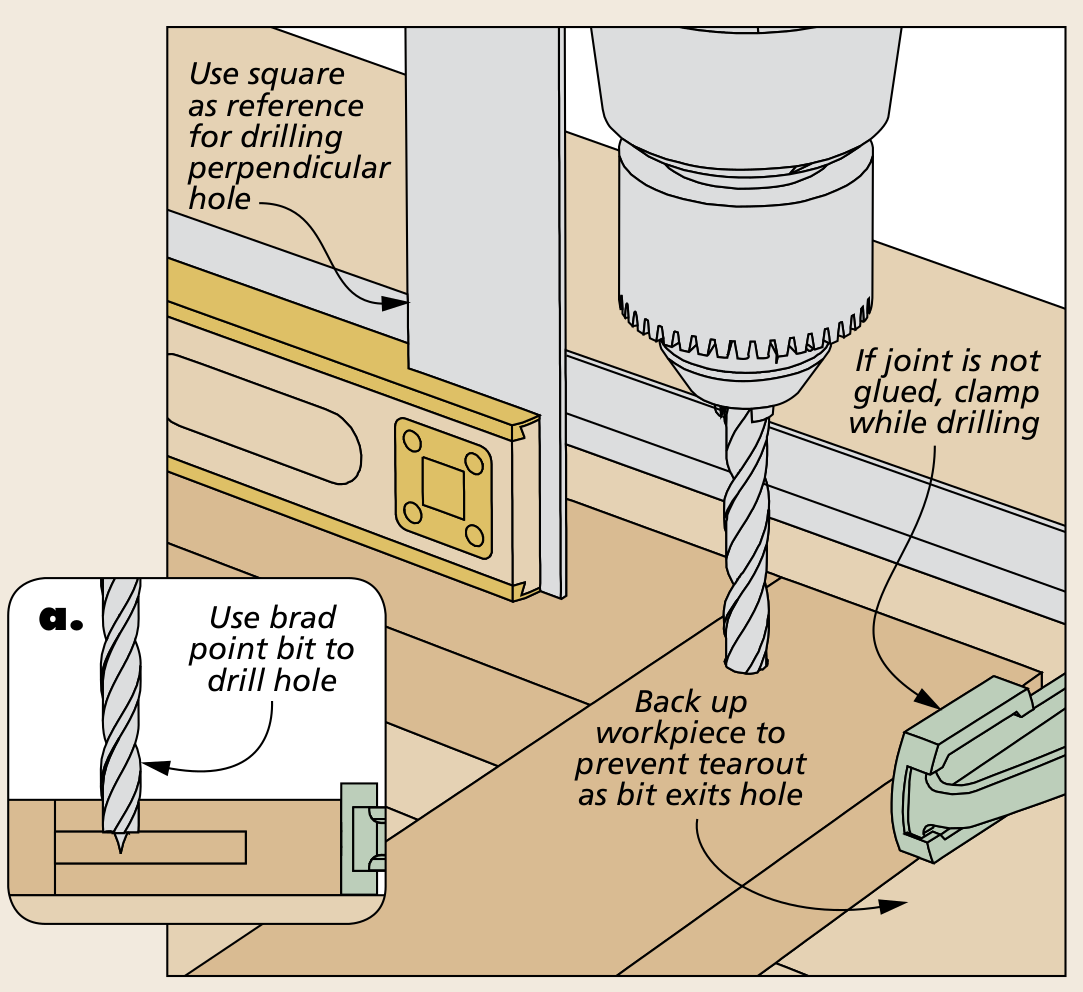
A brad-point bit is a good choice because its center point makes accurate positioning easier and its cutting spurs help produce a clean edge around the hole.
If the mortise and tenon hasn't already been glued together, clamp the joint securely before drilling so the parts can't shift.
You can drill a perpendicular hole by eye, but using an upright square beside the drill provides a helpful visual reference.
When drilling a through hole, clamp or hold a piece of scrap wood against the back of the workpiece. This backup prevents the bit from tearing out the wood fibers as it exits the opposite side.
How to Make Wooden Pins for Mortise and Tenon Joinery
The fit of the pin is important. It should be snug enough to secure the joint without requiring so much force that you risk splitting the workpiece.
Commercial dowel rod is the easiest option if you can find the correct diameter and wood species. I generally prefer using the same species as the project. Even when the wood matches, the end grain of the pin naturally creates some contrast with the surrounding face grain.
Another option is to make your own pins with a draw plate. This lets you create pins from virtually any wood species and fine-tune their diameter for the hole.
Start with a Square Pin Blank
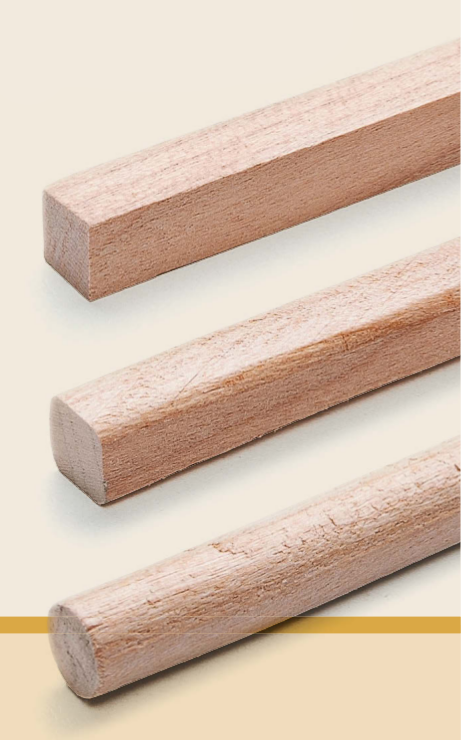
Rip a strip of straight-grained wood into a square blank that's slightly larger than the finished pin diameter.
Cut the blank long enough to give yourself plenty of material to hold onto while forming the pin.

Round the Pin with a Draw Plate
Start with a hole in the draw plate that's slightly smaller than the diagonal dimension of the square blank.
Driving the blank through this first hole knocks off the corners and begins forming the round pin.
Continue working through progressively smaller holes as needed.

Size the Pin for a Snug Fit
For the final pass, drive the blank through the draw-plate hole that matches the diameter of the drilled pin hole.
The resulting pin may have a slightly rough surface, but it should be round and provide a snug fit in the joint.

Chamfer the End of the Pin
Cut each pin at least 1⁄2" longer than the thickness of the assembly. The extra length gives you something to work with while driving and trimming the pin.
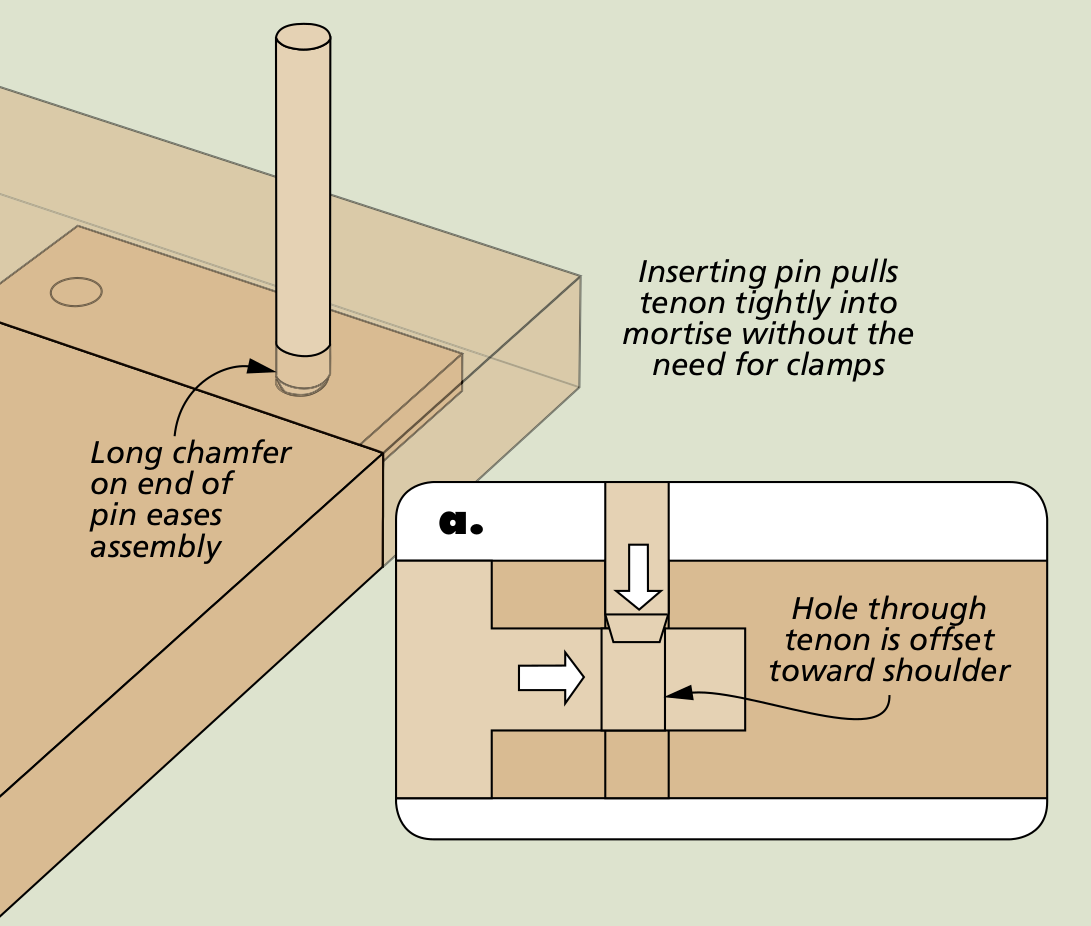
Before installation, chamfer the leading end.
A small chamfer makes it easier to start the pin and reduces resistance as it's driven through the joint. You can quickly create the chamfer with a sanding block, file, or block plane.
How to Install Wooden Pins
With the holes drilled and pins fitted, you're ready for assembly.
A tight-fitting pin doesn't necessarily require glue, but adding a little glue can help fill minor gaps and leave a cleaner-looking joint after the pin is trimmed.
Apply glue near the opening of the hole and around the leading end of the pin. As the pin is driven into place, the glue is carried farther into the joint.
Support the assembly securely above the benchtop. For a through pin, make sure there's clearance underneath for the pin to exit the opposite side.
Once the pin is started, drive it steadily through the joint. A snug-fitting pin can become difficult to move if it's allowed to stop partway through installation.

How to Trim Wooden Pins Flush
Once the glue has dried, the final step is trimming the exposed pin.
Start by sawing the pin slightly proud of the surrounding surface. Place a thin shim between the saw and workpiece to protect the surface from scratches.
Don't try to saw the pin perfectly flush. Instead, leave a small amount behind and finish the job with a sharp chisel.
Hold the chisel bevel-up with its back resting flat against the surface. Carefully score around the pin and then use light paring cuts from several directions to remove the remaining waste.
Working from multiple directions reduces the chance of splitting or tearing the end grain of the pin. Be careful that the corners of the chisel don't dig into the surrounding surface.
A little finish sanding completes the job and leaves the end of the pin flush with the surrounding wood.
What Is a Drawbored Mortise and Tenon?
A drawbored mortise and tenon takes the idea of a pinned joint one step further.
Instead of drilling the pin hole straight through the assembled joint, the hole in the tenon is deliberately offset slightly toward the tenon's shoulder.
When the wooden pin is driven through the joint, it has to bend slightly to pass through the offset hole. That action pulls — or draws — the tenon tightly into the mortise.
The result is a strong mechanical joint that can pull itself together without relying on clamps. This makes drawboring especially useful for traditional furniture and other assemblies that are difficult to clamp.
Step 1: Drill the Pin Holes Through the Mortise
Start by laying out and drilling the pin holes through the mortised workpiece.

Step 2: Transfer the Hole Locations to the Tenon
Assemble the mortise and tenon without glue. Insert the drill bit into the existing pin holes and use it to mark the corresponding locations on the tenon.
Then disassemble the joint.

Step 3: Offset the Holes Toward the Shoulder
Here's the key to the drawbore.
Rather than drilling directly on the transferred marks, use a square and awl to move each hole location approximately 1⁄32" toward the shoulder of the tenon.
It's this slight offset that creates the pulling action when the pin is driven home.

Step 4: Drill the Tenon & Assemble the Joint
Drill through the tenon at the offset marks. Then assemble the mortise and tenon and drive the wooden pins through the joint.
As each pin encounters the offset hole in the tenon, it pulls the tenon toward the mortise and seats the shoulder tightly against the mating workpiece.

Pinned vs. Drawbored Mortise and Tenon Joints
Although the two joints look similar when finished, there's an important difference.
With a standard pinned mortise and tenon, the pin hole is drilled through the assembled joint so the holes in the mortise and tenon align. The pin's primary job is to mechanically lock the parts together.
With a drawbored mortise and tenon, the hole through the tenon is intentionally offset toward the shoulder. Driving the pin through the offset holes pulls the joint tightly together.
Both methods create a strong traditional joint and add an attractive visible detail. Which one you choose depends on whether you simply want to reinforce the joint or want the pin to actively pull the mortise and tenon together.


