Way back in Little League, we spent a lot of time fielding ground balls and catching a pop fly. A lot of time. These essential skills needed to become second nature so that when a grounder occurred in a game, the response was automatic.
A similar principle applies to woodworking. There are some fundamental tasks that come up in nearly every project: like dadoes and grooves. When we take the time to understand their function and learn how to create them with confidence, our projects end up better. It’s pretty easy to take them for granted. They just don’t demand the same kind of attention as box joints or dovetails. But despite this, dadoes and grooves are unmatched for their versatility.
There are a wide variety of ways that they can be used in building furniture. They can strengthen a joint or simply help keep pieces aligned. They’re great for holding panels or drawer bottoms. They are often combined with other types of joints, like tenons and half laps. And they can be used with glue alone or with screws.
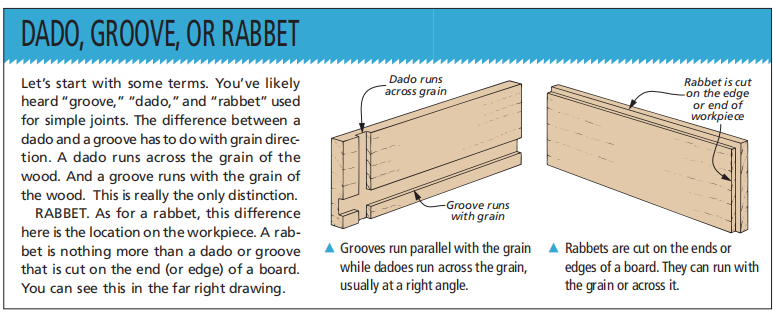
TABLE SAW.
There’s not really a whole lot involved when it comes to making dadoes and grooves. This article focuses on forming these details at the table saw. There’s more to it than just knowing how to make them. Here’s a look at a few ways we commonly use dadoes and grooves and some tips for getting a perfect fit.
CENTERED GROOVES
One place where I use grooves all the time is for holding panels, such as the panel in a frame and panel assembly. Grooves house a panel and hold it in place very effectively. When combined with stub tenon joinery, the result is a strong frame and panel assembly. Quite often though, the panel is a piece of 1⁄4" plywood or 1⁄4" hardboard. Since these materials are usually a bit under 1⁄4" in thickness, you can’t use a stack dado blade to cut the grooves.
SINGLE BLADE.
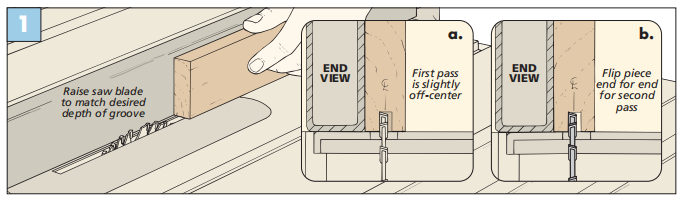
Instead, I cut narrow grooves with a single saw blade. Set the rip fence so the blade is roughly centered on the thickness of the stock. Then as you see in Fig. 1, make a couple passes over the blade, flipping the workpiece end-for-end between each pass. This makes the groove slightly wider and centers the groove on the thickness of the workpiece. If the groove is too narrow, nudge the fence away from the blade just a hair and try again.
 Narrow grooves can be used to hold panels for doors or drawers. Or they can be combined with stub tenons to create strong frames.
WIDE GROOVES
When it comes to case construction for furniture projects, I often use grooves. They do two things. First, they lock the individual components together, increasing the strength of the carcase. And second, they make the assembly a whole lot easier, since all the pieces register together so that they won’t shift out of place.
 Wider grooves are useful in case construction for adding strength and simplifying assembly.
STACK DADO SET.
For most projects, I cut grooves to match the thickness of the stock I’m working with. In these cases, I use a stack dado set to cut the grooves. The trick is to get the dado set adjusted to the correct width.
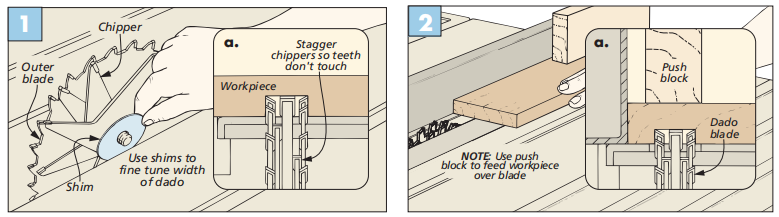
To do this, you’ll need to use a combination of chippers along with the outside blades of the dado set. And if you are working with plywood, you’ll probably need to use shims between the chippers to fine tune the fit (Fig. 1). I always make a few test cuts first before cutting the grooves in my actual workpieces.
As you can see in Fig. 2, cutting grooves on a table saw is similar to ripping a board (except that you aren’t cutting all the way through the workpiece). You use the rip fence to guide the workpiece and position the groove. Although the blade will be covered by the workpiece, it’s a good idea to use a push block.
DADO JOINT
In a dado joint, the end grain of one part connects to the face grain of another. By cutting a dado in one piece, you create a pair of shoulders or ledges to hold the mating piece. This locks the piece in place, which prevents twisting and racking.
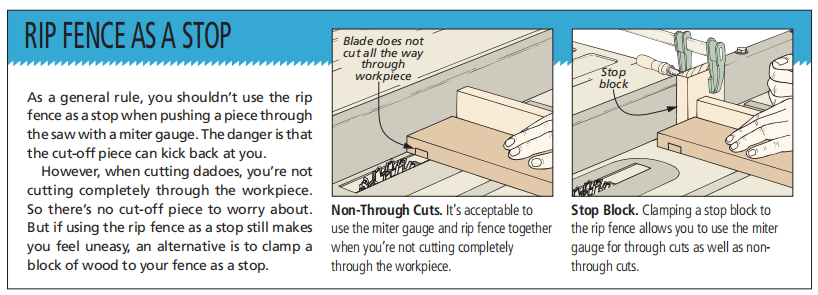
To create this joint, I usually use the dado blade to match the width of the dado I want to cut. To cut the dado, I use the miter gauge to support the workpiece. I use the rip fence as an end stop to position the dado on the workpiece, as shown in Fig. 1. Quite often, I need to make a series of dadoes that are evenly spaced from either end of the workpiece. In this case, you can cut the dadoes in “pairs” by flipping the workpiece end-for-end before readjusting the rip fence for the next set of dadoes.
CROSS-GRAIN CUTS.
Cutting dadoes is a little bit different than cutting grooves. Because you are cutting across the grain, there is a greater tendency for chipping or tearout. There are a couple of things you can do to minimize these problems.
 First, it helps to back up the cut with a long plywood auxiliary fence attached to your miter gauge, as in Fig. 1. This fence prevents the dado blade from blowing out the back edge of the workpiece as it exits the cut. As a side benefit, the fence provides support to the workpiece.
 A dado joint can be used to hold a shelf in a bookcase or to join the parts of a cabinet or case.
SPLINTERING.
In addition to tearout at the back of the cut, you may also have to deal with splintering along the edges of the dado. This is especially true in plywood. As you can see in Fig. 1a, some dado sets have outer blades with teeth that are designed to score the fibers of wood along the dado sides to minimize splintering. Depending on how sharp your blade is or the type of material you are cutting, you may still experience some splintering.
In these cases, I often find that a slower feed rate helps to reduce this splintering. If the splintering is really bad, I place a piece of masking tape over the area where the dado is going to be cut. The tape helps to back up the wood during the cut, keeping any splintering along the edges to a minimum.
DADOES FOR DRAWERS
Drawer joints are subjected to a lot of strain and pressure from the constant opening and closing of the drawer. Although you could join the sides of the drawer to the front and back with butt joints or rabbets, neither of these provides much strength. I often use a tongue and dado joint, as shown in the photo at right. This joint offers good strength and is easy to make here at the table saw.
As an overview, tongues formed on the ends of the drawer front and back fit into narrow dadoes cut in the drawer sides. This creates an interlocking joint that stands up to the tugging of the drawer as it is opened and closed. (This joint works best with false front drawers. For drawers without false fronts, see the locking rabbet joint below.)
TWO-STEP.
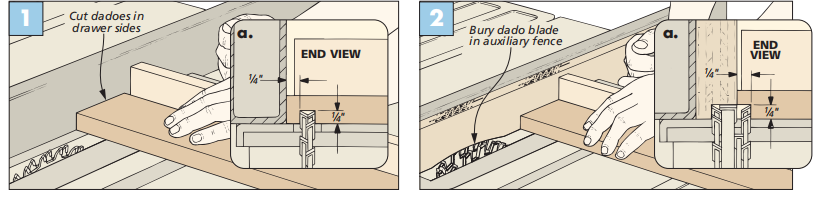
As you can see by the drawings below, this joint is made in two steps. First, dadoes are cut near the ends of each drawer side (Fig. 1). I usually do this with a dado blade, using the rip fence as a stop and the miter gauge to guide the workpiece through the saw.
 The drawer front and back interlock with the sides using this tongue and dado joint.
The second step is to create the tongues on the ends of the front and back. This is done by cutting a rabbet on each end. As shown in Fig. 2, I “bury” the dado blade in an auxiliary fence that’s attached to the rip fence. The trick is to size the tongues to fit snugly in the dadoes cut in the drawer sides.
LOCKING RABBET
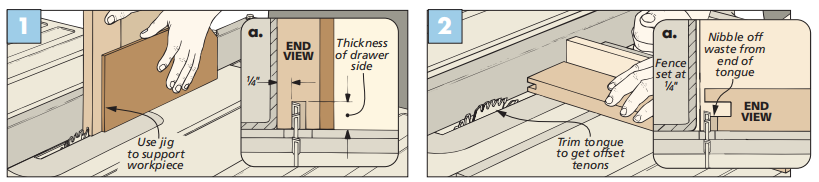
The locking rabbet joint is similar to the tongue and dado, but it provides a little more glue surface. This joint works well when you can’t (or don’t want to) use a false front. In this joint, the drawer front and back get a slightly different treatment. Like the tongue and dado, the process starts with cutting the dadoes in the sides. Then a centered dado is cut on each end of the drawer front and back, as you can see in Figure 1.
 A locking rabbet joint looks good, is fairly easy to make on the table saw, and provides a reasonable amount of strength.
This dado is cut in two passes, turning the workpiece around after the first pass. The goal here is to create a tongue that will fit snugly into the dadoes in the sides. (To hold the workpiece upright and against the fence, I made a support jig.)
Next, simply trim back the inner tongue by nibbling away the waste in a couple of passes (Fig. 2). When the drawer is assembled, the drawer sides should be flush with the ends of the drawer front and back.