


The mortise and tenon is probably the most used and trusted joint in traditional woodworking. For me, making the two parts of the joint always follows a specific order — the mortise comes first, followed by a tenon to fit. Once the mortise is completed, the table saw or the router table will quickly give you an accurate tenon. But I’ve found that the best method of cutting a clean, square, accurately sized mortise is to combine a little modern machine woodworking with some old-fashioned handwork.
THREE STEPS.
My “blended” technique for cutting mortises involves a common, three-step routine. First, I lay out the mortise at the bench. Next, I take the part to the drill press to drill out the bulk of the waste. Finally, it’s back to the bench to square and clean up the mortise. The trick to making the process flow smoothly and produce a top-notch mortise is the way you approach each step.
FIRST, THE LAYOUT. When laying out the mortise, there are two goals. The first is accuracy. You need to make sure the mortise is sized and positioned correctly. The second requirement is a distinct layout line that’s easy to read during the following two steps.
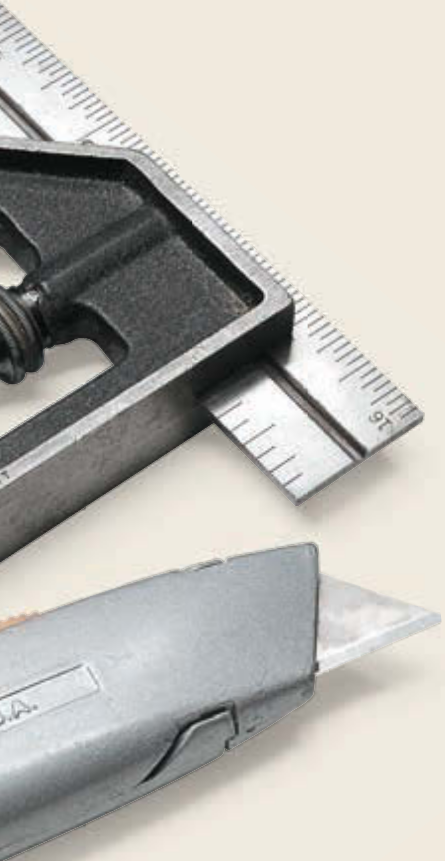
My solution is shown in the drawings below. I use a combination square and a sharp knife as a layout gauge. The square provides the accuracy while the crisp lines incised by the knife create a precise guide for placement of your chisel when cleaning up the mortise.

First, I lay out and mark the two ends of the mortise. Use the blade of the square to measure and use the knife to mark a nick at each end point. Then strike a sharp line across each end (Figure 1).
To mark the cheeks of a centered mortise, use the rule markings on the blade of the square to set it to the thickness of the mortise sides. Next, I position this “gauge” along each face of the workpiece, make a short cut, and measure between them. If necessary, readjust the blade to size the width of the mortise correctly. When you get it right, mark both sides by sliding the square along the edge of the workpiece with the tip of the knife tight to the blade, as in Figure 2.

SECOND, DRILL PRESS. With the layout of the mortise completed, the drill press is your next stop. Here, you’re going to remove most of the waste from the mortise by drilling a series of overlapping holes.
THREE TIPS.
Figure 3 shows how the drill press is set up for the task. To keep the drill bit on target and the holes aligned, I trap the workpiece between two fences. The workpiece can slide along the fences but can’t move front-to-back.

I like to use a Forstner bit or bradpoint bit with a diameter slightly smaller than the width of the mortise — for example, a 3 ⁄ 16 "-dia. bit for a 1 ⁄ 4 "-wide mortise (Figure 3b). You won’t have to worry about centering the bit perfectly and you’ll avoid ending up with “corrugated” sides if the bit wanders slightly.
You’ll want to set the depth stop on the drill press to about 1 ⁄ 16 " deeper than the length of the tenons. This makes fitting the tenons and the final assembly a lot easier.

It works best to drill the holes in a set pattern, as in Figures 3 and 4. Start with a hole at each end as close as comfortable to the layout line. Next, drill staggered holes between the end holes, leaving space between them to provide a solid footing for the drill bit. Finally, drill the connecting holes slowly to keep the bit from wandering.
SQUARE UP THE MORTISE. Now it’s back to the bench to square up the mortise. For this, I use two sharp chisels and a mallet. You’ll need a wide chisel to pare the cheeks of the mortise and a narrow chisel to clean the ends (main photo).

With the workpiece clamped firmly, I begin by establishing the perimeter of the mortise with a series of shallow cuts. Place the wide chisel in the knife line defining the cheek and tap lightly. Work from end to end along both sides. Switch to the narrow chisel and repeat this effort across the ends (Figure 5). Next, I use an angled cut to loosen and lift a small chip from each end, as in detail ‘b’ below.
With this short shoulder established, you can make slightly more aggressive cuts at the ends of the mortise without trying to remove the waste. Then switch chisels and cut deeper along both of the cheeks. The waste will begin to chip from the mortise cheeks.

Continue to alternately pare the sides and the ends. This back and forth pattern will provide clearance for the chisels as you work deeper into the mortise. And you’ll have a better shot at keeping the cuts perpendicular to the edge.
When you reach the bottom, you can use the narrow chisel bevel side down to remove the waste from the corners. You’ll have to angle the chisel into the mortise from both directions to get clear into the ends, as shown in Figure 6.

Finally, be sure the mortise is clean and free of chips and then double-check the depth with a rule or combination square. If everything checks out, you’re done. The mortise is ready for a tenon.


