I’m continually amazed at the innovative new router bits being offered by bit manufacturers. Especially intriguing are the ones designed to make complex, architectural moldings on the router table. They open up a new world of possibilities for adding sophisticated details to a project. A pair of examples are the crown molding and the plinth blocks for the traditional bookcase on page 30.

If you’re accustomed to using standard-size bits, the thought of installing one of these monsters in the router table might give you shivers. But with the right setup and a little know-how, you can get great results without the anxiety. I’ll explain all the key points.
THE RIGHT ROUTER. The first thing you need to consider is whether your router is up to the task. The mass of the bit and the large cutting surface mean that you’ll need a fair amount of horsepower to achieve a clean, chatter-free cut. You’ll get the best results with a router of 2-hp or more. Although most of these bits are not overly large in diameter (1" to 1 1 ⁄ 2 "), they’ll work best when you run them at a slower speed. So you’ll need variable speed. And just as a reminder — these bits should never be used in a handheld router.
FIRM CONTROL. As you can see at left, both the crown molding bit and the face molding bit used to make the plinth blocks have very long cutting edges. To cut the profiles, the workpiece is fed across the bit standing on edge. This means that when the bit is taking a full cut, there’s considerable force pushing on the workpiece. So the main challenge to using these bits is maintaining firm, safe control while making the cuts. This is simply a matter of having the right setup.
A FEATHERBOARD. Rather than relying on hand pressure to keep the workpieces snug against the fence, I enlist the aid of a shop-made, three-spring featherboard, as in the photo above. The featherboard holds the workpiece firmly against the fence so that all you have to do is concentrate on pushing it steadily across the bit. To finish the cut, it’s a good idea to keep a push stick within easy reach.
TALL FENCE. The fence on your router table needs to be tall enough to accommodate the height of the bit as well as the blank. You also need enough depth to bury the entire bit in the fence. An open split fence, as shown above, is a good option. If you have a short fence, you may need to add a tall auxiliary fence.
DUST COLLECTION. One more thing. Effective dust collection is a must. The cuts produce a large volume of dust and chips. And this can clog things up fast. Keep the bit opening clear and you’ll have an easier feed and get a smoother cut.
EXTRA-WIDE BLANKS. I made both the crown molding and the plinth blocks starting with extra-wide blanks, as shown in the two drawings at right. Again, good control of the workpiece is the reason.

The crown profile runs across the full width of the finished molding. So the trick is to start with an extrawide blank. This allows you to raise the bit above the level of the table and maintain a bearing surface at the top and bottom of the blank as you cut the profile, as shown in the upper right drawing. Once the profile is completed, the blank is cut to final size and shape.
The plinth blocks go a little differently. Here, the profile is cut crossgrain along the top edge of the narrow block. To do this, you have to “balance” them on end. So to provide more bearing surface, I cut the profile onto a double width (6 1 ⁄ 2 "-wide) blank that was cut to finished length (lower drawing at right). This way, you’ll get both plinth blocks from the one blank. And note that the featherboard is shimmed up so that it bears against the uncut section of the blank.
LIGHT PASSES. Once the blanks are sized and the router table is set up properly, cutting the profiles isn’t hard. You start with most of the bit’s cutting edge buried in the fence. Then the profile is formed with multiple, light passes — 1 ⁄ 16 " or less. Just nudge the fence back a little after each cut, exposing more of the bit. And you’ll need to adjust the springs of the featherboard after every couple of passes.
You’ll find that it may take a dozen or more passes to rout the profile to full depth. All you have to do is concentrate on pushing the workpiece steadily past the bit — the featherboard does the rest. A slow, steady feed rate will give you a cleaner, easier cut.
The last pass should be a “skim” cut — essentially just smoothing the profile. Maintaining a consistent feed at this point is especially important for a chatter-free result.
Once the profile is fully formed, you can complete the molding at the table saw. And after a bit of finish sanding, your shop-made ”factory” molding is ready to go.
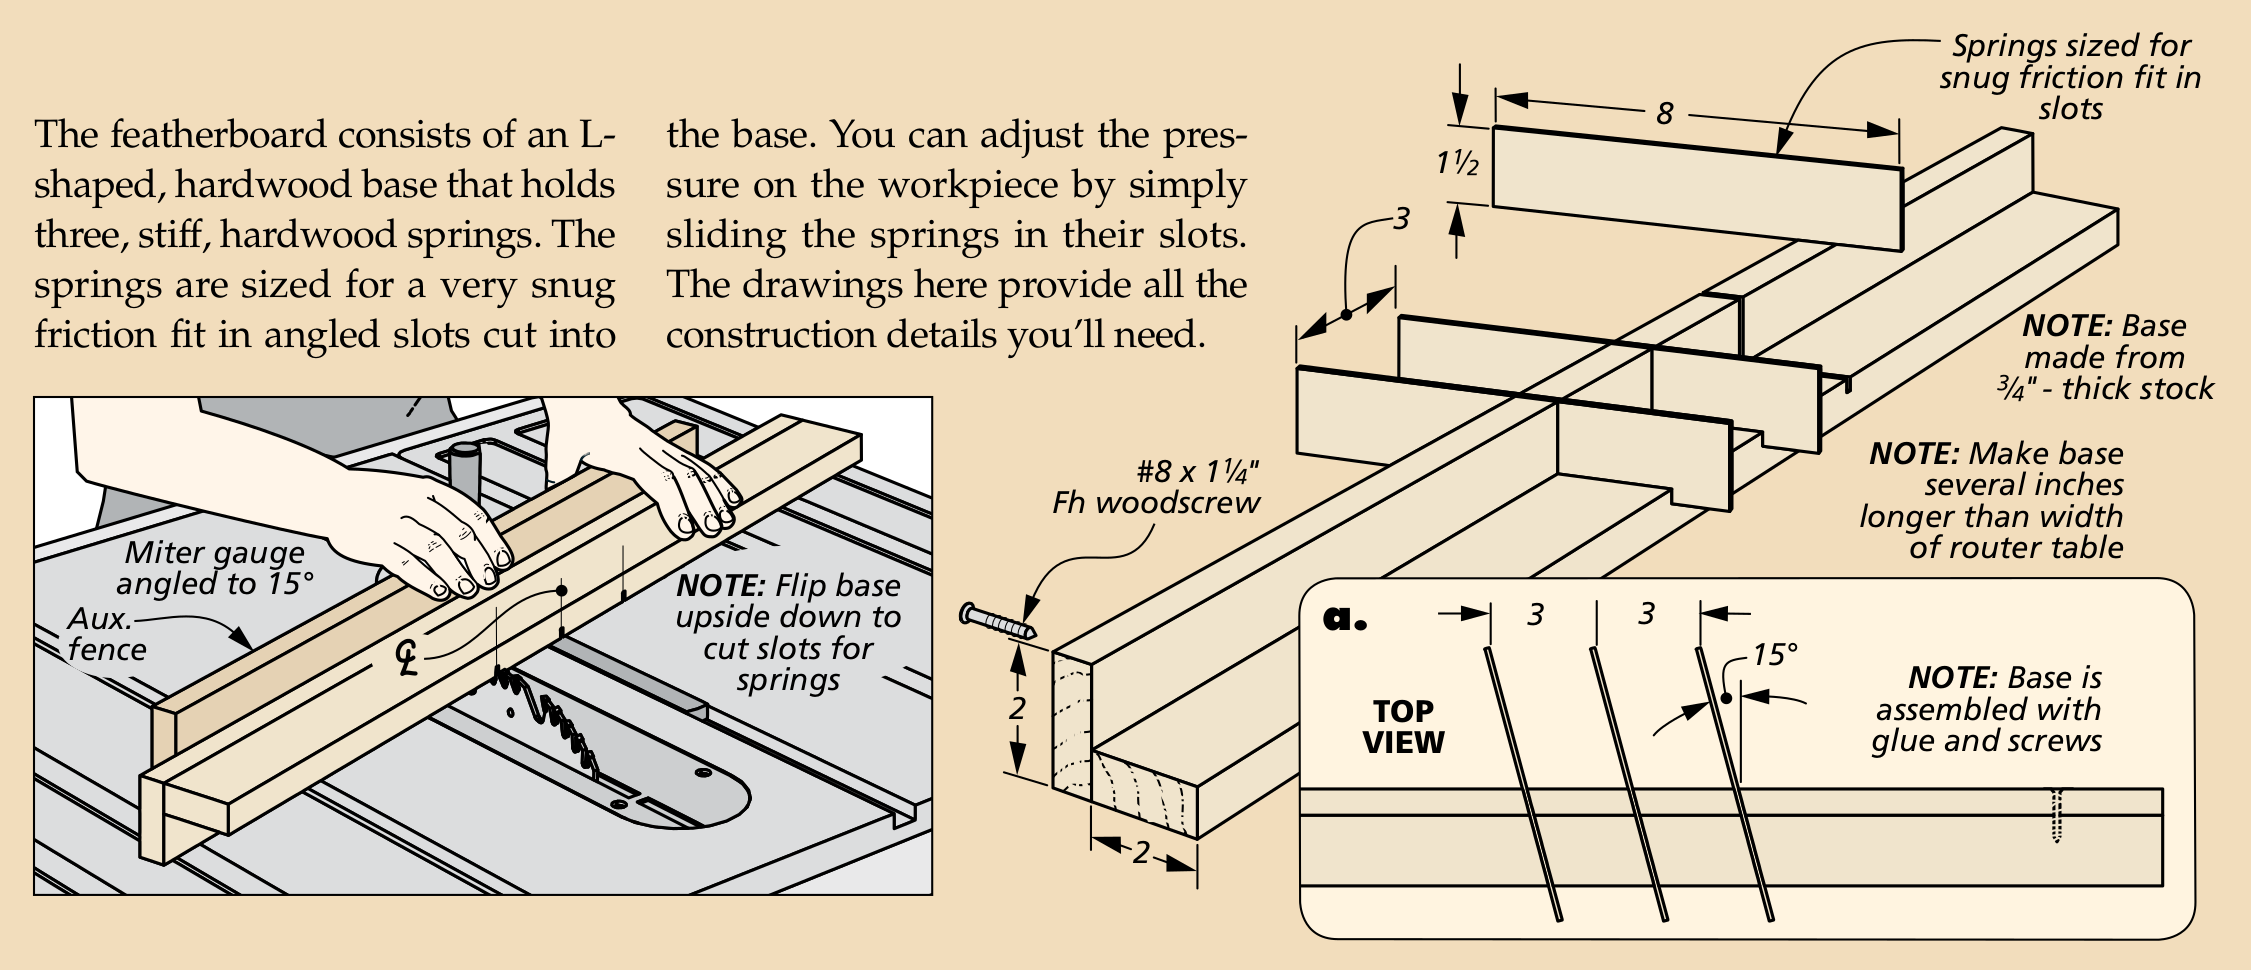
How-To: Make a Molding Bit Featherboard
The featherboard consists of an Lshaped, hardwood base that holds three, stiff, hardwood springs. The springs are sized for a very snug friction fit in angled slots cut into the base. You can adjust the pressure on the workpiece by simply sliding the springs in their slots. The drawings here provide all the construction details you’ll need.