


The table saw works great for cutting accurate workpieces over a wide range of sizes. But when the parts get very small — a big table saw may seem like too much tool for the job. At this scale, maintaining safe control of the pieces while ensuring accuracy becomes a challenge.
But I’ve found that the trick to successfully ripping and crosscutting small parts to size is to adapt the table saw setup and your technique to the task. And I also take advantage of a few helpers.

RIP TO THICKNESS. When sizing larger parts, the order is pretty well set. You plane to thickness, rip to width, and then crosscut to length. But trying to plane really thin parts ( ¼ or less) to thickness is often “iffy” at best. So when the width of the needed pieces allows it, I like to rip them to both thickness and width at the saw.

SAW SETUP. The first step is to adapt or scale down the saw to the job. To do this, I begin by installing a thin-kerf, general purpose (40-tooth) blade. Cutting a thinner kerf requires less effort and leads to cleaner, more accurate cuts. I’ve found that this type of blade will easily handle rip cuts in stock up to 2" thick.
Next comes a zero-clearance insert. This eliminates the worry of a thin piece or small cutoff slipping between the blade and the insert. A custom insert that includes an integral splitter is my choice, as in the lower left photo.

CHECK FOR SQUARE. A couple of quick checks and possible adjustments completes the setup. In order to end up with pieces of consistent thickness, the blade and the face of the rip fence both need to be perfectly square to the saw’s table. I always like to double-check both (lower middle photo, opposite page).
PRECISE PARTS. When you’re dealing with tolerances in small fractions of an inch, measuring parts may require more than a tape measure. Here’s where a set of calipers can be a big help. You’ll quickly know the exact thickness of the piece you just ripped.
REVERSE ORDER. Now you’re ready to go. The process is pretty standard. You’re going to start by cutting the multiple, thin pieces you need from thicker blanks (main photo on opposite page). Then you’ll crosscut them to length. But there’s a minor twist. I’ve found that it works best to reverse the usual order and rip the blanks to accurate width before ripping them to thickness. This way, you avoid having to re-rip the fragile, hard-to-control strips cut from the blank.
RIP TO THICKNESS. So once the blanks are ripped to the required width, the next step is rip thin pieces from them. The goal is to end up with strips that are accurate and consistent. The big challenge is to do the job safely. There are a number of approaches to the task, but for me, the simplest method works the best.
A close look at the main photo at the top will give you the idea. For guaranteed consistency, I simply use the rip fence to gauge the thickness of the cutoffs. The strips are ripped between the fence and blade. The key to feeding and controlling the blank and the cutoff is a notched, MDF push block that can ride over the blade. It provides both the forward push and downward pressure necessary for good control.
You’ll want to make a test cut or two to find an accurate fence setting. The calipers help me zero in. If you find that a strip is too thick, don’t try to re-cut it. It will be too hard to control and chances are the results won’t be accurate.
To guarantee accuracy, you’ll need to maintain good pressure against the fence. I like to position my hand in front of the blade to act as a stationary featherboard. You may be more comfortable with the real thing, but you’ll have to reposition it after every cut.

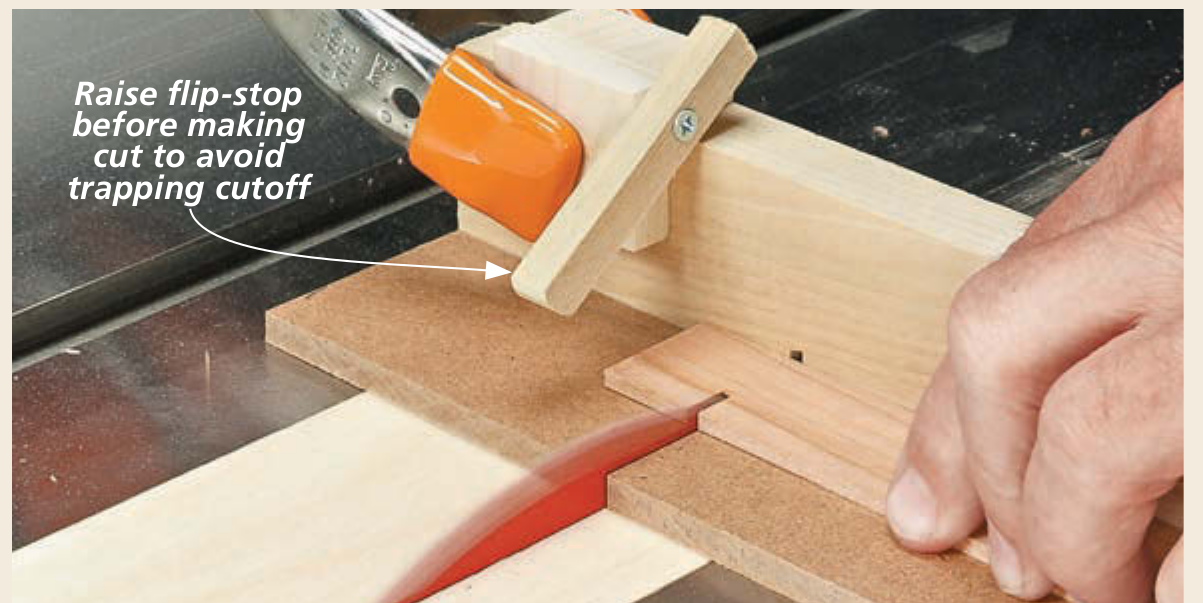
CROSSCUTTING. The last step is to crosscut individual pieces from the strips to final length. Again, the major issue is how to feed the thin pieces in a way that ensures a clean, accurate, and safe cut. My answer is shown in the drawing above and the left photo below — a scaled-down cutoff sled attached to the miter gauge. The sled carries the nestled workpiece through the blade with a minimal effort on your part. And both the blank and the cutoff are always under control.
When the pieces get very short — less than a couple of inches — I cut them to length on the right side of the blade. You can use the flip-stop shown below to guarantee accurate, repeatable results.
You’ll discover that very thin, short pieces may crack as they’re cut or be caught by the blade once they’re loose. Making the cuts very slowly may help. If this doesn’t work, try the solution shown in the Shop Tip below.
My last piece of advice is simple — just take it slowly. Starting out with crisply cut, accurate parts will save you time in the end.
Shop Tip: Tape It
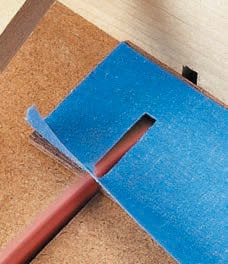
Short, fragile cutoffs can be kept intact by reinforcing them. Apply a wide piece of masking tape and then turn up the leading edge as shown at right. The tape strengthens the piece during the cut and will also keep it in place afterward.


