



The Versatile Chamfer: How to Use Chamfered Edges in Woodworking
Some woodworking edge profiles are closely tied to a particular furniture style. An elaborate ogee molding, for example, might look right at home on traditional furniture but out of place on a simple Shaker table.
The chamfer is different.
This simple angled cut works with nearly every furniture style, from traditional and Craftsman to Shaker and contemporary designs. And unlike many decorative profiles, a chamfer does more than improve appearance.
It can protect vulnerable corners, soften sharp edges, draw attention to important design features, and even make heavy furniture components appear thinner and lighter.
The key is knowing where to use a chamfer, how large to make it, and when to stop it short of an adjoining surface.
What Is a Chamfer in Woodworking?

A chamfer is a flat, angled surface cut along an edge or across a corner.
Most woodworking chamfers are cut at 45° to the adjoining surfaces, although other angles can be used.
The result is a simple, straight profile that replaces a sharp 90° corner with a flat, sloping surface.
Chamfer vs. Bevel: What's the Difference?
The terms chamfer and bevel are sometimes used interchangeably, but there's a useful distinction.
A chamfer typically removes a corner where two surfaces meet, creating a relatively narrow angled face.
A bevel often refers to an angled cut extending across a larger portion of a workpiece, such as the sloped edge of a panel.
There's no rigid dividing line between the two. In most woodworking applications, the intended shape and function are more important than the terminology.
How Are Chamfers Measured?
A chamfer is usually dimensioned by the distance it extends along the two adjoining surfaces rather than the width of its angled face.
For example, a 1/4" chamfer at 45° removes 1/4" from each of the adjoining faces.
Understanding this distinction makes it easier to lay out consistent chamfers on furniture parts.
How to Cut a Chamfer in Wood
One of the advantages of a chamfer is how easy it is to make.
You don't need a specialized molding cutter or complicated setup.
Depending on the size of the workpiece and the desired profile, you can cut a chamfer with several common woodworking tools.
- Block plane: Ideal for small chamfers, easing edges, and making controlled adjustments by hand.
- Spokeshave: Useful for chamfering curved or irregular edges.
- Router: A chamfer bit makes it easy to create consistent profiles along straight or curved edges.
- Table saw: A tilted blade works well for cutting long, straight chamfers on larger workpieces.
For small chamfers, I often prefer a block plane. It gives me excellent control over the size of the cut and makes it easy to adjust the profile as I work.
For longer edges or repeated parts, a router or table saw provides more consistency.
Full Chamfers vs. Stopped Chamfers
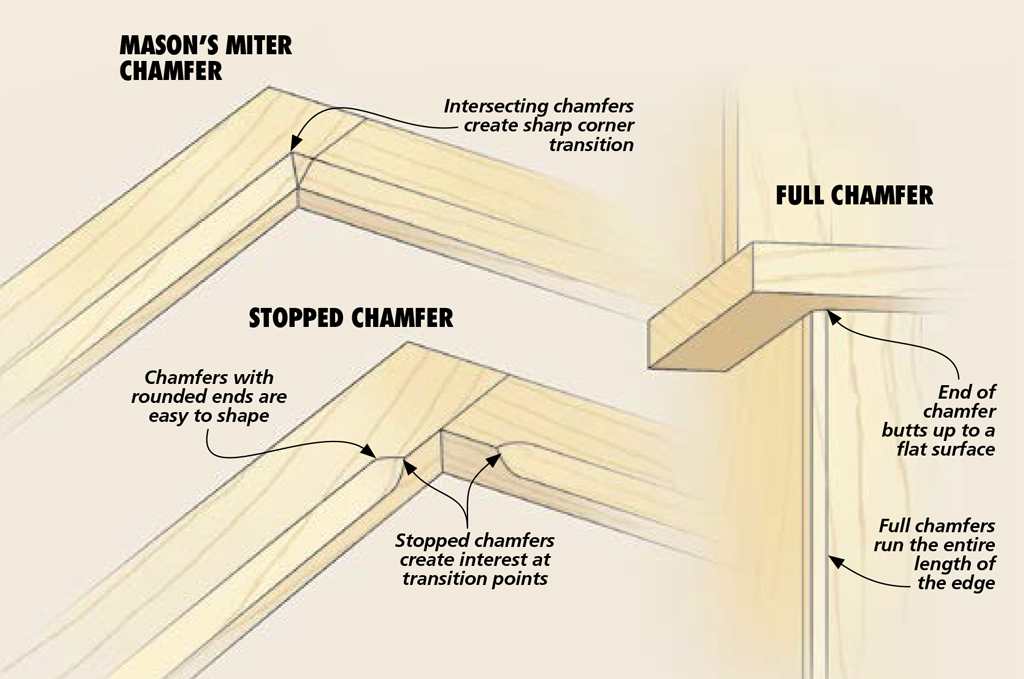
Not every chamfer needs to run the entire length of a board.
In fact, deciding where a chamfer starts and stops can have a major influence on the appearance of a project.
Full Chamfers
A full chamfer runs the entire length of an edge.
It may terminate at the end of the workpiece or meet another surface, such as a rail or adjoining panel.
Full chamfers are often a good choice for outside edges, where they provide a clean, continuous profile.
They can also be used on the inside edges of frames.
When two inside chamfers intersect, the transition can be shaped into a mason's miter, creating a crisp, square-looking intersection.
Stopped Chamfers
A stopped chamfer ends before reaching one or both ends of the workpiece.
This leaves a section of the original square edge intact.
Stopped chamfers are particularly useful on the inside edges of frames and on case corners where a continuous chamfer might interfere with adjoining moldings or other details.
But there's another reason to use them: appearance.
The transition between the square edge and the chamfer creates an opportunity for a decorative detail.
You can make the transition subtle or emphasize it with a more elaborate termination.
We'll look at several options later in the article.
Why Add Chamfers to Furniture?

A chamfer may be one of the simplest woodworking profiles, but it can serve several important purposes.
Some are practical, while others are purely visual.
Often, a single chamfer accomplishes both.
1. Protect Corners from Chips and Damage
Sharp outside corners are vulnerable to dents, chips, and everyday wear.
A small chamfer removes the fragile corner, making it less likely to be damaged.
Even a chamfer as small as 1/16" can make a difference.
For example, adding a small chamfer around the bottom of a table leg helps reduce damage when the table is moved across the floor.
It's a simple detail that can improve the durability of a project.
2. Soften Sharp Edges
Chamfers can also make furniture more comfortable to use.
The sharp corner of a tabletop or drawer front can feel unpleasant against your hand.
A small chamfer eases that edge without dramatically changing the appearance of the piece.
It's an especially good choice when you want a crisp, straight profile rather than a rounded-over edge.
3. Add Decorative Detail
A chamfer can turn an otherwise plain, square edge into an attractive design feature.
The effect depends largely on its size.
A narrow chamfer may be barely noticeable, while a chamfer 1/4" wide or larger can become a prominent part of the furniture's design.
The larger the chamfer, the more attention it attracts.
For that reason, it's important to choose a size that complements the proportions of the project.
4. Create a Crisp, Contemporary Appearance
Chamfers are particularly well suited to furniture with clean, simple lines.
Their flat surfaces and sharp transitions add visual interest without the ornamentation of a curved molding.
On a contemporary coffee table, for example, chamfered edges can reinforce the geometric character of the design.
The same treatment works well on Shaker-inspired furniture, where understated details are often more appropriate than elaborate profiles.
5. Draw Attention to a Design Feature
A chamfer can also help direct the viewer's eye.
Consider a picture frame with several chamfered profiles along its inside edges.
Each angled surface leads your eye toward the opening, helping focus attention on the artwork or photograph.
I think of this as a funnel effect.
The same principle works on furniture with open shelves.
Chamfers along the inside edges of a cupboard frame can subtly direct attention toward the items displayed inside.
It's a useful way to emphasize an important part of a project without adding unnecessary decoration.
6. Make Thick Parts Look Thinner
One of my favorite uses for a chamfer is reducing the visual weight of a heavy furniture component.
Take a thick tabletop, for example.
Adding a wide chamfer to the underside removes some of the visual mass along the edge.
From a normal viewing angle, the top appears thinner and lighter than it actually is.
You can use the same trick on table and chair legs.
A wide chamfer along the inside corner of a square leg reduces its blocky appearance without changing the outside dimensions.
It's a subtle design technique that can make a surprisingly big difference.
Choosing the Right Chamfer Size
There's no single chamfer size that works for every project.
The best choice depends on the scale of the furniture and the effect you're trying to achieve.
For a small box or drawer front, a narrow chamfer may be all that's needed to ease the edge.
For a large tabletop or substantial furniture leg, a wider chamfer may be more appropriate.
Here are a few useful starting points:
| Chamfer Size | Typical Effect |
|---|---|
| 1/16" | Eases sharp edges and helps reduce corner damage |
| 1/8" | Adds subtle definition without drawing much attention |
| 1/4" | Creates a noticeable decorative edge |
| 3/8" and larger | Makes a stronger visual statement or reduces apparent thickness |
These aren't fixed rules. They're simply useful proportions to consider.
When possible, try the chamfer on a scrap piece of the same material before cutting the actual project.
That makes it much easier to judge how the finished profile will look.
Decorative Stopped Chamfer Designs
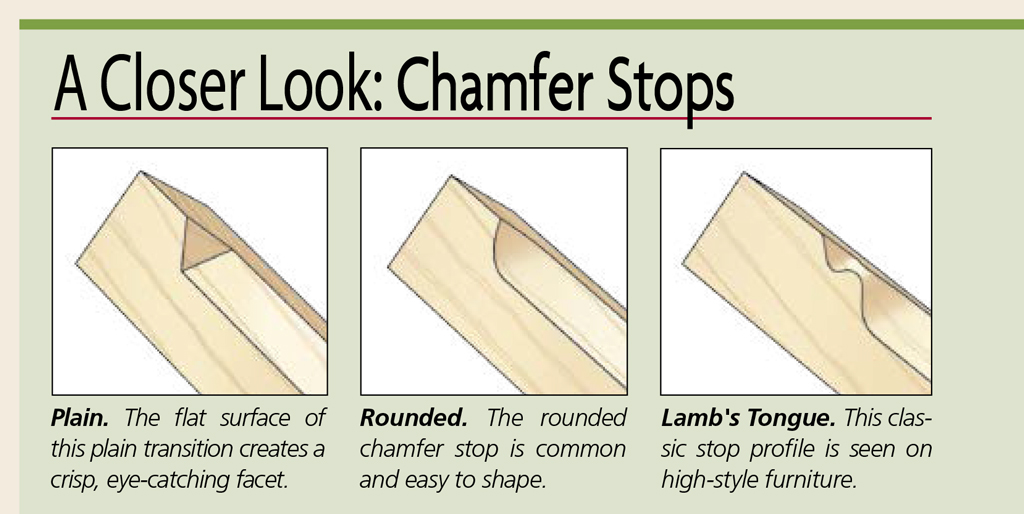
A stopped chamfer offers another opportunity to customize the appearance of your project.
Rather than simply ending the chamfer abruptly, you can shape the transition between the angled surface and the original square edge.
Some transitions are straight and understated. Others use curved or angled cuts to create a more decorative effect.
The important thing is consistency.
If you're adding stopped chamfers to several legs, rails, or frame members, make sure the transitions are positioned and shaped the same way.
Careful layout helps these small details look intentional rather than accidental.
A Simple Edge Detail with Big Design Possibilities
It's easy to overlook the humble chamfer when planning a woodworking project.
But few edge treatments offer the same combination of versatility, simplicity, and practical benefits.
A small chamfer can protect a vulnerable corner or make a sharp edge more comfortable to touch.
A larger chamfer can emphasize a design feature, lighten the appearance of a heavy component, or give a project a crisp, contemporary look.
And with stopped chamfers, you can add decorative details that make even a simple piece of furniture more interesting.
The next time you're designing or building a project, take a closer look at the edges.
A well-placed chamfer might be exactly what the project needs.
How to Use a Block Plane: 5 Essential Woodworking Techniques
A block plane is one of the easiest ways to create a clean, consistent chamfer. But that's just the beginning of what this handy tool can do.
In How to Use a Block Plane: 5 Essential Woodworking Techniques, you'll discover practical ways to put this versatile hand tool to work, from easing sharp edges and trimming end grain to fine-tuning parts for a perfect fit.
Whether you're new to hand planes or looking to improve your technique, these five essential skills will help you get smoother surfaces, cleaner edges, and better results on your next woodworking project.
MASTER THESE 5 BLOCK PLANE TECHNIQUES → Get More from One of the Most Versatile Hand Tools in Your Shop


