


A table saw sits at the center of most woodworking shops — and with good reason. It’s the go-to tool for ripping, crosscutting, breaking down sheet stock, and even cutting joinery. For most of these cuts, the workpiece is held horizontally, flat against the table. But with a practical method for holding a workpiece vertically, you can use your table saw to shape its edge rather than just cut it to length and width.
The key is learning a few simple techniques and building a couple of accessories. This allows you to make raised panels, cut tenons, and the slots for splined miters. You can even make quick rabbets without having to install a dado blade.
TALL FENCE. The first step to making vertical cuts is to come up with a way to support a workpiece on edge and keep it from tipping during a cut. For this, I turn to a tall fence. An auxiliary fence to fit over your saw’s rip fence keeps a large panel stable. The height of the fence also allows you to make these cuts safely by keeping your hands well away from the blade.

The design shown in the drawing at left provides a very solid fence. It attaches to your table saw’s rip fence with two studded knobs that fit into threaded inserts in the back of the fence. By simply tightening the knobs, the fence becomes a sturdy fixture, ready to handle tall workpieces.
BUILDING THE FENCE. I used Baltic birch plywood for the fence, but MDF would also work well. To make your own fence, start by cutting the sides. You can make them the length of your rip fence and about 12" tall. You’ll need to cut grooves in the sides of the fence to house the supports. The width of the supports depends on your saw’s rip fence. Just size them for a snug fit. After drilling countersunk screw holes for the supports, drill holes for the threaded inserts in the side opposite the blade.

Assembling the fence with screws goes pretty quickly. I didn’t use glue in the grooves just in case I need to adjust the fit after assembly. Finally, check to make sure the fence sits square to the table.
RAISED PANELS. With the fence complete, you’re ready to put it to work on a project. And a good first project is making raised panels. I like this technique because it saves the cost of an expensive router bit.
The examples in the margin photos show two options. The top panel features a simple beveled edge. The lower panel defines the raised field with a shoulder. Both styles are easy to make using the tall fence.

SHOULDER. The photos above show how to make the cuts that form the shoulder. All you need to do is set the blade height to 3 ⁄ 16 " and the rip fence to 1 1 ⁄ 2 " and cut along all four edges of the outside face.
ANGLED CUT. Next, install the tall fence and set the saw blade angle. I’ve found 10-12° is about right for this design. Then simply line up the blade and set the height to just meet the inside corner of the cut you made earlier and make the cuts.

As you can see in the photos, I like to place a handscrew at the top edge of the panel. The handscrew rides on the fence and helps keep the panel square as you make the cut.
The tall fence is a great first step in making vertical cuts. To find a simple jig for cutting tenons, slots for splined miters and more, turn the page.
How-To: Cut Rabbets with a Tall Fence
I usually cut rabbets using a dado blade buried in an auxiliary fence. But installing a dado blade can be time consuming. So, when I only need to cut one or two rabbets, I find it’s quicker to just install the tall fence and use the two-step process shown in the photos.
You start by setting the fence to determine the width of the rabbet and then the blade height to define its depth. Next, make the first cut with the workpiece in the horizontal position. Then, flip the workpiece on its edge and adjust the fence position and blade height to meet the kerf of the first cut. Hold the workpiece vertically to make the cut and complete the rabbet.
ADD A SLIDING JIG
After making cuts with the tall fence, you can probably imagine how vertical cutting techniques can be applied to joinery. You’ll find that making a sliding jig for cutting tenons and splined miters is also a great addition to your table saw.
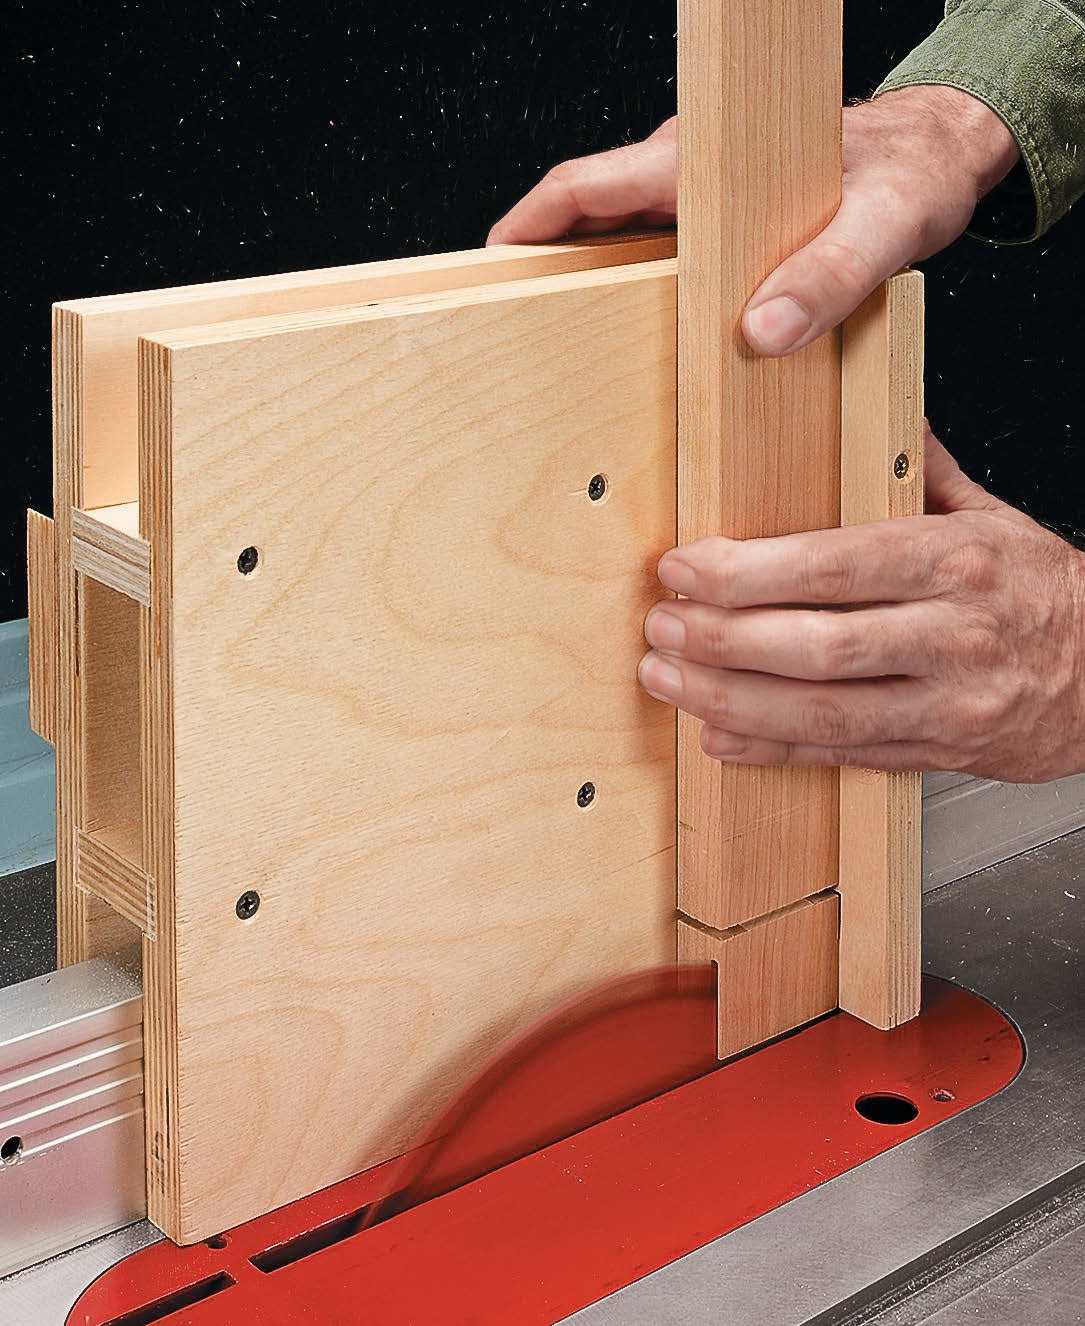
REVERSIBLE JIG. The sliding jig shown in the illustration at right is similar to the tall fence you made earlier. But in this case, the jig slides on your rip fence instead of remaining stationary. You’ll also notice a cleat on either side of the jig. A 90° cleat holds a workpiece straight and square for cutting tenons. On the other side, a 45° cleat secures a mitered workpiece while you cut a slot for a spline.

BUILDING THE JIG. The sliding jig relies on the same construction you used for the fixed, tall fence. Two plywood sides with grooves housing the two supports make up the body of the jig.
Once again, start by cutting the sides to size and then cut grooves for the supports. Next, you’ll need to cut the supports to the correct width for your saw. I did this by “sneaking up” on a good fit, dry fitting the parts, and testing them on the rip fence. You want the jig to slide freely, but without any slop. Now you can assemble the jig by attaching the supports with screws in the countersunk holes.
On one face of the jig, I cut a shallow dado and attached a cleat square to the table. On the other side (with the 45° cleat), no dado is necessary. This allows you to adjust the accuracy of the miter cut by finetuning the placement of the cleat. Both cleats are simply attached with screws — no glue. By not using glue, you can also easily replace the cleats when they get chewed up.
But before you attach either of the cleats, raise your table saw blade to full height and make sure to locate the screws for the cleats well above that point. Finally, I found it helpful to add a light coat of wax to the inside of the jig (the part that slides along the fence). This will keep it running smoother by reducing the friction, while still maintaining a tight fit on the rip fence.
USING THE JIG
After assembling the jig, you’re ready to put it to work. It’s a good idea to experiment a little bit using some scrap pieces. This way, you’ll get a feel for how to align cuts to layout marks and also how to get the most out of the jig in your shop.
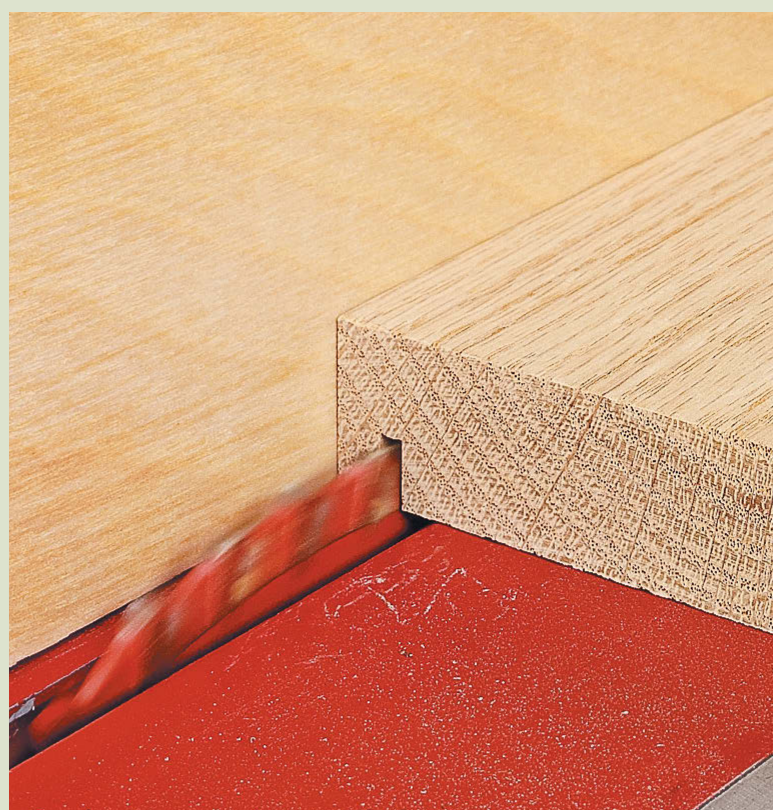
SPLINED MITERS. One of my favorite applications is making splined miter joints. Whether in small applications, like picture frames, or larger projects such as edging a cabinet, the perfect, seamless miter joint is a woodworking staple. But no matter how well cut, the joint is inherently weak due to its endgrain glue surfaces.

Adding a spline — a thin strip of hardwood fit into slots on the mating faces of each piece — dramatically increases the strength. But cutting a perfectly matched slot on the mitered ends of the workpieces can be a tricky operation.
That’s where the angled side of the jig comes into play. By holding the workpiece at the correct angle, cutting the slot is a breeze. As you can see in the photo at left, all you need to do is position the workpiece on the 45° cleat and fasten it in position with a small clamp.
Then, using a dado blade centered on the workpiece, you can cut the slot with little chance of error. The jig also allows you to vary the dimensions of the slot. A thin spline is all you need for picture frames and other small projects, but a thicker spline will guarantee plenty of strength for heavier applications, such as a cabinet face frame.
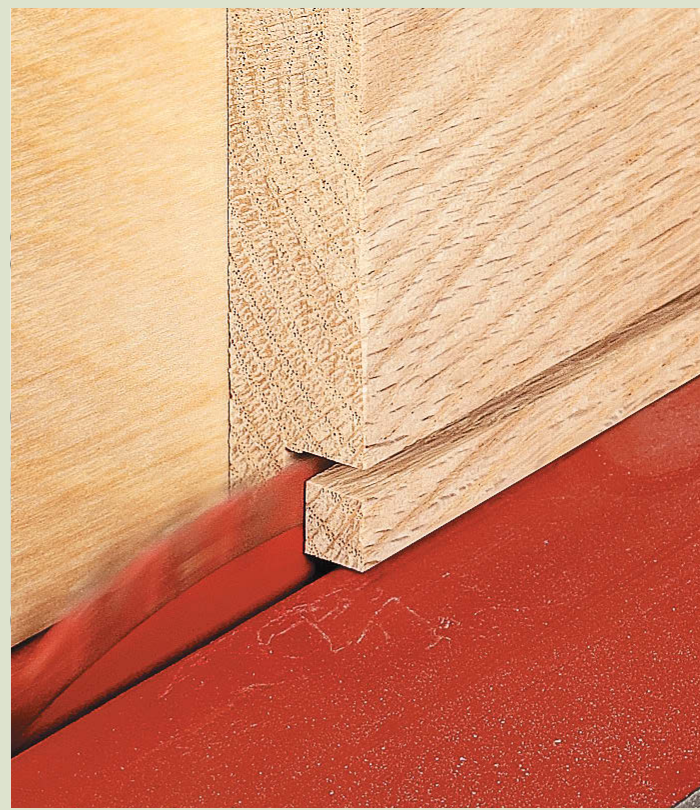
SPLINES. For the spline, all you need to do is plane some stock to match the thickness of the slot. It’s a good idea to make sure the grain of the spline is oriented perpendicular to the slot. This way, you won’t need to worry about the spline splitting under pressure. Then, a little glue and clamps make for a straightforward assembly.
You can complete the joint by trimming the spline on both the inside and outside of the assembled frame with a flush cut saw and follow up with a little sanding. An example of a finished joint is shown in the inset photo on the bottom of the opposite page.
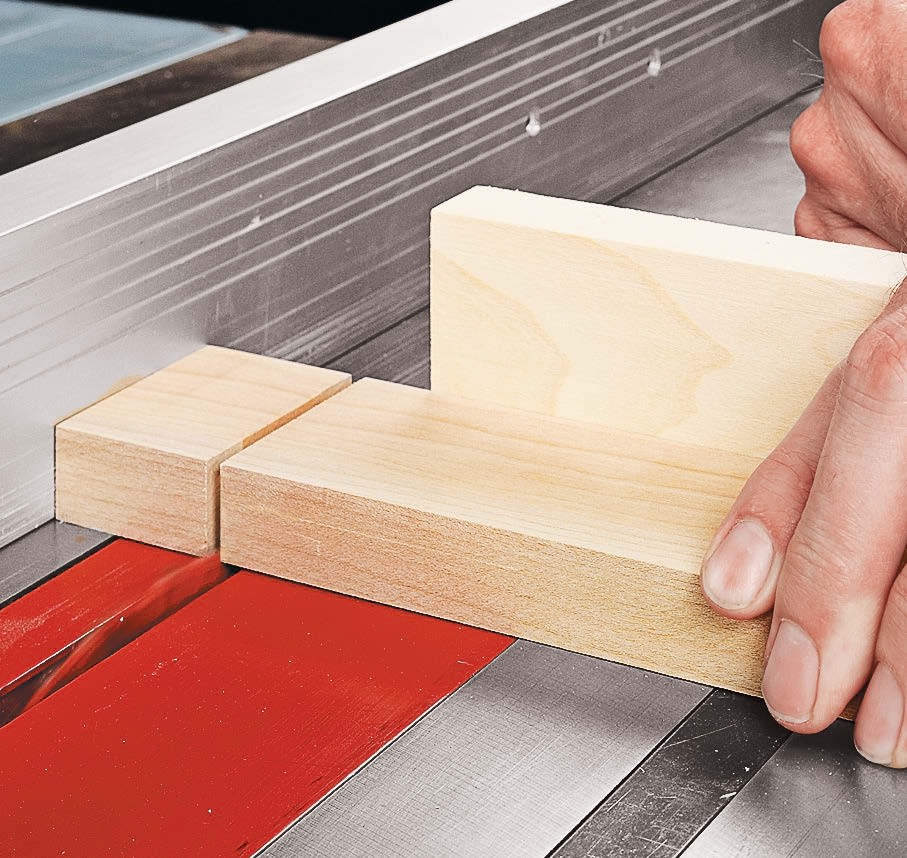
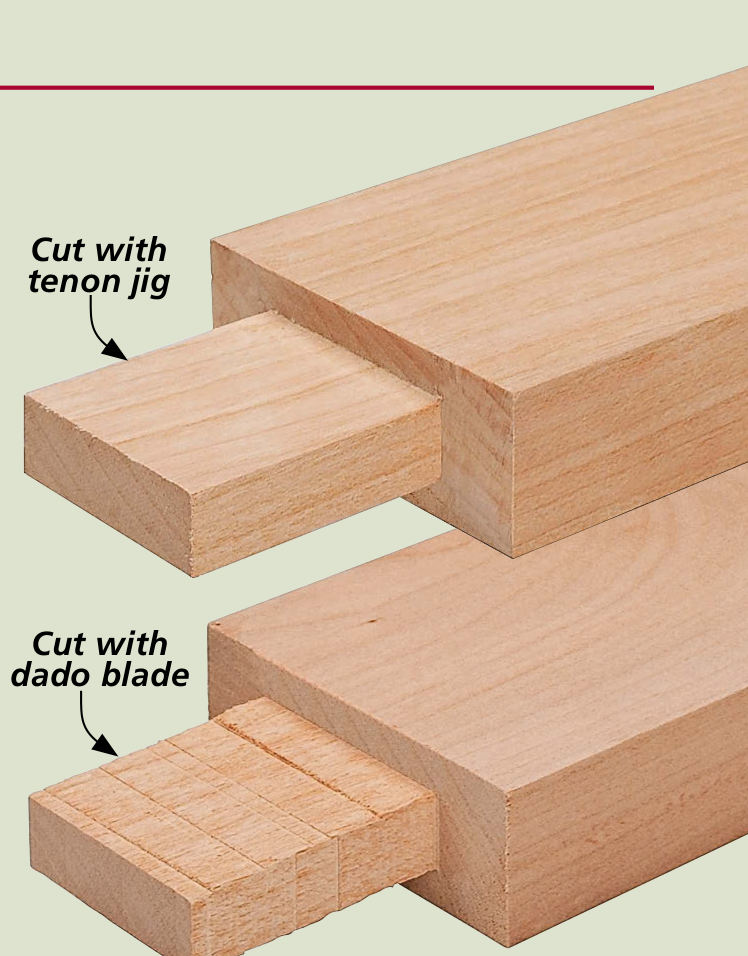
CUTTING TENONS. The mortise and tenon joint is another favorite for many woodworking projects. And there are several ways to cut tenons. One common method uses a dado blade with the workpiece held flat on the table and guided by a miter gauge. This technique is quick and reliable. But for many applications, particularly when using a through tenon, where part of the tenon is visible, the result is less than desirable. As you can see in the photos in the box below, a dado blade leaves a rough surface on the face of the tenon.
By cutting a tenon vertically using a tenon jig, you get a much smoother face. A good-quality rip blade leaves a face that seldom requires any further planing or sanding to achieve a tight fit. The smooth face provides a better surface for the glue and adds more strength to the finished joint.
Fortunately, cutting tenons is a simple operation using the jig. The box below shows the steps. The thing I really like about this jig is how easy it is to adjust the thickness of the tenon simply by moving the rip fence. The smooth tenon will result in a strong joint that lasts for years.
SAFETY. While the jigs shown here are designed with safety in mind, there’s one thing to remember as you put them to use. It’s a good idea to get in the habit of sliding a workpiece all the way through the cut and well past the blade before removing it from the jig. Don’t just pull the jig and workpiece back through the blade. You risk catching the back of the blade and having the workpiece kick back.
Once you get the hang of using the tall fence and the sliding jig, you’ll see how easy it is to incorporate vertical cutting techniques in your future projects. You’re sure to agree it was well worth taking the time to make the jigs.
How-To: Cut Tenons with the Sliding Jig
Use a miter gauge to cut a shoulder on all four faces of the workpiece to define the length of the tenon. You can use the rip fence as a stop.
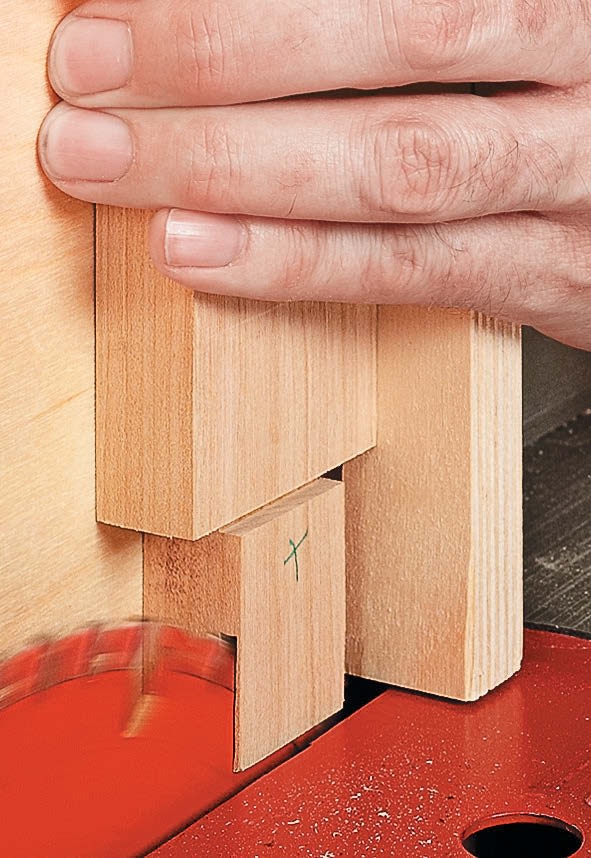
Align the blade with the shoulder cut and slide the jig and workpiece through the cut.
The smooth face of a vertically cut tenon makes for a stronger glue joint.


