


How to Cut Wooden Threads with a Shop-Made Router Jig
Cutting threads is usually something we associate with metalworking. A tap and die can create matching internal and external threads, allowing two parts to screw together. But you can use the same basic principle to create threaded connections in wood.
Commercial wood threading kits are available, but they can be expensive and are often limited to a few thread sizes. For larger wooden threads, there's another option: build a wood threading jig that uses a router to cut both internal and external threads.
This shop-made threading jig uses a rotating platen, a length of Acme-threaded rod, and a router to produce matching wooden threads. It's a clever setup that works much like a reverse lathe, allowing you to create threaded lids, containers, and other woodworking projects without a wood lathe.
In this Woodsmith Shop video, Chris Fitch demonstrates how the jig works and uses it to cut matching threads for a wooden canister and its lid.
How Does a Wood Threading Jig Work?
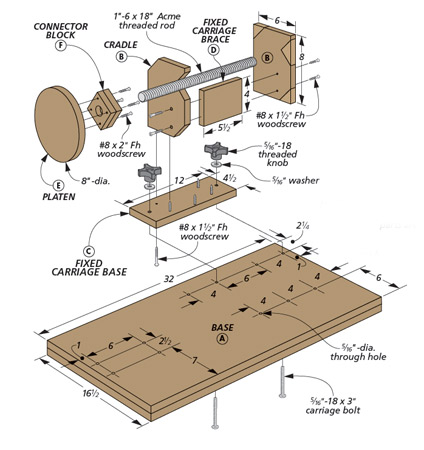
The heart of this jig is a rotating platen that holds the wooden workpiece. The platen connects to a length of threaded rod, which controls how far the workpiece advances as it rotates.
A small dowel engages the threads of the rod, guiding the platen forward or backward at a consistent rate.
Meanwhile, a router mounted behind the workpiece cuts the thread profile into the wood.
By combining the rotation of the workpiece with controlled movement along the threaded rod, the jig creates a continuous spiral thread.
The concept is similar to the way a lathe cuts screw threads, except the workpiece is advanced by hand while the router bit does the cutting.
The Threaded Rod Determines the Pitch
The threaded rod controls the pitch of the wooden threads.
For the canister project, the jig uses a 1"-diameter Acme-threaded rod with five threads per inch (5 TPI).
That means the workpiece advances 1" for every five complete rotations of the platen, or 1/5" per revolution.
Because the jig follows the threads of the rod, the resulting wooden threads have the same pitch.
The design can accommodate different threaded rods, allowing you to create different thread pitches for other projects.
An Adjustable Router Carriage
The router is mounted in an adjustable carriage behind the workpiece.
The carriage can move forward and backward to accommodate different workpiece diameters and adjust the depth of cut.
The router can also be tilted slightly to match the helix angle of the thread.
This adjustment helps the cutter follow the spiral path accurately.
The Thread-Cutting Router Bit
The jig uses a 90° double-bevel metal-cutting bit to form the wooden threads.
Although designed for metalworking, the cutter's geometry produces smooth cuts in wood.
The relatively low rake of the cutting edges helps create a clean thread profile.
The cutter is only one part of the system. Accurate threads depend on the threaded rod, platen, workpiece alignment, and router carriage working together.
Cutting Internal Threads in a Wooden Canister
With the jig assembled and adjusted, the first step is cutting the internal threads in the canister.
These threads will accept a matching threaded plug that becomes part of the lid.
Step 1: Mount the Canister to the Platen
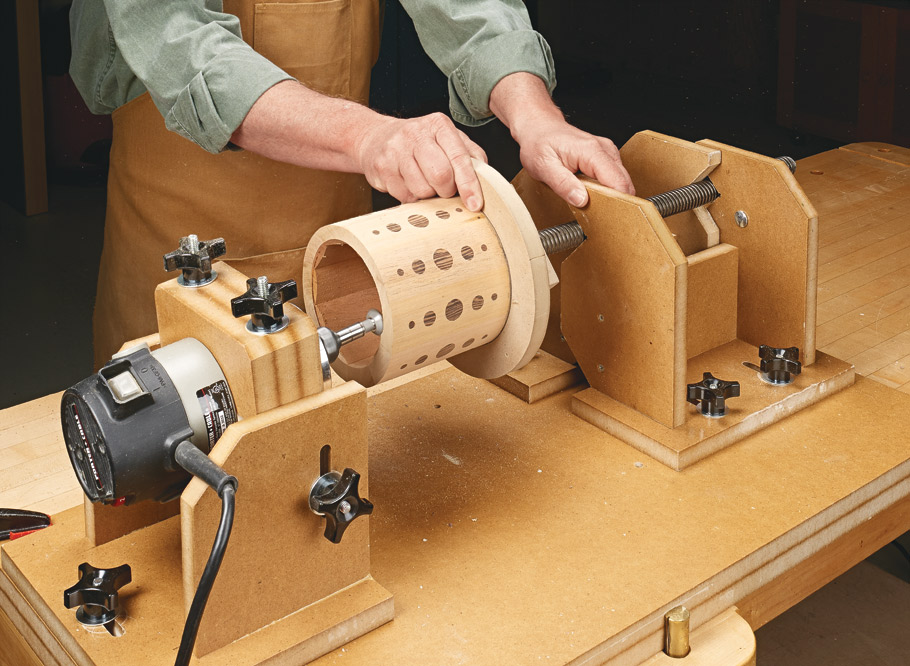
Attach the wooden canister securely to the rotating platen.
The platen is connected to the Acme-threaded rod, which guides the canister as it rotates toward the router bit.
For this project, the rod has five threads per inch, so each complete rotation advances the canister by 1/5".
Step 2: Set the Router Position
Position the router carriage to match the diameter of the canister.
The router is tilted slightly to follow the helix angle of the Acme threads.
Before cutting, mark the desired thread depth inside the canister.
In this project, Chris makes a pencil mark approximately 3/4" from the opening. This corresponds to the depth of the threaded plug that will fit inside the canister.
The mark provides a visual reference for how far to advance the workpiece during the cut.
Step 3: Cut the Threads in Multiple Passes
Rather than trying to cut the full thread depth at once, make several light passes.
With the router running, slowly rotate the platen to advance the canister into the cutter.
Maintain steady movement to reduce the chance of burning.
Continue until the cutter reaches the depth mark, then reverse the platen's rotation to withdraw the workpiece along the same thread path.
Turn off the router and wait for the bit to stop before adjusting the carriage for a slightly deeper cut.
Repeat the process, gradually increasing the cutting depth until the threads are fully formed.
For the internal threads, Chris plans on approximately three passes.
Taking light cuts reduces the amount of material removed at once and helps produce cleaner, more consistent threads.
Step 4: Ease the Thread Edges
After cutting the internal threads, lightly sand the entrance to the threaded opening.
You can also ease the sharp peaks of the threads.
Removing the most delicate edges helps reduce the chance of chipping when the lid is installed and removed.
Avoid aggressive sanding that could change the thread profile or loosen the fit.
Cutting External Threads for the Wooden Lid
Once the internal threads are complete, the next step is making a matching threaded plug for the canister lid.
The same jig cuts the external threads, but the router setup and cutting direction require additional attention.
Step 1: Mount the Lid Plug
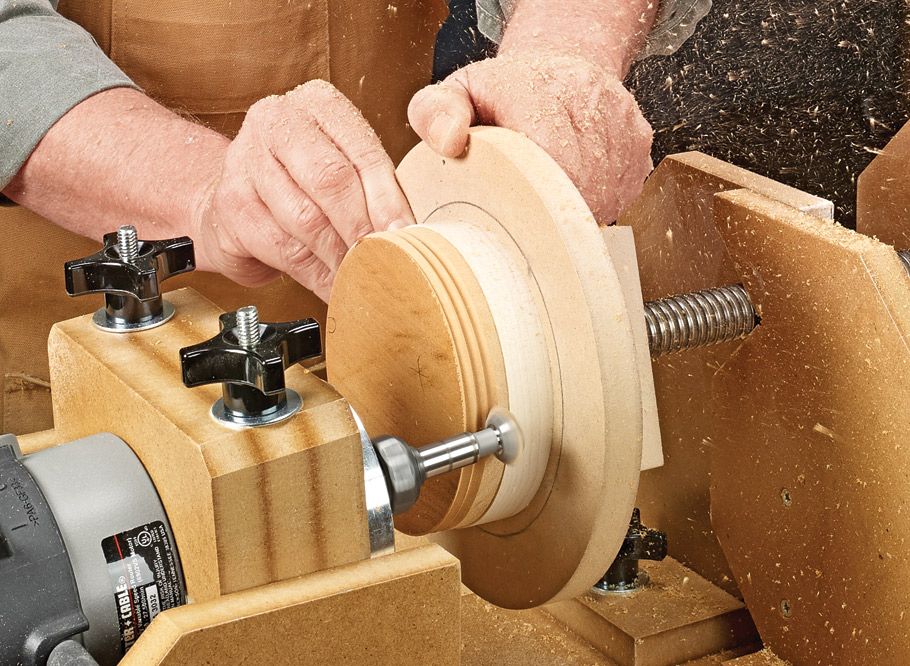
Attach the wooden plug to the platen using a spacer between the plug and the platen.
The spacer provides clearance so the router bit can cut threads across the full thickness of the plug without contacting the platen.
The plug uses the same Acme-threaded rod that guided the canister.
This is important because using the same threaded rod ensures that the internal and external threads have matching pitches.
Step 2: Adjust the Router for External Threads
Move the router carriage to position the cutter against the outside of the wooden plug.
The cutting arrangement differs from the internal threading operation.
In the demonstration, the plug rotates in the same direction as the router bit at the cutting point, creating a greater risk of the cutter grabbing the workpiece.
This setup requires particular caution. Use only a properly designed jig with secure workholding, appropriate guarding, and a cutting procedure validated for the router and cutter. Do not attempt to reproduce the operation with an improvised fixture.
Step 3: Make Light Thread-Cutting Passes
As with the internal threads, cut the external threads gradually.
Start with a shallow cut and rotate the platen steadily to advance the plug past the router bit.
After each pass, stop the router and adjust the carriage to increase the depth of cut.
Continue making light passes until the threads are close to their final size.
The exact number depends on the wood, cutter setup, and final thread dimensions.
Test-Fitting the Wooden Threads
The final step is checking how the threaded plug fits inside the canister.
Remove the platen and plug assembly from the jig and carefully thread the plug into the canister by hand.
The goal is a smooth, secure fit without excessive resistance.
If the threads are too tight, return the plug to the jig and make another light cutting pass.
Check the fit frequently rather than removing too much material at once.
As Chris explains in the video, the key is to sneak up on the final fit.
Once the plug threads smoothly into the canister, it's ready to become part of the finished lid.
What Can You Make with a Wood Threading Jig?
The threaded-lid canisters are a great introduction to the possibilities of this shop-made jig.
They combine a practical storage project with an interesting woodworking technique.
The round canisters are shaped using a router table, so there's no need for a wood lathe.
The completed containers can be used to store small parts, spices, or other small items. They also make distinctive handmade gifts.
But the jig isn't limited to canisters.
Because the workpiece attaches to a platen, you can adapt the setup for other wooden components that fit within the jig's working capacity.
Potential applications include larger threaded containers, decorative wooden hardware, and custom threaded connections.
The size of the workpiece, threaded rod, and jig construction determine the practical limits.

Build the Wood Threading Jig and Threaded-Lid Canisters
Want to try cutting wooden threads in your own workshop?
The Shop-Made Threading Jig woodworking plan includes two projects in one.
First, you'll build the router-powered threading jig that creates matching internal and external threads.
Then, you'll put it to work making a set of round wooden canisters with twist-on lids.
It's a project that combines jig building, precision router work, and practical woodworking techniques.
Best of all, you don't need a wood lathe to make the canisters.
GET THE STEP-BY-STEP WOODWORKING PLANS → Build the Shop-Made Threading Jig & Canisters
Add Wooden Threads to Your Woodworking Skills
Cutting wooden threads opens up a range of possibilities for functional and decorative woodworking projects.
With a shop-made router threading jig, you can create matching internal and external threads in sizes that may be difficult to achieve with commercial threading kits.
The combination of a rotating platen, Acme-threaded rod, and adjustable router carriage provides a versatile approach to making threaded wooden components.
And once you've built the jig, the threaded-lid canisters are a satisfying way to put your new skills to work.
GET THE STEP-BY-STEP WOODWORKING PLANS → Build the Wood Threading Jig


