


A high-gloss finish has long been the popular choice for tabletops and other flat surfaces. In addition to protecting the surface, a glossy finish also brings out the subtle beauty of the wood.
But getting a high-gloss finish presents a special challenge. The problem is achieving the "smooth-as-glass" surface. Straight from the can, glossy finishes are very reflective. But they often impart a "plastic" look to the surface. For the most part, that look is the result of the layers of finish not being completely flat.

No matter how much care you take when applying the finish, whether brushed on or sprayed, the surface will still not dry smooth. To get a professional-looking result, you'll need to level and then polish it. This two-stage process of leveling the surface and then polishing it to a mirror gloss begins where your normal finishing regimen leaves off.
The good news is, achieving a mirror shine doesn't require any special equipment, just a little extra time and patience. It begins with proper preparation of the workpiece.
SURFACE PREPARATION. A high-gloss finish will reveal any imperfections in the surface, so you'll need to start by making sure the piece is flat and smooth. A random-orbit sander is a good start for the initial rounds of sanding a tabletop. But it can leave swirl marks and ridges where the strokes overlap, even if you're careful with the finer grits. These marks are often visible on a flat surface.
To make sure the surface is flat and free of dips and ridges, I turn to an extra-long sanding block for the final few rounds of sanding. The long, wide block shown in the photo rides over the low spots and levels the surface nicely. I use this block to sand the surface through 220-grit.
INSPECT THE SURFACE. When you've flattened the workpiece, remove the sanding dust and give the surface a careful inspection. I use a shop vacuum with a brush attachment to take care of the dust. Then, wipe down the surface with mineral spirits and examine it for sanding marks. Placing a light behind and just above the surface (called a raking light) will help identify any dips or ridges. Once you're satisfied that the surface is flat, you're ready to move on to the next step.

GRAIN FILLING. If the wood is an open-grained variety like oak, walnut, or mahogany, you'll probably need to fill the pores of the wood with a paste wood filler before you go any further.
Commercial paste wood fillers use a bulking agent suspended in a finish and a solvent to fill the pores. Most fillers rely on silica as the bulking agent since it's very stable. It won't swell or shrink with seasonal changes.
Paste wood fillers will help you get fast and predictable results. They're available in different shades to match most commonly used types of wood. I prefer oilbased rather than water-based fillers because they give you more time to work. Water-based fillers dry a little too quickly for me, but they're the right choice if you prefer to use a water-based finish.
APPLYING GRAIN FILLERS. Filling the grain can be messy. So the first step is to cover your worksurface. I'll warn you also, that stirring the filler is actually the hardest part of the process. Chances are the filler has settled in the can and is quite hard to mix. Yo'll need a sturdy stirring stick and a lot of patience. The filler is ready to use when it's about the same consistency as cake frosting.

The key to applying the filler is to push it into the pores and then remove the excess without pulling it out. While some finishers prefer to use a stiff brush, I find a plastic putty knife works well. You'll quickly get the feel for applying the filler. Work across, rather than with the grain, to cover the surface and to avoid pulling the filler out of the pores. The box below explains the technique.
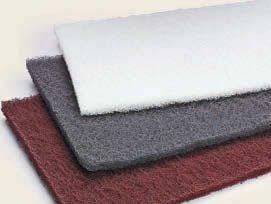
CLEANING UP THE SURFACE. After allowing the filler to dry for a few minutes, I use the tip of the putty knife to scrape away the excess. Then, let the surface dry for a while longer, usually about half an hour. Finally, use a selection of non-woven abrasive pads like the ones you see below to rub the surface with the grain to remove the remainder of the filler. Even here, be mindful not to pull it out of the pores.
FINAL INSPECTION. Now use the raking light again to examine the surface. It's not uncommon to need a second coat of filler to get a perfectly smooth surface. Once you've achieved that result, let the workpiece dry completely for a day. Then you can move on to applying the finish.
How-To: Apply a Paste Wood Filler

Apply Across the Grain. Keep the blade of the putty knife flat and pull the filler across the grain.

__Excess. __ Using the tip of the putty knife, work diagonally to scrape the excess filler from the surface.

Final Cleanup. Using a non-woven abrasive pad, lightly rub with the grain to remove the final residue from the surface, making sure not to pull it out of the pores.
Apply the Finish

You can use any of your favorite high-gloss finishes and get great results. Brushing lacquer and varnish are the most common choices and both work very well. Regardless of your choice, the goal is the same - to build up a film thick enough to flatten and polish without rubbing through to the wood.
There are a few differences in the technique for applying each one. The biggest difference is the time required between coats. Lacquer dries quickly, usually fast enough to avoid problems of dust settling on the surface. This allows you to apply several coats in a day with little effort. Lacquer also has the advantage of "melting" into the previous coat.

For varnish, you'll need to scuff sand between each coat to remove dust particles and prepare the surface for the next coat. One coat per day is the practical limit. Varnish, however, builds faster and will require fewer coats to achieve a film thick enough to rub out.
I usually apply four coats of varnish or eight coats of lacquer before beginning to rub out the surface. But the most important step is to allow the finish to properly cure before rubbing it out. The time for this can depend on the temperature and humidity in your shop, but it's a good idea to give it at least a week.
Build It Up: Finish & Flatten

Brush On the Finish. Use a good quality brush to apply several coats of finish on the surface.

Flatten the Surface. Wrap wetdry sandpaper around a cork block and use a lubricant on the surface.

Dull but Dead Flat. After filling the grain and building up several coats of finish, wetsanding produces a flat surface. Although the finish is dull and almost non-reflective, it is now ready to buff to a high-gloss shine using even finer abrasives.
WET SANDING. It may seem counterintuitive, but for the next step you need to dull the finish before working it back to a final high-gloss shine. Once again, the goal here is to make sure the surface is perfectly flat and has an even scratch pattern in the varnish or lacquer. In this step, I wet-sand the surface to smooth it and remove any remaining surface imperfections.
I start with 800-grit, wet-dry sandpaper from a paint or auto parts store (photo above). Wrap the sandpaper around a flat cork block and use a lubricant to speed the process (mineral spirits for a lacquer finish, water for varnish). The lubricant creates a slurry and floats the dust away.
Working in a circular motion and using light pressure, you'll quickly level the surface and bring it to a uniformly dull sheen. Use plenty of lubricant to keep the surface wet as you work. The drawing shows the technique and a magnified view of what's happening.
When the surface looks flat and consistent, clean it with a cloth and inspect it. If there are no shiny spots left, move to 1200-grit and repeat the process through 1500 grit. After you've achieved a flat, uniform sheen, you're ready to rub the surface to a high gloss.
PUMICE & ROTTENSTONE. Now it's time to bring the dull surface to a mirror gloss. Although there are several ways to achieve this goal, the traditional method is to use two powdered abrasives - pumice and rottenstone. Once again, you'll need a lubricant. In this case, paraffin oil lubricates the surface and forms a slurry. A felt block is the perfect tool for this step.

Felt Block. Use a felt block to rub the surface with the pumice (or rottenstone) to an oil slurry. You don't need to apply much pressure, just work in small sections using a circular motion.
Pumice is available in different grades (particle sizes) with 4F the finest. Since you already sanded through 1500-grit paper, you can move directly to 4F pumice.
Start by pouring out a small puddle of paraffin oil in the center of the workpiece and sprinkling in a small amount of pumice. Less is better.
The consistency of the slurry should be a little bit like motor oil. Now rub the mixture into the surface with only moderate pressure, again using small circles. The important thing here is to make sure to cover the whole surface with roughly a consistent number of strokes. If the paste gets too thick, simply add a few more drops of paraffin oil to the mixture. When you have a semi-gloss sheen, clean the surface and inspect it for uniformity.

ROTTENSTONE. Rottenstone is an even finer abrasive than pumice. And this is where the surface will really begin to shine. The technique is exactly like rubbing with pumice. But there's one note of caution: make sure you've completely cleaned the surface before you begin and make sure to switch to a fresh felt block. Any of the larger pumice particles will contaminate the surface and leave noticeable scratches in the finish.
At this point, the biggest temptation is to rush. Take your time and make sure to keep the pressure light and the amount of time spent on each section consistent. To check your progress, simply wipe the surface with a clean cloth and inspect the results. In the end, you'll find a mirror finish that makes all the effort worthwhile.
Rubbing Alternatives: Micro-Mesh & Swirl Remover

The key to a mirror finish is to use a series of ever-finer abrasives to flatten the surface of a thick film finish. And there’s more than one way to achieve this result.

MICROMESH. Micro-Mesh Abrasives look like sandpaper, but the abrasive material is mixed into a rubber coating, designed to continually expose fresh abrasive to the work. Available from 1200 - 12,000 grit, you can rub out a high-gloss finish either wet or dry.

AUTOMOTIVE PRODUCTS. There are also several products sold as swirl removers for auto finishes that will work on wood finishes. In these products, the fine abrasives are suspended in solution. You can apply these by hand with a cloth or with a powered polisher.


