When it comes to making moldings or adding a decorative profile to a project, a router is most likely the first tool that springs to mind. But before the invention of the electric router, a common method for creating beads, flutes, and other simple profiles was to use a scratch stock.
A scratch stock is about as basic a woodworking tool as you can imagine. Essentially, it’s nothing more than a small, L-shaped block of wood that holds a thin, steel cutter. The end of the cutter is shaped to match the profile you wish to make.

The scratch stock is used by scraping the cutter over the surface of the wood, similar to how you use a card scraper. By making repeated passes, the cutter “scratches” the profile into the wood. While it may sound a bit crude, a scratch stock actually works surprisingly well.
LOW-TECH ADVANTAGE
With the wide selection of router bits that are available today, you might wonder if the scratch stock still has a place in woodworking. But there are a few good reasons why this tool remains useful.
For starters, scratch stock cutters can be ground to just about any profile you desire. So you can create profiles for which router bits don’t even exist. This is especially useful if you’re trying to duplicate a profile for a period reproduction or repair a damaged section of molding on an antique.
Second, a scratch stock can be more cost effective than purchasing a router bit, especially if you just need a few feet of molding. Rather than buy a router bit that you may never use again, you can make a scratch stock cutter in half an hour or so.
And third, a scratch stock can even be used on round or curved workpieces that you may not be able to shape with a router.
MAKING A SCRATCH STOCK. Because a scratch stock is such a simple tool, it’s usually shop-made. (You’ll find details for making a scratch stock at Woodsmith.com.)
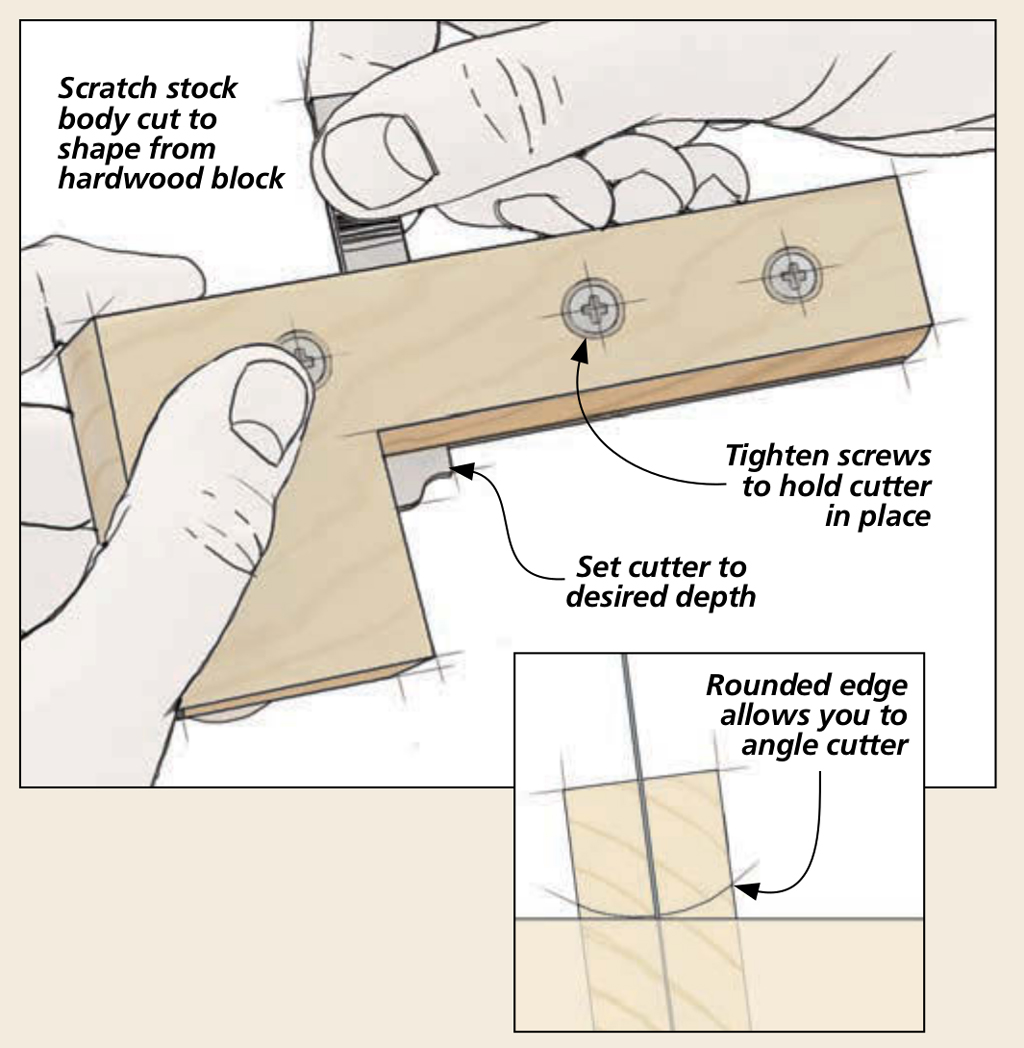
Typically, the handle, or “stock,” is an L-shaped block of wood that’s either cut into two pieces or slit down the center to hold the cutter. Beveling or rounding the bottom edge of the stock will create the necessary clearance to allow you to change the angle of the cutter as needed.

The cutter can be made out of a thin piece of tool or spring steel. Old cabinet scrapers or old handsaws make an excellent source for scratch stock cutters. You can even make cutters from worn-out band saw or hacksaw blades.
You can file or grind the profile on the end of the cutter. I usually start by scribing the profile on the face of the steel and then removing the waste with a set of needle files. Most simple profiles can be shaped in just a few minutes. Then the cutter is clamped in the body of the scratch stock by tightening a couple of wood screws (see drawing in upper right).
WOOD SELECTION. The type of wood you select for your project can affect the quality of the profile when using a scratch stock. A scratch stock works best in even, straightgrained hardwoods like walnut, mahogany, and cherry. It doesn’t work as well in softwoods. (Softwood fibers tends to tear and compress.)
USING A SCRATCH STOCK. There’s nothing very difficult about using a scratch stock, but it does take a little practice. Creating the profile is essentially a matter of holding the scratch stock against your workpiece and dragging it across the surface. The short leg of the “L” acts as a fence by riding against the edge of the workpiece, as shown in the lower left drawing.
PUSH OR PULL. You can either push or pull the scratch stock, but I find it easier to work in short sections, rather than trying to make each pass along the entire length of the workpiece. You’ll also have to experiment with the cutting angle by tilting the scratch stock toward you or away from you to get the best cutting action.

For the first few passes, you’ll want to make sure that you’re holding the scratch stock tight against the edge of the workpiece. But as the profile starts to take shape, the cutter will “track” in its own path and become easier to control.
Since there’s no depth stop on a scratch stock, you’ll have to pay attention to how deep you’re cutting and stop when you reach the desired depth of the profile.
One final note. Don’t expect a scratch stock to create a profile as sharp and consistent-looking as a router bit. Like many hand tool methods, your results will likely have some minor variations. But these will be subtle enough that they won’t detract from the overall appearance of the project. And if anything, they’ll give the project a handcrafted look.