

There are probably a dozen different ways to cut tenons. But there’s only one method that gives me the combination of accuracy, efficiency, and consistency that I need on a day-in/day-out basis. This reliable technique involves using a stack dado blade installed in the table saw. After giving it a try, you’d be pretty hard pressed to come up with a downside.
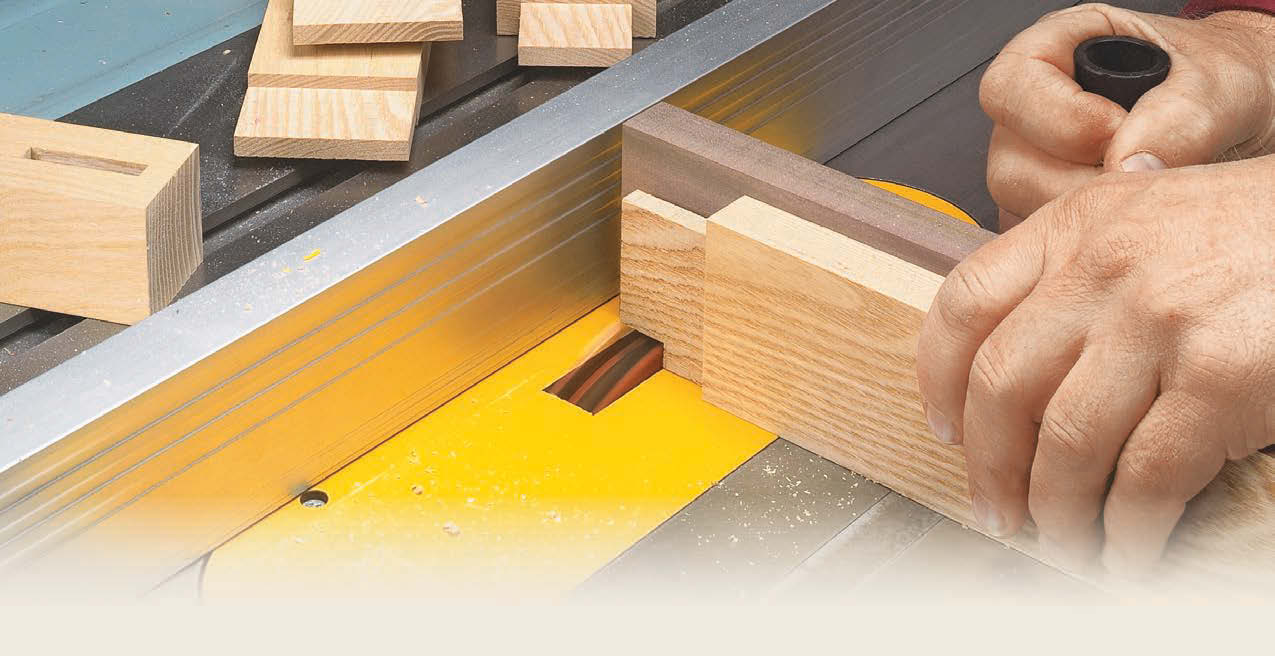
IN A NUTSHELL. The basic setup is shown in the photo above. Here’s a brief explanation of how it works. A wide dado blade is installed in the saw. An auxiliary fence is attached to the miter gauge to back up the cuts and prevent tearout. The rip fence is positioned to gauge the length of the tenon.

You cut one cheek of the tenon with as many passes as necessary, then flip the workpiece over to cut the opposite cheek. Finally, you cut the top and bottom shoulders with the workpiece held on edge. And with just a short introductory course, you should be good to go.
CONSISTENT WORKPIECES. Before setting up the saw to cut the tenons, you’ll need to size the workpieces. And this is the starting point for accurate, snug-fitting tenons. First, it’s important that the pieces are all planed to the exact same thickness. Then the edges should be straight and parallel to one another and the ends cut perfectly square.
PREPARING THE SAW. Although it’s not difficult, setting up the saw to cut the tenons is half the battle. Once this is done, the cuts go quickly.
The dado blade is the first ingredient. A high quality, carbide-tooth blade is your best bet. You’ll get smoother cuts with a minimum of effort. I like to use a relatively wide stack — 5 ⁄ 8 " to 3 ⁄ 4 ". This allows me to cut short tenons in a single pass or longer tenons with just a few passes. Fewer passes results in smoother cheeks. And a zero-clearance insert surrounding the blade will help prevent tearout at the shoulders.
YOUR GUIDES. The miter gauge and rip fence are your guides when making the cuts. So it’s important that both are ready for the task. There are a couple aspects to this.
As I mentioned, you’ll want to add an auxiliary fence to the miter gauge. It should be long enough to provide a steady bearing surface and extend into or past the blade to back up the cuts.

If the tenons are short ( 3 ⁄ 4 " or less), I add an auxiliary rip fence and then raise the blade up into it. When the tenons are long enough to require multiple passes, you won’t need an auxiliary fence.
CHECKUP. The next step is a quick checkup, as shown in the drawing. To get clean, accurate tenon shoulders, the rip fence should be perfectly parallel to the blade. And also check to make sure the face of the fence is square to the table. Finally, be certain that the miter gauge is set square to the blade and the rip fence. It’s impossible to get square shoulders if the miter gauge is out of adjustment.
BLADE HEIGHT FIRST. Once everything checks out, you can start making adjustments. Since the height of the blade determines the thickness of the tenon and its fit to the mortise, this is where to begin.

Using a combination square or rule to measure the height of the blade, set it a little bit low. Then make a pair of test cuts across the tip of one workpiece (Figure 1).
To ensure accurate results, hold the workpiece down firmly during the cuts. Now you can test the fit of this “stub” tenon to the mortise, as in Figure 1a. To zero in on the final height, raise the blade in tiny increments and repeat the routine until the corner of the tenon fits snugly into the mortise.
RIP FENCE. Now you can position the rip fence to establish the length of the tenon. Your real goal here is an accurate shoulder-to-shoulder length between the tenons on each end of the workpieces.

Again, I’m conservative. With the fence positioned just shy of the tenon length, I pick up the test piece and cut back to the shoulder lines with several passes. For the final cut, the end of the tenon is in firm contact with the fence (Figure 2).
Then flip the workpiece end-forend and cut the tenon on the opposite end. Use a rule or tape to take a shoulder-to-shoulder measurement (Figure 2a). Tweak the fence setting as necessary and try it again until the length is dead-on.

MAKING THE CUTS. At this point, making the cheek cuts on the rest of the workpieces is pretty routine. Just start with a cut across the end and work back toward the shoulder. Remember that the fewer passes you make to remove the waste, the smoother the tenon cheeks will be. And strong downward pressure is the key to consistent thickness.
THE EDGE SHOULDERS. The final step is to cut the edge shoulders if necessary. The difference here is that the workpiece is held on edge, as shown in Figure 3.

In most cases, the blade height will need to be readjusted. You can do this using the same “cut and test” technique as before. When the test tenon slides into the mortise, you can complete all the cuts.
It works best to start at the end of the tenon and cut back to the shoulder. Take care when making the final cut at the shoulder. To avoid scoring the long shoulders, use only light pressure against the fence. An option is to leave a small amount of waste at the shoulder and then clean it up with a chisel.
From setup to completed tenons, the process probably won’t take more than thirty minutes. And what’s most important, the tenons will fit like a hand in a glove.


