

The table saw and plywood are certainly two of the most important woodworking innovations of all time. I can’t imagine working without either. And although the two may not seem like a good match, the table saw is always my first choice when the task is breaking down full sheets of plywood into accurately sized panels for a project. It’s all in how you plan for the job. I’ll offer my simple approach.
THE BEST SETUP. The first step is to make sure your saw setup is up to snuff. This starts with the right blade. A 60-tooth triple chip or crosscut blade will produce clean cuts with minimal chipping. Installing a zero-clearance insert as shown below, will guarantee even better results.

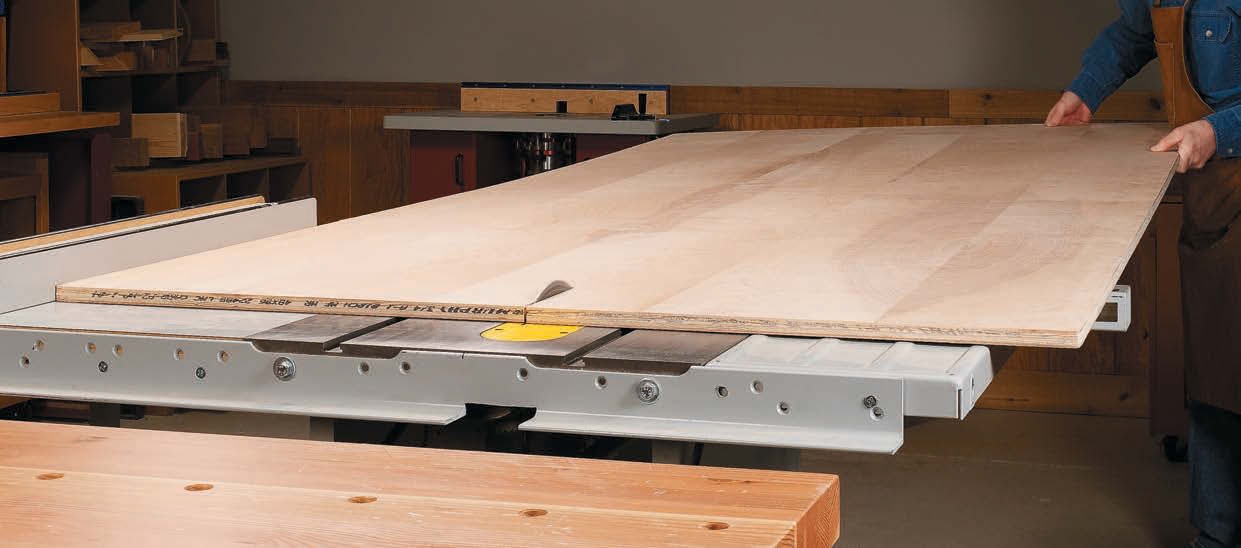
Next comes outfeed support. When cutting large panels, stable outfeed support covering both sides of the blade is a must (top photo). And if necessary, don’t hesitate to position support to the left side of the saw.
ROUGH SIZE. Now you’re staring at a 4' x 8' sheet wondering how to proceed. You want to begin by breaking the sheet down into manageable, rough-sized pieces. Then you can cut these roughsized pieces to finished size.
TWO HALVES. I like to start by ripping the sheet into approximate halves, as in the top photo above. (The exact width may depend on the finished widths required.) You’ll find that the resulting half sheets are much easier to handle.
The factory edges on a sheet of plywood are usually straight enough to be used as a guide for cutting. But they’re generally not clean enough to be used as a finished edge. You’ll always want to trim a factory edge during final sizing of a panel. So always allow extra width for this trim cut.

The goal is to end with a straight, clean cut on each piece. This edge will be used to begin cutting the pieces to final size. So take care and maintain good control when making the cuts (Shop Tip, below).
ROUGH LENGTH. If the project calls for wide panels (the center cabinet of the media center), you next face the task of crosscutting the half sheets to rough length. There are a couple of ways to get this done. Whenever possible, I use the rip fence as a guide to crosscut wide panels. Although a half sheet of plywood can be a bit unwieldy, the end of the panel riding against the rip fence will provide a stable guide edge.
You’ll need adequate outfeed and side support to hold and catch both pieces. The trick is to keep the end snug to the fence while feeding the panel. You’ll need to push the trapped piece completely through the blade, so position yourself with one hand on each side of the blade.
GUIDE CLEAT. If the saw’s rip capacity won’t let you make the cuts using the fence, you can work around this by using a cleat to guide the cut. The cleat is clamped to the underside of the panel and positioned to run along the edge of the saw’s left extension wing, as in the upper right photo.
ROUGH TO FINAL SIZE
Once the sheet or sheets are broken down into the rough sizes that are needed, cutting them to finished size follows a straightforward sequence.

The first step is to rip the pieces to finished width. You should have one clean, straight “long” edge on each piece. The factory edge will always be trimmed away (upper left photo below). So the opposite edge should serve as your reference edge. If this edge isn’t cut clean and straight, you’ll want to re-cut it before going further.
Set the rip fence to the desired finished width and with the good edge against the fence, run the panel through the blade. To make the smoothest, cleanest cut, always try to feed the panel steadily without pausing. A jerky, inconsistent feed can create a scored or burned edge. Think ahead to position your hands and body to allow for a steady, controlled push.
CROSSCUT TO LENGTH. The final step is to crosscut the pieces to finished length. Again, this is not a “one technique fits all” situation.
To ensure clean edges and a square panel, I always make a finish cut on both ends. The first cut simply trims and squares one end. This is followed by a square cut to finished length.
One of the easiest and most accurate ways to cut the panels to length is to use a crosscut sled, as shown below. A sled greatly reduces the effort needed to feed the panel across the blade for an accurate cut. When multiple identical pieces are needed, a stop block can be clamped to the sled for the final squaring cut. (I avoid using the miter gauge. It provides poor support and control.)

A sled may not accommodate wide panels. Here, you have a couple of options. One is to use a square factory edge referenced against the rip fence to guide the panel. If a panel is not too long in relation to its width (no more than 2 to 1), it can be safely cut to length in this way. Again, this can be a good way to accurately size identical multiple pieces.
Panels too large for either a sled or the rip fence can be cut to final length using the cleat method mentioned previously and shown above. Make sure the edge of the table is parallel to the blade and the cleat is attached squarely.
The lesson here is that when building a large plywood project, starting with square, accurately sized panels makes everything else easier. And the table saw is the place to get this done.
Shop Tip: Hold-Down
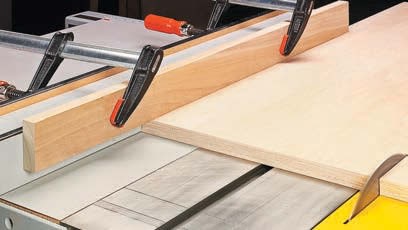
A simple hold-down will help control large panels of plywood on the table saw. Just clamp a long cleat to the rip fence to trap the panel.


