


How to Adjust a Box Joint Jig for Perfect-Fitting Joints
Box joints are a great choice for woodworking projects that need strong, attractive corner joinery. They're especially popular for wooden boxes, drawers, trays, and small cabinets. But getting a perfect fit between the interlocking fingers can take a little trial and error.
If the joints are too loose, you'll end up with visible gaps between the fingers. If they're too tight, the parts may be difficult or impossible to assemble without damaging the wood.
Fortunately, getting snug-fitting box joints doesn't require a complicated jig or elaborate setup. A simple table saw box joint jig with an indexing key is all you need. The secret is knowing how to adjust the jig when the fit isn't quite right.
In the video, we'll show you how to identify common box joint fit problems and make the small adjustments needed for strong, gap-free joints.
What Makes a Perfect-Fitting Box Joint?
A properly fitted box joint should slide together with light hand pressure. The fingers, also called pins, should fit snugly into the matching slots without noticeable gaps.
You shouldn't need to force the joint together with a mallet. At the same time, the parts shouldn't wobble or feel loose when assembled.
A good-fitting box joint provides two important benefits:
- Strength: The interlocking fingers create a large amount of long-grain glue surface for a durable connection.
- Appearance: Evenly spaced fingers and tight seams create a clean, professional-looking corner.
This is especially important on decorative projects where the joinery is a prominent design feature.
For example, the silverware tray featured on the Woodsmith Shop uses angled sides and matching angled box joints. The exposed joinery adds to the appearance of the tray, making accurate cuts and a snug fit particularly important.
How a Table Saw Box Joint Jig Works
One of the simplest ways to cut box joints is with a table saw, dado blade, and indexing jig.
The jig consists of a fence and a small hardwood key. The key registers each previously cut slot so you can make a series of evenly spaced cuts across the end of a workpiece.
After cutting the first slot, you position it over the indexing key. The key then establishes the spacing for the next cut.
Repeating this process creates a series of fingers and slots that interlock with the matching workpiece.
The Three Measurements That Matter
For accurately spaced box joints, three dimensions need to work together:
- Dado blade width: Determines the width of the slots.
- Indexing key width: Must match the width of the slots for accurate positioning.
- Distance between the blade and key: Determines the width of the fingers left between the slots.
When these measurements are properly matched, the fingers and slots fit together snugly.
However, even a small difference in spacing can affect the fit. That's why making test cuts is an essential part of setting up a box joint jig.
Test the Fit Before Cutting Your Project
Before cutting box joints in your project parts, make a few test cuts in scrap material.
Use stock that's the same thickness as your project pieces, and cut a complete set of mating box joints.
Then try assembling the test joint by hand.
A properly adjusted jig should produce fingers that slide into the slots with light pressure and leave no noticeable gaps.
If the joint is too loose or too tight, the test pieces will tell you which adjustment to make.
The important thing is to make small changes to the jig and cut a new test joint after each adjustment.
How to Fix Loose Box Joints
One of the most common problems when cutting box joints is a loose fit.
If the fingers slide into the slots too easily and leave visible gaps, the fingers are too narrow.
This usually means the indexing key is positioned too close to the dado blade.
Move the Indexing Key Farther From the Blade
To correct a loose-fitting box joint, adjust the jig so the indexing key is slightly farther away from the dado blade.
On a jig with an adjustable fence, loosen the fence and shift it a small amount to increase the distance between the key and the blade.
This increases the width of the fingers left between the slots.
Secure the fence, then cut another test joint to check the fit.
Make small adjustments rather than moving the fence too far at once.
How to Fix Box Joints That Are Too Tight
The opposite problem occurs when the fingers are too wide for the matching slots.
You may find that the joint is difficult to assemble or won't go together at all.
Trying to force the pieces together can split the fingers or damage the edges of the joint.
The solution is to make the fingers slightly narrower.
Move the Indexing Key Closer to the Blade
To correct an overly tight box joint, loosen the jig fence and shift the indexing key slightly closer to the dado blade.
This reduces the width of the fingers between the slots.
After securing the fence, cut a fresh test joint and check the fit.
Continue making small adjustments until the fingers slide into the slots with light hand pressure.
Box Joint Jig Troubleshooting Guide
Here's a quick reference for adjusting your jig based on the fit of the joint.
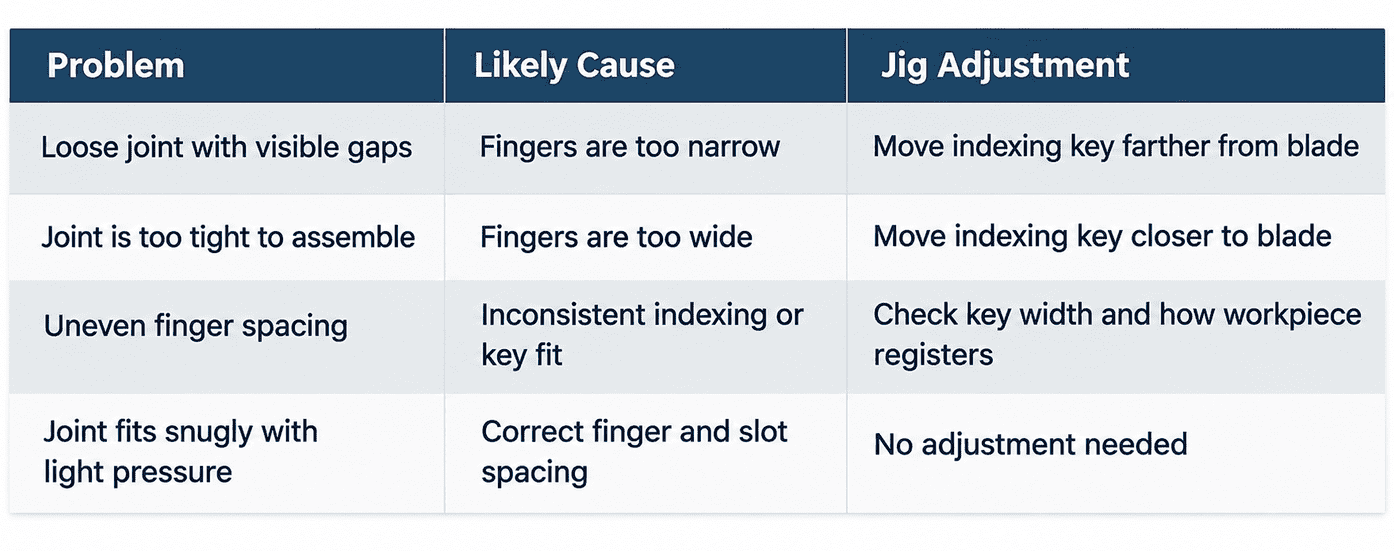
Important: Make all jig adjustments with the table saw turned off and the blade completely stopped. After each adjustment, secure the jig before making another test cut.
Tips for Cutting Accurate Box Joints
Once you've dialed in the jig, a few simple habits will help you get consistent results.
- Use a hardwood indexing key. A durable, accurately sized key helps maintain consistent spacing.
- Match the key to the dado blade. The key should fit the slots without excessive play.
- Keep the workpiece firmly against the fence. Any movement during the cut can affect the spacing.
- Clear away sawdust. Chips caught between the workpiece and indexing key can cause positioning errors.
- Make small adjustments. Even a slight change in key spacing can make a noticeable difference in the joint's fit.
- Cut fresh test joints. Don't rely on previously cut joints after changing the jig setup.
- Use a backing board. Supporting the workpiece can help reduce tearout as the dado blade exits the cut.
Dial In Your Box Joint Jig for Better Results
Cutting tight-fitting box joints is all about getting the relationship between the dado blade and indexing key just right.
If the joints are too loose, move the key farther from the blade to make the fingers wider. If the joints are too tight, move the key closer to the blade to make the fingers narrower.
With a few test cuts and small adjustments, you can quickly fine-tune your jig to produce strong, accurate box joints that fit together with light pressure.
It's a simple setup technique that pays off every time you build a box, drawer, or other project featuring box joint joinery.
Featured Project: Traditional Silverware Tray
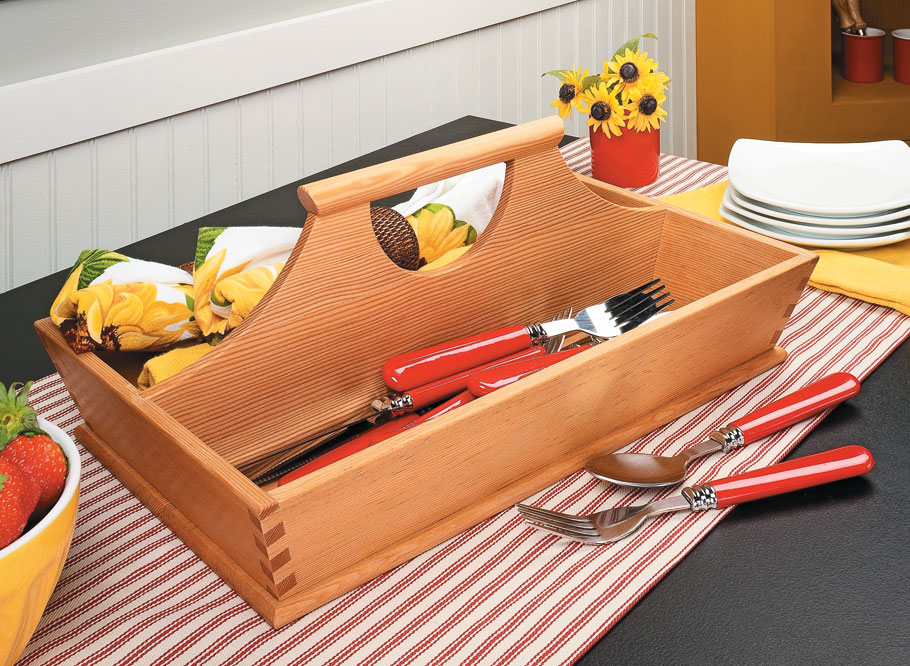
Put your box joint skills to work with this classic handled Silverware Tray. Featuring splayed sides, eye-catching angled box joints, and a shaped center divider, this versatile project combines traditional craftsmanship with practical storage. It's a great way to build your joinery skills while creating a useful organizer for silverware, tools, or craft supplies.
GET THE STEP-BY-STEP WOODWORKING PLANS ➜ Build a Traditional Silverware Tray


