


A zero-clearance insert is one of the simplest upgrades you can make to a table saw. It provides better support around the blade, helps reduce tearout, and prevents narrow offcuts from dropping into the wide opening around a standard throat plate.
You can buy replacement inserts, but there's another option: Make your own.
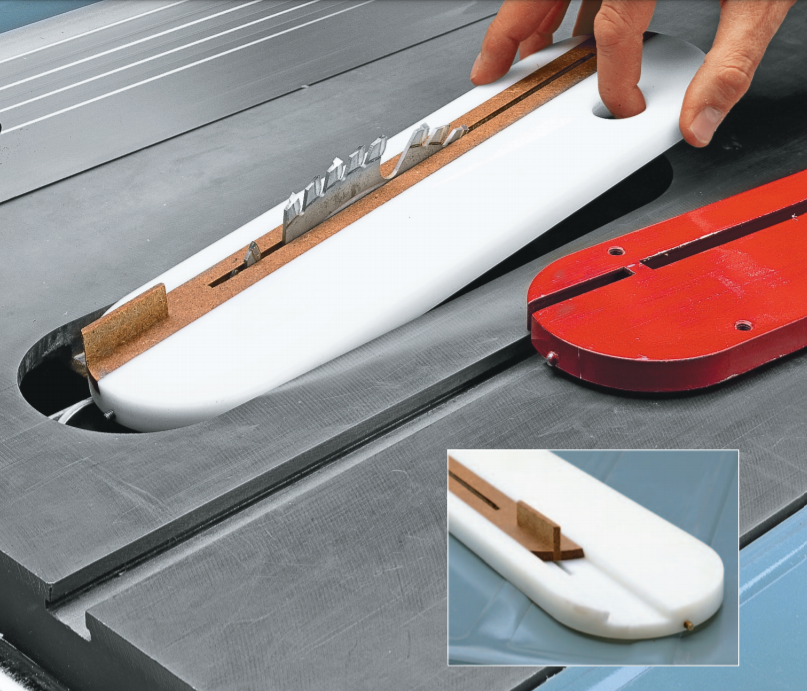
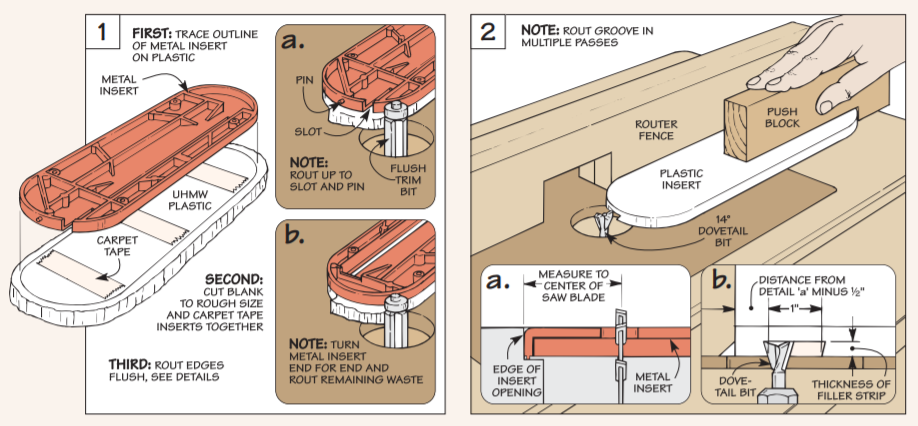
This shop-made table saw insert takes the idea one step further. The main throat plate is made from slick, stable UHMW plastic, while a replaceable hardboard strip surrounds the saw blade. When the strip becomes worn — or you switch to a blade with a different kerf — you can replace the center rather than making an entirely new throat plate.
What Is a Table Saw Zero-Clearance Insert?
The factory throat plate on a table saw typically leaves a relatively wide opening around the saw blade. That clearance allows the saw to accommodate different blades and setups, but it also leaves part of the workpiece unsupported during a cut.
This can be especially noticeable when ripping a narrow strip. The strip can drop into the opening between the blade and the throat plate. In the wrong situation, a narrow piece can become wedged in the opening.
A zero-clearance insert, or ZCI, solves the problem by reducing the opening around the blade to essentially the width of the blade kerf itself.
Because the insert supports the workpiece immediately alongside the blade, there's far less room for a narrow strip to fall into the opening.
DOWNLOAD THE FREE STEP-BY-STEP PLANS: Zero-Clearance Table Saw Insert
A Zero-Clearance Insert Can Also Reduce Tearout
There's another advantage to supporting the workpiece close to the blade: cleaner cuts. As the blade teeth cut through the bottom of a workpiece, the surrounding wood fibers are supported by the insert rather than hanging over a large opening.
That additional support helps reduce chipout and tearout along the bottom face of the cut.
[IMAGE 2: Detail showing the table saw blade passing through the narrow opening of the zero-clearance insert. Use Screenshot_2021-04-19_110446.png.]
A zero-clearance insert isn't a substitute for a sharp, appropriate table saw blade, but it's one more way to improve the quality of the cut.
Why Make the Insert from UHMW Plastic?
The main body of this insert is made from Ultra-High Molecular Weight polyethylene, commonly called UHMW.
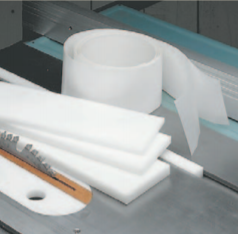
UHMW has a couple of characteristics that make it well suited to woodworking jigs and fixtures. First, it's extremely slick. Workpieces glide easily across the surface as they're fed through a cut.
It's also dimensionally stable when exposed to normal changes in shop humidity. Once the insert has been fitted to the throat opening of your saw, you don't have the seasonal movement you'd expect from a wood insert.
But the biggest advantage of this particular design isn't the UHMW itself.
It's the replaceable center strip.
Add a Replaceable Hardboard Center Strip
A conventional shop-made zero-clearance throat plate eventually gets chewed up around the blade. Once the opening becomes too large, much of the advantage of having a zero-clearance insert is lost.
This design avoids replacing the entire throat plate.
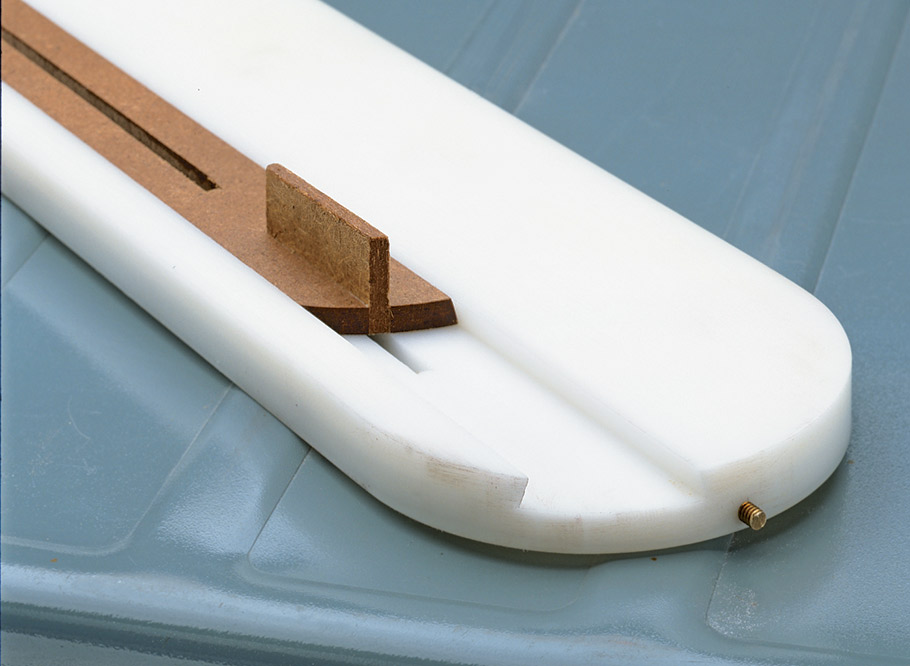
A replaceable hardboard filler strip fits into the center of the UHMW insert.
The saw blade cuts its kerf through this inexpensive center strip rather than requiring you to replace the entire UHMW plate.
Once the opening becomes worn, remove the old strip and install a new one.
Make Several Replacement Inserts at Once
This is one of those projects where a little extra work during the initial setup can save time later.
Once you have the tooling set up to make the hardboard filler, make several strips and keep the extras near your saw.
Then restoring the zero-clearance opening doesn't require building another throat plate. Simply install a fresh filler strip and cut a new kerf.
Use Different Inserts for Different Table Saw Blades
The replaceable design also comes in handy if you regularly switch between blades with different kerf widths.
A thin-kerf blade and a full-kerf blade don't create the same opening. With a conventional zero-clearance throat plate, switching between them can defeat the purpose of the close-fitting insert.
Here, you can dedicate individual hardboard strips to different blades.
Remove one filler strip, install the appropriate replacement, and you can maintain close support around the blade without making another complete insert.
Woodsmith Tip: Label your replacement strips for the blades or setups they're intended to be used with. That makes it easy to grab the correct insert when changing blades.
Add a Splitter to the Zero-Clearance Insert
This design also gives you the option of incorporating a simple splitter into the replaceable hardboard insert.
The splitter is made from a piece of 1⁄8"-thick hardboard that fits into a short slot at the back of the filler strip.
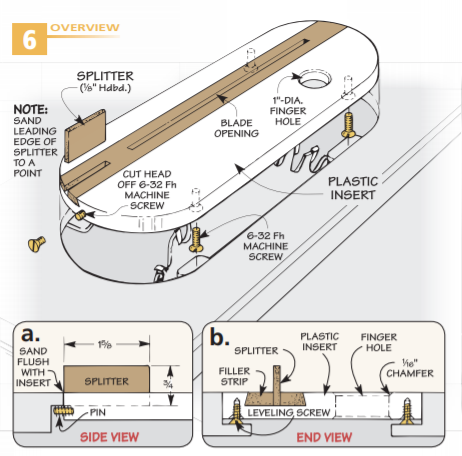
After cutting the slot, glue the splitter in place.
Then sand the leading edge of the splitter to a point. This helps prevent the workpiece from catching as it passes the blade and engages the splitter.
The splitter sits behind the blade and helps keep the kerf open as the workpiece moves through the cut.
Important: A shop-made splitter should be appropriate for the particular saw, blade, cut, and setup you're using. Don't remove or defeat the manufacturer's blade guard, riving knife, or other safety equipment simply to accommodate a shop-made insert.
Add Leveling Screws for a Flush Fit
A zero-clearance insert needs to sit flush with the table saw surface.
If it's too low, the leading edge of a workpiece can catch as you feed it into the blade. If it's too high, the workpiece can rock or hang up as it crosses the insert.
Leveling screws let you fine-tune the position of the UHMW plate so its top surface aligns with the cast-iron saw table.
Take the time to adjust each point until the transition from the saw table to the insert is smooth.
Fit the Insert to Your Particular Table Saw
Table saw throat plates aren't universal.
The length, width, thickness, shape, mounting system, and support points vary from one saw to another. So use your saw's original throat plate as the reference when sizing your shop-made version.
The goal is a secure insert that can't move during use and sits perfectly flush with the surrounding table.
Before cutting a blade kerf, also make sure the insert and its fasteners have adequate clearance for your saw's mechanism and blade.
Creating the Zero-Clearance Kerf
Once the throat plate is fitted and leveled, install the appropriate hardboard center strip.
The blade then needs to create the opening that makes this a true zero-clearance insert.
Exactly how this should be done depends on your particular table saw and the amount of clearance available below the uncut insert. Follow the saw manufacturer's recommendations and don't use a procedure that interferes with the blade, arbor, riving knife, guard, or other safety equipment.
Once the kerf has been established, the hardboard supports the workpiece immediately alongside the blade.
Now you're ready to take advantage of the insert.
When Should You Replace a Zero-Clearance Insert?
The opening will gradually become larger as the insert sees use.
Replace the hardboard center when the kerf becomes damaged or enlarged enough that it no longer provides close support around the blade.
That's where this design really pays off.
Instead of replacing this: UHMW throat plate + all the fitting and leveling work You're replacing this: One inexpensive strip of hardboard.
Slide in a fresh insert, establish a new blade kerf, and you're back to a close-fitting opening.
A Simple Upgrade for Better Table Saw Cuts
A zero-clearance insert is a relatively small table saw upgrade, but it addresses two common problems.
It provides better support for narrow rip cuts, helping prevent small strips from dropping into the throat opening. And because the insert supports the wood fibers right alongside the blade, it can also help produce cleaner cuts with less tearout on the bottom face.
Building the main plate from UHMW makes the insert slick and stable, while the replaceable hardboard center means you don't have to start from scratch every time the blade opening becomes worn.
Add dedicated strips for different blades and the optional splitter, and you have a table saw insert that's considerably more versatile than a basic zero-clearance throat plate.
DOWNLOAD THE FREE STEP-BY-STEP PLANS: Zero-Clearance Table Saw Insert
RELATED VIDEO: How to Make a Zero-Clearance Miter Saw Insert


