

Installing the hinges to mount a door to a project is a task I used to approach with apprehension. The final installation can make or break the look of a project. For me, locating and cutting the mortises for the hinges perfectly can be a tedious process with no room for error.
No Mortises. To solve this problem, I often turn to no-mortise hinges. Sure, you won’t have to cut any mortises, but there are still a few tricks to getting the installation to look just right.
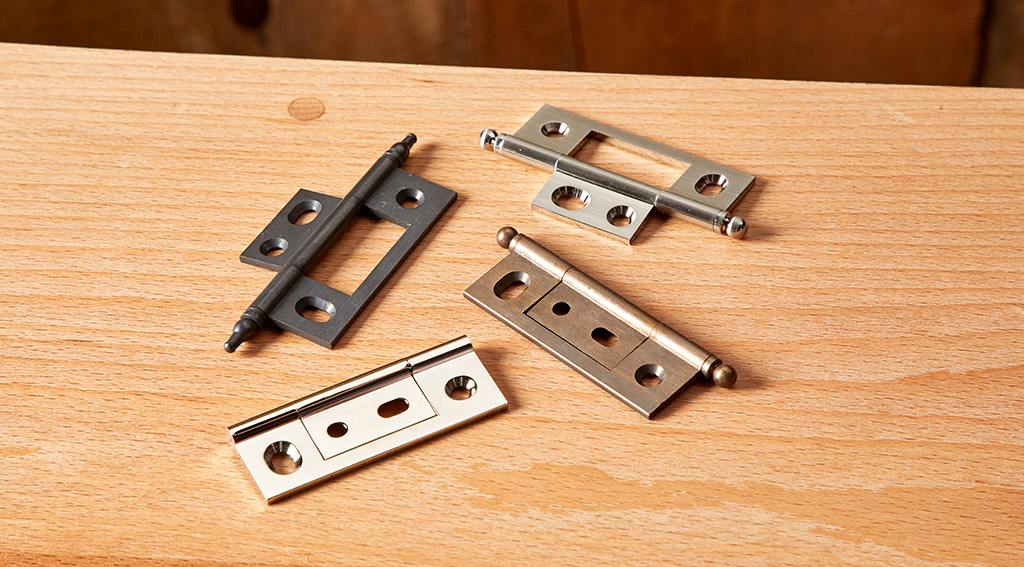
Before getting into the details of the installation process, it’s important to understand just what a no-mortise hinge is and what makes it work. What’s a No-Mortise Hinge? When it comes to no-mortise hinges, you’ll find quite a variety to choose from. But it pays to buy quality hinges like these from Horton Brasses. Tight tolerances in manufacturing eliminate play and result in sweet-swinging doors.
Instead of identically sized hinge leaves, there’s a small inner leaf that “nests” inside a wide outer leaf. The Horton Brasses non-mortise hinges are engineered for a 3/32” gap-the standard for fine cabinetry. Nesting each leaf together creates a thin profile. This is what allows you to get by without cutting any mortises. In fact, it provides the perfect gap (about 1⁄16") where the door meets the cabinet. This nesting results in the hinge barrel being offset to one side. This offset is the key to making the installation of the hinge a snap.
INSTALLING A HINGE
The process that follows for installing a no-mortise hinge covers typical installation where the door is inset in a basic cabinet.
Getting Started. The first thing you’ll need to do is to create a slight back bevel on the hinge side of the door. This creates the elbow room necessary for the door to close — and stay closed without binding on the hinge. You can do this at the table saw by tilting the blade just a couple degrees.
Another great option is to use a hand plane to form a bevel. Do this after the door has been fit to its opening. Again, you don’t need much.
Since there aren’t any mortises to help align the door and case with each other, you’ll need another method. And that’s where the hinge comes into the installation process.
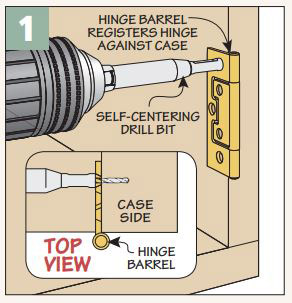
Locating the Hinge. The first step is to locate the hinge on the side of the cabinet. To do this, butt the barrel of the hinge tightly against the edge. There’s no specific rule as to where to mount the hinge on either the door or the cabinet. I make a layout mark based on the size of the hinge and the overall look.
Once you’ve located the hinge, go ahead and drill the holes for the mounting screws in the outer leaf. With the holes complete, you can go ahead and install the screws.
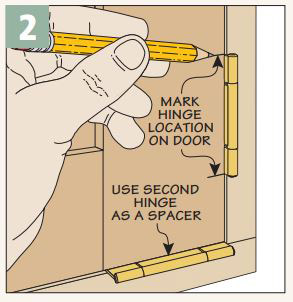
Transfer the Location. Now you’re ready to position the door in the opening. To create a matching, even gap along the bottom of the door, use another hinge as a spacer. Then with the door in place, mark the location of the hinge on the door.
Drilling the Door. The next step is to locate the screw holes for the hinge in the door. To do this, remove the door and take the hinge off the cabinet. You can then use it as a template for locating and drilling the screw holes through the back side of the leaf.
The trick here is to flip the hinge and use the barrel as a guide to locate the hinge perfectly, just like you did on the case. With the hinge flipped this way and aligned on the marks you transferred earlier, drill pilot holes for the screws.
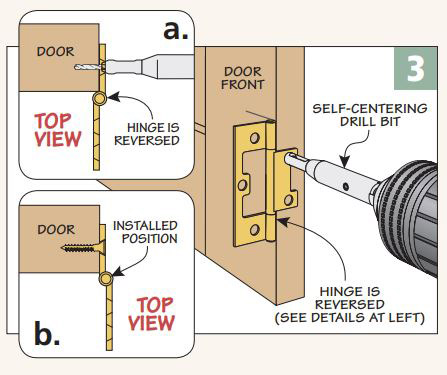
Now all you need to do is turn the hinge over and attach it to the door in the correct orientation. Once you have both hinges installed on the door, you can mount the door in the cabinet.
No-mortise hinges are a handy solution to a tricky problem. They look great. And as you can see here, the design of the hinge makes the installation quick and easy.
![]()


