


Fluting is a great way to add an elegant detail to a project with nothing more than a router and a core box bit. But the challenge has always been making sure the flutes are evenly spaced.
Fortunately, there are several jigs on the market that make this an easy task. One of the easiest to use is the Automatic Flute Spacing Jig , from DRL Group shown in the main photo above .
Unlike some fluting jigs, the Automatic Flute Spacing Jig isn’t actually used in routing the flutes. Its purpose is simply act as a set up gauge for the fence to create perfectly spaced flutes without measuring. It will space two to seven flutes on any workpiece up to 12" wide. (For routing flutes with a handheld router, see the jig in the box on the opposite page.)
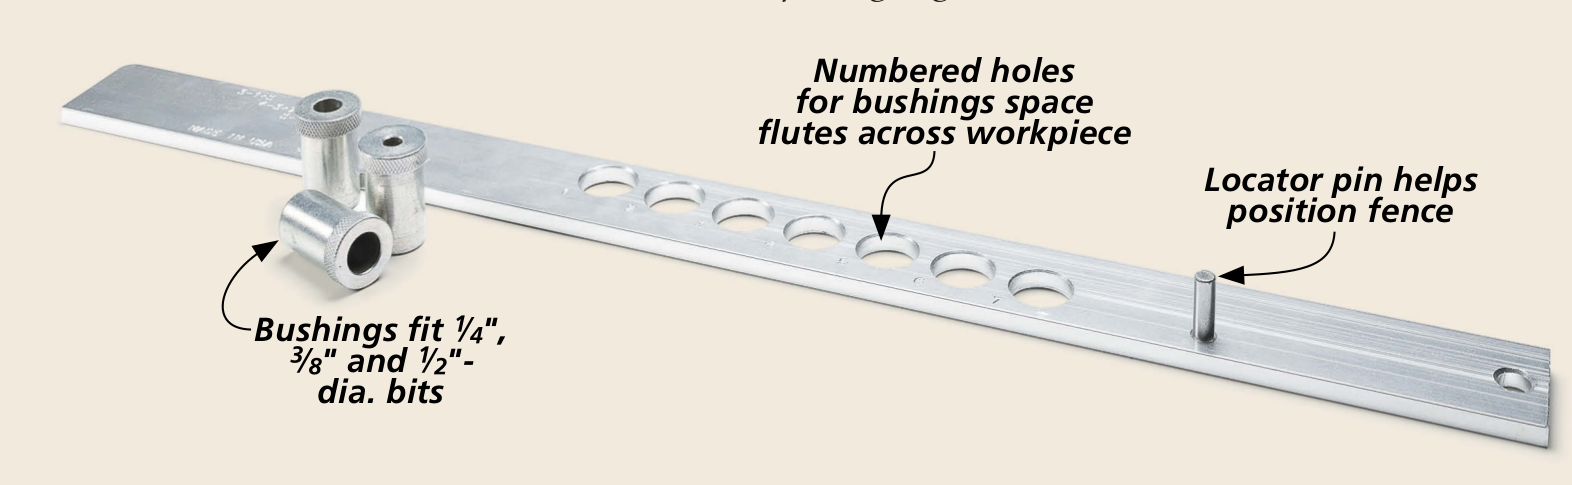
THE JIG. If you take a look at the photo below, you’ll see that the Automatic Flute Spacing Jig is simply an aluminum bar with a series of numbered holes, a set of three steel bushings, and a locator pin. Each bushing is designed to fit a different diameter router bit (more on this later). The holes in the base hold one of the bushings during set up.

EQUAL SPACING.
You’ve probably seen the old trick of laying a ruler diagonally across a board to divide it into equal sections. Well, this jig works on the same principle. It positions the router table fence for each flute by dividing the width of your workpiece into equal sections. Here’s how the jig works.
SET UP. Start by selecting a bushing to match the diameter of the core box bit you’re going to use to rout the flutes. Slip the bushing into one of the holes in the jig and over your router bit, as shown in the inset photo at right.
Now, all you have to do is place your workpiece on top of the jig and slide the router table fence up to the edge of the workpiece, sandwiching it between the fence and the locator pin on the jig. The fence is stopped when it contacts the opposite corner of the jig (see photo at right).
After tightening down the fence, you can remove the jig and rout your flute. To rout additional flutes, simply reposition the fence by moving the bushing to a different hole on the jig and repeat the set-up procedure.

HOLE SELECTION. The only tricky part of using the jig is knowing which hole to place the bushing in. Fortunately, the manufacturer specifies the different hole combinations for three-, four-, five-, six-, and seven-flute applications right on the jig (lower right photo on opposite page). Using these combinations will give you evenly spaced flutes across the width of the workpiece.

FLUTE SPACING. Because the jig uses the workpiece to position the fence, the flute spacing is fixed based on the width of the workpiece and the number of flutes you rout. (See the margin photo at right for an example of this.) This means you can’t precisely locate the spacing of the flutes.
However, you can vary the spacing to some extent by not using certain holes. You can also use the jig to rout flutes along the edge of a board, or exactly down the middle of your workpiece.

BIT OPTIONS. Most of the time, I use a core box bit for routing flutes. But the Automatic Flute Spacing Jig will also work with straight bits or V-groove bits. However, you are limited by the diameter of the three bushings that are included with the jig — 1 ⁄ 4 ", 3 ⁄ 8 ", and 1 ⁄ 2 ".
PRICE. Even though this may not be a jig you use every day, at $30, the Automatic Flute Spacing Jig won’t break the bank either. (See page 51 for sources.) And you’ll appreciate the time it saves, as well as the perfect results you’ll see when the job is finished.
Worth a Look: Rockler Fluting Jig

Routing evenly spaced flutes on the router table is a snap with the jig shown above. But you can also get the job done with a handheld router and the jig shown in the photo at right made by Rockler .
This handheld router jig straddles the workpiece and allows you to use a plunge router for stopped flutes. It can also be used to rout grooves along the length of a workpiece.
The base of the jig is designed with a fixed fence on one side and a sliding fence on the opposite side. These work together to trap the workpiece. The router attaches to the jig through pre-drilled holes in the clear, sliding baseplate.
To use the jig, first locate the center of the workpiece and mark it on the coated yellow strip. From there, you can decide where you want to place the flutes and mark the strip accordingly. Then it’s just a matter of lining up the baseplate with your marks and routing the flutes. For easy positioning, the pre-drilled mounting holes on the baseplate align the bit with the “zero” mark on the factory-attached ruler.
For information on buying this jig, refer to Sources on page 51.


