


When it comes to making frames, the miter joint is probably the first thing that comes to mind. It seems simple enough. Just cut each end of the workpieces at a 45° angle and glue them all together. But there’s more to it than that.
First, you need eight spot-on miter cuts to achieve a gap-free fit when assembled. Then you have to figure out a good assembly method. Clamping 45° parts with slippery glued surfaces can result in the workpieces sliding out of alignment and ruining the fit. Here are a few techniques and tips for cutting and assembling mitered frames you can be proud of.

MITER SAW.
Good miters begin with perfect miter cuts. Although the miter saw sounds like the right tool for the job, I’ve found that most miter saws can’t make a precise 45° cut nearly as well as the table saw. This is because the miter saw is really a jobsite tool, designed for the construction industry. Very few are capable of being tuned properly to provide the level of accuracy necessary for precision woodworking.
TABLE SAW. The table saw, however, can cut miters reliably every time. But it does need to be set up properly for the job. That means you need to take a little time to set the miter gauge accurately before getting started.
In addition to setting the miter gauge to 45°, the blade has to be 90° to the table, as well. You can use the head of a combination square or a drafting triangle to check ck the miter gauge angle against the blade (drawing above).
I also install an auxiliary fence and a stop block on the miter gauge. The longer fence gives you better control of the workpiece. To help prevent the workpiece from moving during the cut, you can add a strip of adhesive-backed sandpaper per to the face. The stop block ensures the pieces will be the same length (more on that later). Another advantage of this method is that the fence also helps prevent tearout on the workpiece by backing up the cut.
Speaking of tearout, I’ve found that I get the best results by angling the miter gauge toward the blade as shown in the drawing above. This puts the workpiece on a path to cut “downhill” on the grain for a cleaner cut.
SKIM CUT. One tip I’ve learned through experience is to follow up the initial miter cut with a second, skim cut. I do this because sometimes the saw blade will deflect just enough to throw off the angle of a miter cut. By making a skim cut (just cutting an extra hair off the end), you ensure that you get a consistent miter on your workpiece.
LENGTH. In addition to cutting accurate miters, opposite sides of the assembled frame must be equal in length. If they’re not consistent, gaps in the joint are inevitable. This is where the stop block makes all the difference.
The Shop Tip below shows the technique. You start by cutting a stop block with one square end and one mitered end. After making the first cut, insert a spacer (I use a playing card) between the stop block and workpiece and make the skim cut to the final length. This small skim cut barely affects the final length of your workpiece. But if it’s vital that the frame be an exact size, you’ll need to take the thickness of the spacer into account when setting up the stop block.
ASSEMBLY. With the angles and the lengths dialed in, all that remains is to keep things square during the glueup. A little extra care here can make sure that your hard work up to this point pays off. I usually use a simple and reliable technique — masking tape on the mating corners. The tape is strong enough to hold the joints and stop the pieces from shifting.
For small pieces, the tape is enough, but for larger assemblies you can easily add clamps across the joints. The key here is to make sure the assembly stays square. I use a square to check the corners as I add the tape, as shown in the first drawing in the How-To below.
CLAMPS & JIGS. There are other methods you can use as well. Band clamps are a reliable way to glue up a frame (center drawing in the How-To). You can also build an assembly jig like the one in the right drawing. Using the jig, all you need to do is hold the glued up ends together until the glue tacks up. Then, you can use tape or a band clamp to hold the final two corners.
Give these methods a try next time you need to make a frame. I’m sure you’ll find them helpful for taking the headaches out of making gap-free miter joints.
Shop Tip: Skim Cuts
To make a skim cut, I use a playing card as a spacer. It’s just about the perfect thickness to allow you to clean up the face of a miter cut. As you can see in the drawings below, I cut the ends of all the workpieces to rough length on one side of the blade. Then you’ll need to reset the miter gauge on the opposite side to make the final cuts.
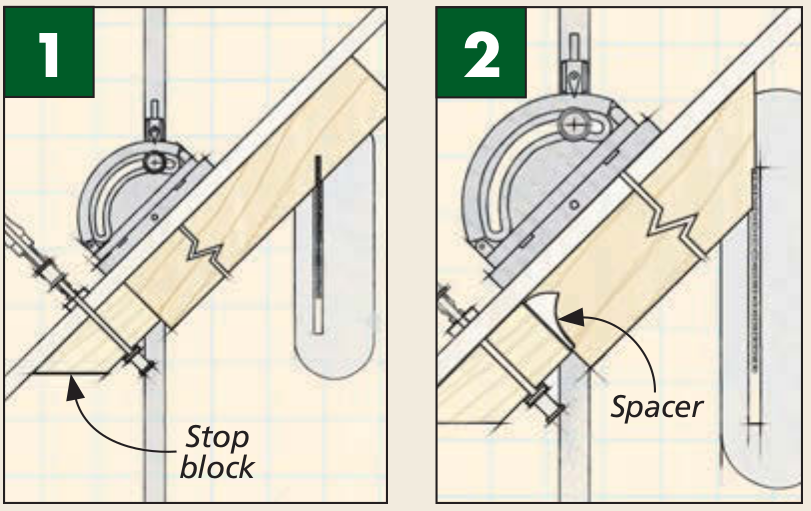
First Cut. Using the square end of the stop block, set the rough length and make the first cut. Then, insert a spacer to make the skim cut.

Final Cut. After resetting the miter gauge to the opposite side, use the mitered side of the stop block and repeat the procedure on this end.
How-To: Glue Up a Mitered Frame

Tape. For many frames, all you need is a strip of painter’s tape on each corner to hold the joint while the glue sets up.

Band Clamp. Band clamps are made for miters. You can use a band clamp with corner blocks for a flawless assembly.

Jig. A simple assembly jig gives you a flat surface and a square block to use as a reference for gluing up the miters.


