

For frame and panel construction, stub tenon and groove joinery is hard to top. It’s quick, strong, and very “table saw friendly.”
One of the keys to building a long-lasting project is choosing the best joinery at each stage. My goal here is strong, snug-fitting joints with the least amount of time and effort. This is why time and again I call on stub tenon and groove joinery for frame and panel assemblies. The entire job can take place right at the table saw, the setups are simple, and the results are top-notch.
THE ADVANTAGES.
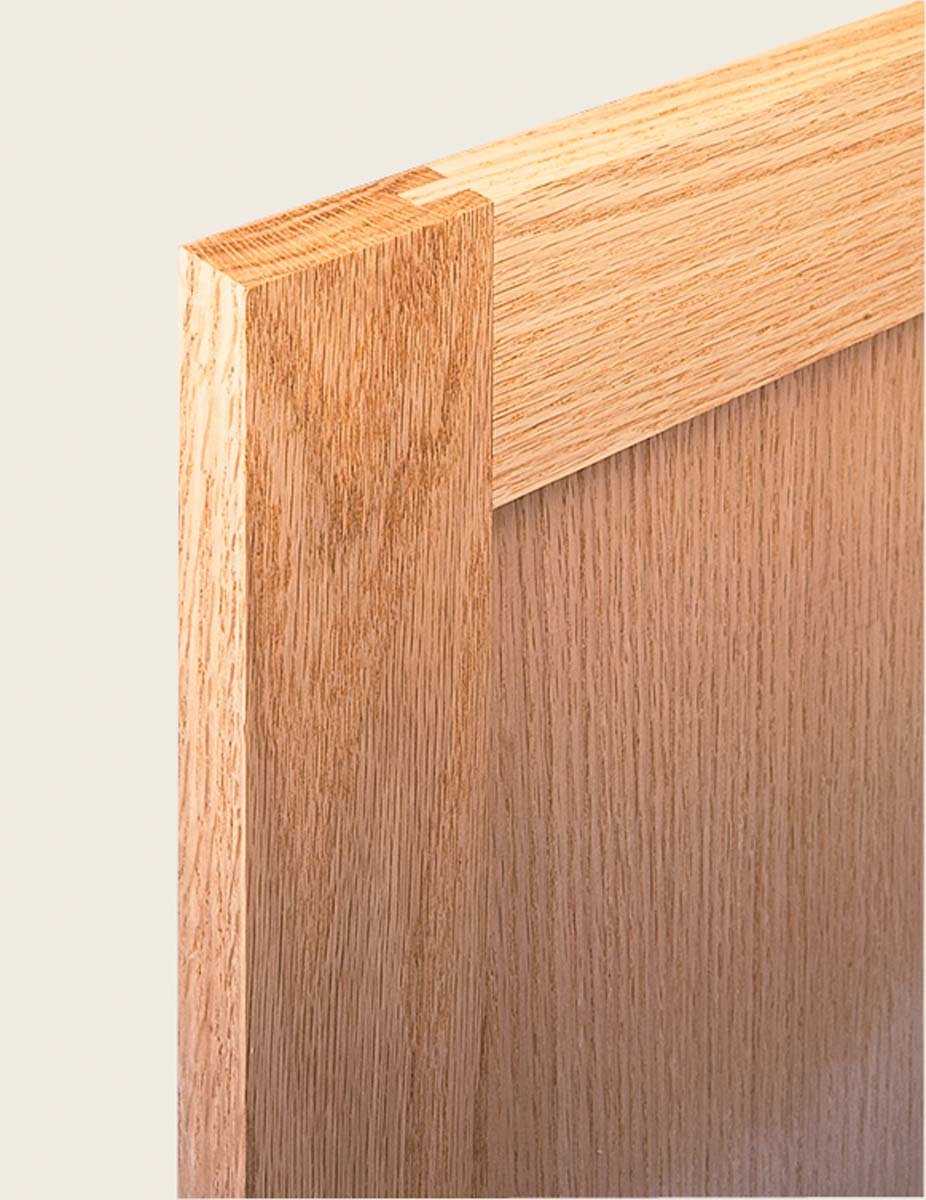
A stub tenon and groove is similar to a mortise and tenon, but there are a couple of things that set it apart. The main difference is that a shallow, continuous groove is substituted for a deep mortise. Cutting a centered groove at the table saw is easier and faster than drilling out and cleaning up a mortise. And since the groove is continuous along the workpiece, it can hold a tenon at each end, as well as the panel (drawing below).
The smooth, consistent groove then makes cutting and fitting the short, mating stub tenon an easier task. Finally, at the end of the job, the assembly of a stub tenon and groove joint is very forgiving. The tenons can be easily aligned in the groove for a tight, square assembly.
CONSIDERATIONS.
 Before going to the following page to learn the technique, let me mention a couple of points. First, I often use plywood for the panel and glue it into the frame. This adds extra strength to the assembly. However, if you use solid wood panels, they should “float” in the frame, without glue.
The thickness of the panel determines the width of the groove in the rails and stiles. So if you use plywood for the panel, be sure to size the groove to fit. The depth of the grooves can vary from a minimum of 1⁄4" to a maximum of 5⁄8". If the groove is shallower, the joint won’t have enough “bite.” If it’s deeper, you’ll start to weaken the wood.
THE GROOVE
The first step is to cut the grooves in all four of the frame pieces (stiles and rails). The grooves need to be centered in the pieces, cut to the right width (to match the panel thickness), and the right depth. You can accomplish all this with a simple table saw setup.
You’ll see the basics in Figure 1. The setup consists of the rip fence, a featherboard, and either a standard blade or a dado blade. This choice is governed by the width of the groove. If the groove is 1⁄4" or less, I use a standard blade. For anything over 1⁄4", I’ll put on a dado blade slightly narrower than the groove.
THE TECHNIQUE.
 The key to centering the groove is to cut it with two passes, using the rip fence as a guide. You cut one side of the groove in the first pass, then rotate the piece end-for-end to cut the opposite side. Since both cuts are registered from the fence, the groove is always centered (Figure 1a). The featherboard ensures the workpiece is held snug to the fence and the cuts are accurate.
SET UP.
 A test piece or a workpiece can be used to set the blade height and the fence position. This is a cut and test process. Start by setting the blade a bit low and adjust the fence so that the first cut will fall near the middle of the workpiece. Make a set of passes, then check the depth of the groove. Adjust the blade height, make a second pair of passes, and so on, until the depth of the groove is dead-on.
At this point, the width of the groove will be undersize. So adjust the fence setting and repeat the set of cuts until the panel is a snug, but easy, fit in the groove (Figure 2). Now, you can cut identical grooves in the rest of the pieces.
THE STUB TENON
With the grooves completed, you can use them as a gauge for the stub tenons you’ll cut on the ends of the rails. The table saw setup used to cut the tenons is shown in Figure 3.
 A dado blade, wider than the length of the tenon, is buried in an auxiliary rip fence. This way, the fence can act as an end stop to gauge the length of the tenon while the dado blade cuts one cheek in a single pass. An auxiliary fence is attached to the miter gauge to back up the cut and prevent chipout.
FIRST, ADJUST.
Once the saw is ready to go, you’ll start by adjusting the blade height, then the rip fence. The height of the blade determines the thickness of the tenon and its fit in the groove. So I always make certain to get this right. Start by setting the fence “close” with the blade a little bit low. Make a cut across the tip of one rail, flip it over and make a matching cut across the opposite face. Be sure you press down firmly on the workpiece so you get a full-depth cut.
Compare the tenon to the groove to judge how much to raise the blade for the next trial. Then simply sneak up on the fit until the tenon slides snugly into the groove. Now use the same method to adjust the fence and establish the length of the tenon (Figure 3a).
 Here, you can test the fit directly to the groove (Figure 4). To ensure a tight assembly, the tenon should be a hair short of bottoming out. When the fence is positioned, you can cut the tenons on all the rails. Concentrate on keeping the end of the workpiece snug against the rip fence and flat against the table.
ASSEMBLY.
 |
| Your efforts will be rewarded with a flush, tight-fitting assembly. |
Once the tenons are cut and the panels sized, the assembly goes quickly. I position the panel in one stile, add a rail at each end, and finally the remaining stile. After checking the alignment of the parts, a pair of clamps completes the job (main photo). And you’ll find that for the small investment of time, the return is pretty impressive.


