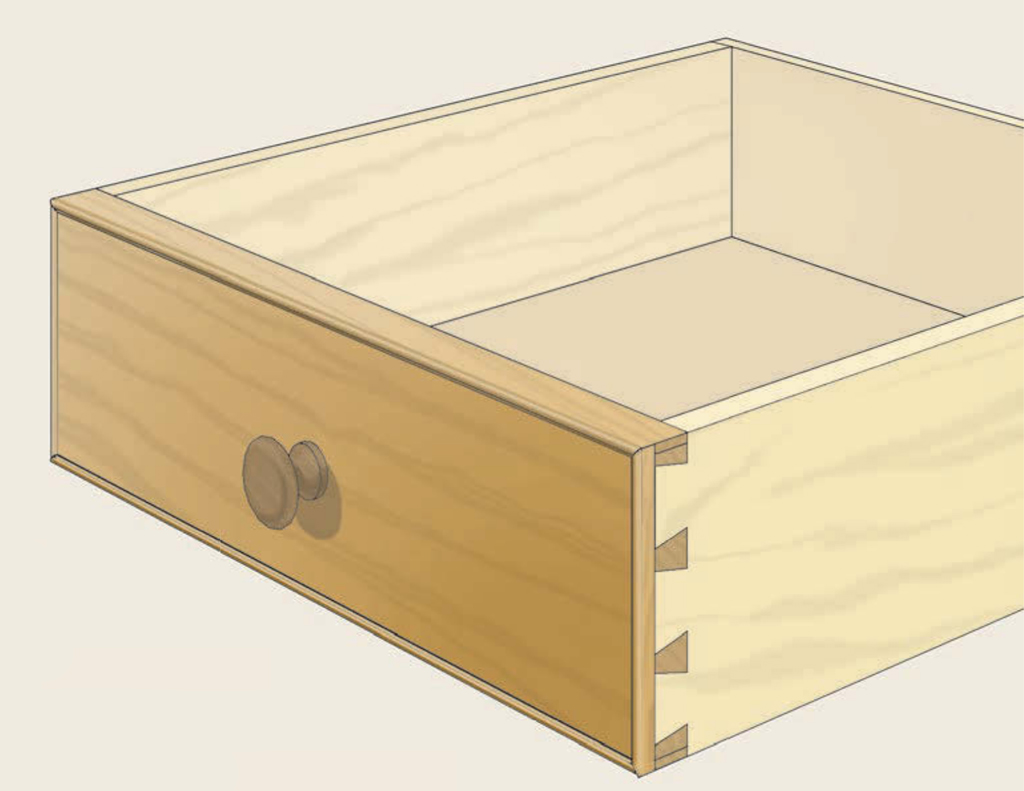
The chest of drawers on page 32 features cock bead (bead that stands proud of the surface) framing the drawer openings in the case. The applied bead adds pleasing depth and detail to the flat front of the case. In this instance, the beading was simply mitered to fit inside the drawer openings and then glued in place. This is a commonly used, tried-and-true method of adding cock beading to a project.
However, framing the case openings isn’t the only way to incorporate this detail into a design. Another option is to wrap cock beading around the dovetailed drawer fronts. This technique offers virtually the same appearance.

WHY & WHEN? A couple of natural questions are: “Why choose one method over the other? And what are the pros and cons of each?” Of the two techniques, applying the cock beading to the drawer openings is initially easier. The beading is simply mitered to fit. However, the cock bead changes the size of the openings and this requires adding extra runners and kickers to the inside of the case.
When the cock bead is added directly to the drawer front, you avoid this extra work. And in my mind, the finely crafted look of a drawer front fitted with a narrow cock bead just can’t be beat.
There are trade-offs. First, fitting the beading to a dovetailed drawer in this traditional way involves more finicky work. And second, the use of this technique is limited by the drawer height.
The beading applied to the sides of the drawer front will always run “cross-grain” to the front. A large amount of expansion or contraction across the front may cause the mitered corners of the beading to open or the beading to pop loose. For this reason, this technique is best used on drawer fronts no more than about 6" in height. This is one reason this technique wasn’t practical for the chest of drawers.
But it never hurts to know more than one way to skin a cat. So I’ll offer a quick lesson on adding cock beading to a dovetailed drawer.
HOW IT WORKS. A look at the exploded view drawing at left will give you a basic idea of what’s involved. And the drawings on the opposite page fill in the details.
In a nutshell, the drawer front is rabbeted to hold the beading. Fullwidth beading is applied to the top and bottom of the drawer while narrower beading is fit to sides. This way, the attractive dovetail joinery is not covered over. The key to fitting the beading is cutting stopped miters on the ends of the top and bottom pieces.
GETTING STARTED. You start by building the drawer to fit the opening using half-blind dovetails. The beading is fit (let in) and installed after the drawer is assembled. And as I mentioned, the cock beading on the sides won’t cover the dovetails. Also, keep in mind that once the beading is installed, you can’t trim the drawer without affecting the appearance of the bead.
THE BEAD. The cock bead should fit flush to the perimeter of the drawer front. So before cutting the rabbets, you’ll want to have the bead in hand. This allows you to size the rabbets accordingly.
For the best appearance, the bead should be fairly thin — 1 ⁄ 8 " to ⁄ 16 " thick. Initially you can make all the bead the same width. The side pieces will be trimmed down at the time of fitting. The width of the bead is sized so that only the rounded profile stands proud.
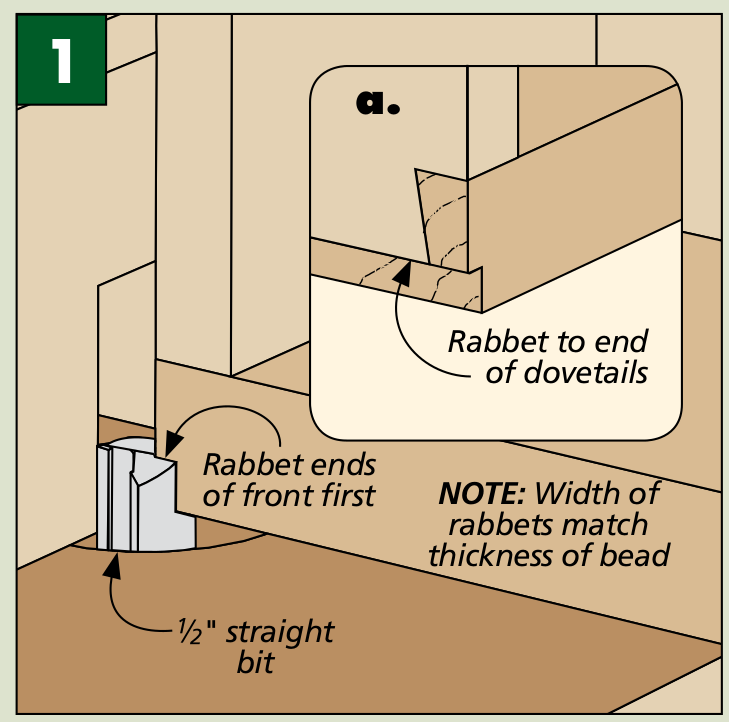
“RABBET” THE FRONT. To make room for the bead, the top and bottom edges of the front are not actually rabbeted, but are trimmed through the entire thickness. The bead will fit flush to the inside face of the front and there will be no joint visible from above or below. The sides are simply rabbeted back to the ends of the dovetails.
Although there are a number of ways to remove the waste, my first choice is a straight bit in the router table. Figures 1 and 2 give you the idea. Start with the ends. This way, any chipout will be removed when you trim the top and bottom. You can use the drawer to adjust the height of the bit. The rabbet should stop at the ends of the dovetails. A test piece can be helpful to get the width of the rabbet right.
When trimming the top and bottom edges, I set the bit slightly low ( 1 ⁄ 32 " to 1 ⁄ 16 ") to avoid cutting into the sides. The remaining thin edge can be pared away after routing.
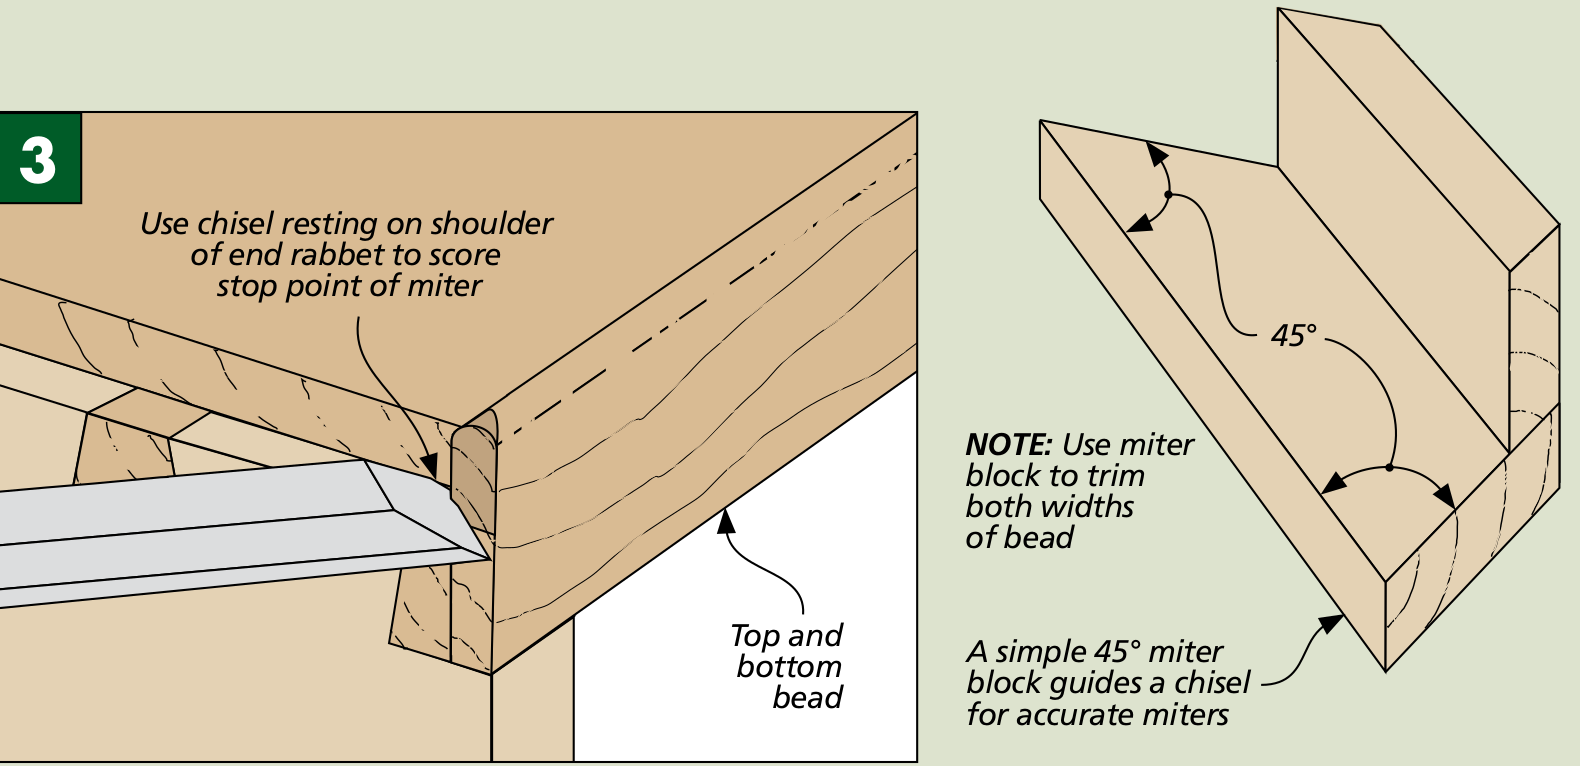
FITTING THE BEAD. Now you’re ready to miter the bead around the front. This just takes care. Since the top and bottom bead are wider, a stopped miter is required on these pieces, as shown in the Exploded View on the opposite page.
I like to work around the front, fitting each corner in order. Start by squaring up one end of the top piece. Set it in place and use the side rabbet to mark the end point of the miter, as shown in Figure 3.
You can use a simple miter block and a chisel to gradually pare the stopped miter. Just be careful to stop the miter cut at your mark.
Next, with the side bead pieces trimmed to width, use the miter block to pare a mating miter on a side piece. Then move to the corner below and repeat the process.
You want to fit all the pieces before attaching any of the bead. And when ready, the bead can be glued and clamped in place. Finally, I like to reinforce the “end grain” joints between the side pieces and the drawer front with brads. This ensures all that fine work will hold up for a lifetime and more.
How-To: Make Beaded Drawers