


Building a Custom Infill Shoulder Plane
There's something especially satisfying about building a woodworking tool you'll actually use. And when that tool combines traditional metalworking, fine hardwood, and a little creative design, the process can be just as rewarding as the finished result.
This custom infill shoulder plane started with a leftover brass body from an old ShopNotes project. The two sides were already dovetailed to the sole, but that was about it.
Rather than let the unfinished plane go to waste, I brought it home, where it sat in a drawer for several years. I even tried giving it away a couple of times.
Eventually, I decided it was time to finish the project. But instead of simply following the existing design, I wanted to create something a little different.
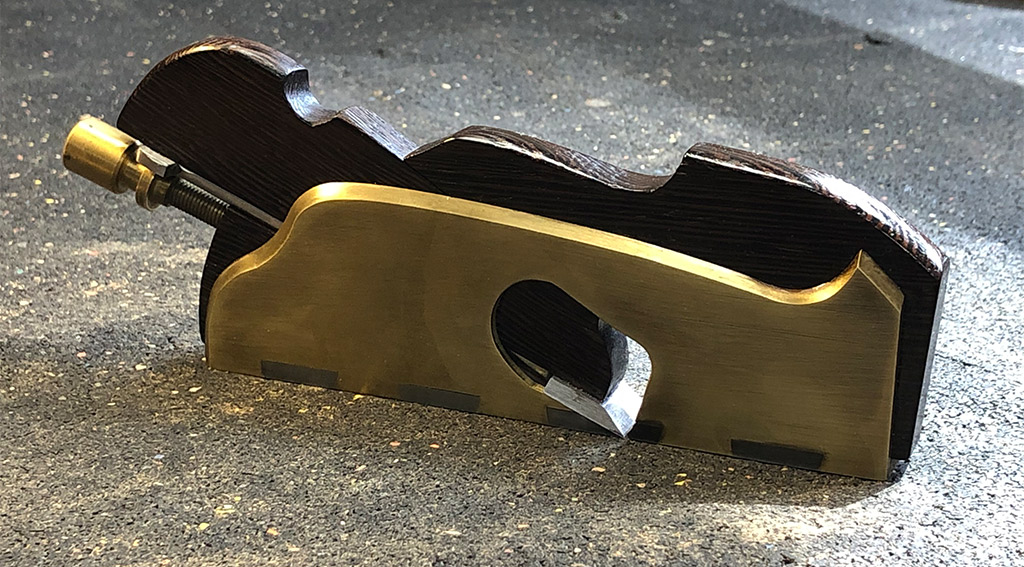
The result is a custom shoulder plane with a reshaped brass body, wenge infill, mechanical blade adjustment, and a profile inspired by several classic and modern hand planes.
Starting with a Dovetailed Shoulder Plane

The starting point was a dovetailed brass plane body made for a ShopNotes project.
Traditional infill planes often feature metal sides and a sole joined with dovetails. Hardwood components fill portions of the body, providing support for the blade while also shaping the tool's appearance and feel.
The original ShopNotes shoulder plane design drew inspiration from a classic Spiers plane.
Following that design would have been the quickest way to complete the tool. But since I already had the basic body, I decided to take the opportunity to customize it.
I wanted a plane that retained the traditional brass-and-wood construction while incorporating some of the more contemporary styling found on modern premium hand planes.
FEATURED PLAN: Build Your Own Dovetailed Shoulder Plane
A shop-made shoulder plane is a rewarding project for woodworkers who enjoy building their own tools. The Dovetailed Shoulder Plane plans provide the starting point for creating a custom hand plane with traditional metal-and-wood construction.
Designing a Custom Shoulder Plane Profile

One of the most enjoyable parts of building a custom tool is deciding how it should look.
The original design had a traditional Spiers-inspired profile, but I wanted to explore some alternatives.
After sketching several shapes, I settled on a design that blended elements of Veritas shoulder planes with the flowing forms found on Sauer & Steiner planes.
The biggest change involved the wooden infill.
Letting the Wenge Infill Stand Out

On many traditional infill shoulder planes, the wooden components sit mostly inside the metal body. You see some of the wood, but the metal sides dominate the appearance.
I wanted the opposite effect.
By allowing the wenge infill to rise above the brass sides, the wood becomes a major part of the plane's profile.
The front infill and blade wedge work together to establish the silhouette, giving the plane a distinctive shape.
Wenge was a natural choice for the infill. Its dark color creates a strong contrast with the brass, and the finished combination gives the tool a classic appearance with a contemporary twist.
The goal wasn't simply to make the plane look different. I wanted the wood and metal components to feel like parts of a unified design.
Fitting the Blade to the Plane Body
A shoulder plane needs a precisely fitted blade to do its job well.
Unlike a typical bench plane, the cutting iron on a shoulder plane extends to the sides of the body. This allows the blade to cut right into the corner of a rabbet or against the shoulder of a tenon.
That feature is what makes a shoulder plane so useful for fine-tuning joinery.
On this project, however, the brass body was wider than the blade paired with it.
Rather than leave the mismatch, I needed to narrow the body to suit the cutting iron.
Sanding the Brass Body to Width
As it turned out, bringing the body down to the correct width was one of the most time-consuming parts of the project.
I used a drill press edge sander to gradually remove material from the sides of the brass body.
This allowed me to work toward the final dimensions while keeping the sides straight and even.
The important detail was to maintain a consistent relationship between the blade and the sides of the plane.
A shoulder plane works best when the blade can cut flush with, or project just slightly beyond, the sides of the body.
That way, the plane can trim the full width of a rabbet or tenon shoulder without leaving a narrow ridge behind.
WOODSMITH TIP: Check the Blade Fit Before Final Shaping. When building a shoulder plane, establish the relationship between the cutting iron and the plane body before completing the final shaping and finish work. Getting the width right early helps avoid unnecessary adjustments after the plane has been polished and assembled.
Shaping the Brass Shoulder Plane Body
With the body sized to the blade, the next step was creating the final profile.
The brass alloy used for projects like this is a free-machining variety that cuts relatively cleanly without gumming up cutting tools as readily as some other brass alloys.
That makes it practical to shape with common shop equipment, provided the tools and cutting methods are suitable for nonferrous metal.
I cut the basic shape of the body at the band saw.
Then I used a combination of router work and hand filing to create the chamfers and refine the edges.
The files were especially useful for blending transitions and getting the details just right.
This was one of those projects where taking a little extra time with the final shaping made a noticeable difference in the appearance of the finished tool.
Adding Mechanical Blade Adjustment
One feature I particularly like about the ShopNotes shoulder plane design is its mechanical blade adjustment.
Some traditional infill planes rely on tapping the blade with a small hammer to adjust cutting depth.
That approach works, but I prefer the convenience of a mechanical adjustment.
It makes it easier to fine-tune the blade projection when switching between heavier cuts and the very fine shavings needed to fit joinery.
The adjustment mechanism looked like one of the more complicated parts of the project, but it turned out to be easier to make than I expected.
It's a feature I'm glad I kept in the updated design.
Finishing the Brass and Wenge
Once the metal shaping was complete, I sanded the body to 220 grit.
Freshly worked brass can have a bright, almost flashy appearance. That wasn't quite the look I wanted for this plane.
Instead, I used a brass aging solution to darken the metal and tone down the shine.
A little dark wax helped complete the effect.
The result is a more subdued brass finish that complements the dark wenge.
Finishing the Wooden Infill
The wooden components received several coats of clear shellac.
Shellac is a good choice for a small project like this because it applies easily, dries quickly, and brings out the natural character of the wood.
The clear finish enhances the wenge without hiding its dark color or grain.
Together, the aged brass and shellac-finished wood give the plane a distinctive appearance.
WOODSMITH TIP: Test Metal Finishes First. Brass aging solutions can produce different results depending on the alloy, surface preparation, and application. Before treating a completed tool, test the solution on a scrap of the same metal. Follow the product's safety and application instructions, and make sure the metal is clean before applying the treatment.
A Shop-Made Shoulder Plane That's Ready for Work
This shoulder plane took longer to complete than I originally expected.
Some of that time went into shaping and fitting the parts. But a surprising amount was spent deciding exactly what I wanted the finished tool to look like.
That's part of the appeal of building your own hand tools.

You have the opportunity to create something that's suited to the way you work, right down to the smallest details.
And in this case, the effort was worth it.
The completed shoulder plane looks great, feels good in the hand, and performs the joinery tasks it was designed for.
It also makes a nice companion to another rescued ShopNotes project — a shop-made block plane.
Both are reminders that sometimes the most rewarding projects begin with parts that might otherwise have been discarded.
Build Your Own Shoulder Plane
Whether you're cleaning up a rabbet, trimming a tenon shoulder, or fine-tuning a joint, a shoulder plane is a useful addition to any woodworking shop.
And building one yourself adds another level of satisfaction.
The Dovetailed Shoulder Plane plans provide a starting point for creating your own shop-made hand plane. Follow the design or use it as inspiration for a custom version that reflects your own woodworking style.
BUILD A DOVETAILED SHOULDER PLANE → A Custom Hand Tool for Precision Joinery
Learn How to Use a Shoulder Plane
A shoulder plane is one of the most useful tools for refining joinery. Learn how to trim tenon shoulders, clean up rabbets, and fine-tune machine-cut joints for a better fit.
EXPLORE JOINERY PLANE TECHNIQUES → Get More Precision from Your Hand Tools


