


The jointer is a deceptively simple tool. All there is to using one is to turn it on and run your workpiece over the top. If everything is adjusted properly, you end up with a flat, straight edge (or face).
But when you don’t get the results you expect, tracking down the cause of the problem can be a real exercise in frustration. This is because more than most other tools, a jointer requires precise alignment and setup in order to work properly.
Fortunately, most of the time the remedy is fairly simple. But determining the problem is half the battle. So here’s a look at some of the more common jointer problems you may encounter and some steps on how to go about fixing them.
Tapered Cuts
When jointing the edge of a board, a common problem is ending up with a tapered cut. In some cases, this can be caused by infeed and outfeed tables that aren’t parallel.
But a more common (and easier to fix) cause is an outfeed table that is just a bit higher than the jointer knives. As the board travels over the cutterhead, the outfeed table acts like a ramp, lifting the workpiece ever so slightly. After making several passes, the board will start to show a pronounced taper.
The solution is to lower the outfeed table so that it’s level with the height of the knives. To do this, place a straightedge on the outfeed table so it extends over the cutterhead. Then rotate the cutterhead by hand until one of the knives is at top dead center.
Next, loosen the table lock (usually found on the back of the jointer) and turn the table adjusting knob (or lever) until the straightedge just barely contacts the knife.


Snipe
An outfeed table that is too low can lead to a different kind of problem — snipe. In this case, the jointer will work just fine through most of the cut. But once the trailing end of workpiece leaves the infeed table, it “drops” onto the outfeed table and the knives take a deeper cut along the last couple inches, as shown in the drawing at right.
Here again, you can verify the problem by using a straightedge to check the height of the outfeed table in relationship to the knives. If the table is too low, simply raise it using the adjustment knob.

Scalloped Cuts
When properly adjusted, a jointer should leave a straight, smooth surface that doesn’t need any sanding or touching up. But it’s not unusual to discover a series of scallops or ripples along the freshly jointed edge of a board. Dull jointer knives can often be the cause of this. But if your knives are sharp, there are a couple of other things to look for.
FEED RATE. Each knife takes a small, circular “bite” out of the wood. Ordinarily, these bites overlap so that you can’t tell where one ends and the next one begins. But if you run a workpiece over the jointer too quickly, it can leave scallop marks. So the first thing to do is simply slow down the feed rate to see if that solves the problem.

KNIFE HEIGHT. If slowing down doesn’t get rid of the problem, chances are one of the knives is sitting a little bit higher in the cutterhead than the others. With each revolution of the cutterhead, the raised knife takes a slightly deeper cut than the others.
You can determine which knife is the culprit by using a straightedge and a set of feeler gauges. Then it’s simply a matter of loosening the knife gib bolts and adjusting the height of the knife, just as you see in the photo shown at left.


Out of Square Edges
One of the primary functions of a jointer is to create a straight edge that is square with the face of the board. A jointer that can’t do this isn’t of much value.
Most out of square problems can be traced to fence alignment issues. The first step in fixing this problem is to do a simple check of your fence. Using an accurate square, check your fence at several points along its length to make sure that it’s truly square to the jointer tables. If it’s not, adjust the stops on your fence according to your owner’s manual until the fence is square.

Occasionally, you’ll find a fence that isn’t flat. A slight bow or crown in a jointer fence shouldn’t really affect accuracy. But a jointer fence that’s twisted or warped will make it nearly impossible to joint a square edge.
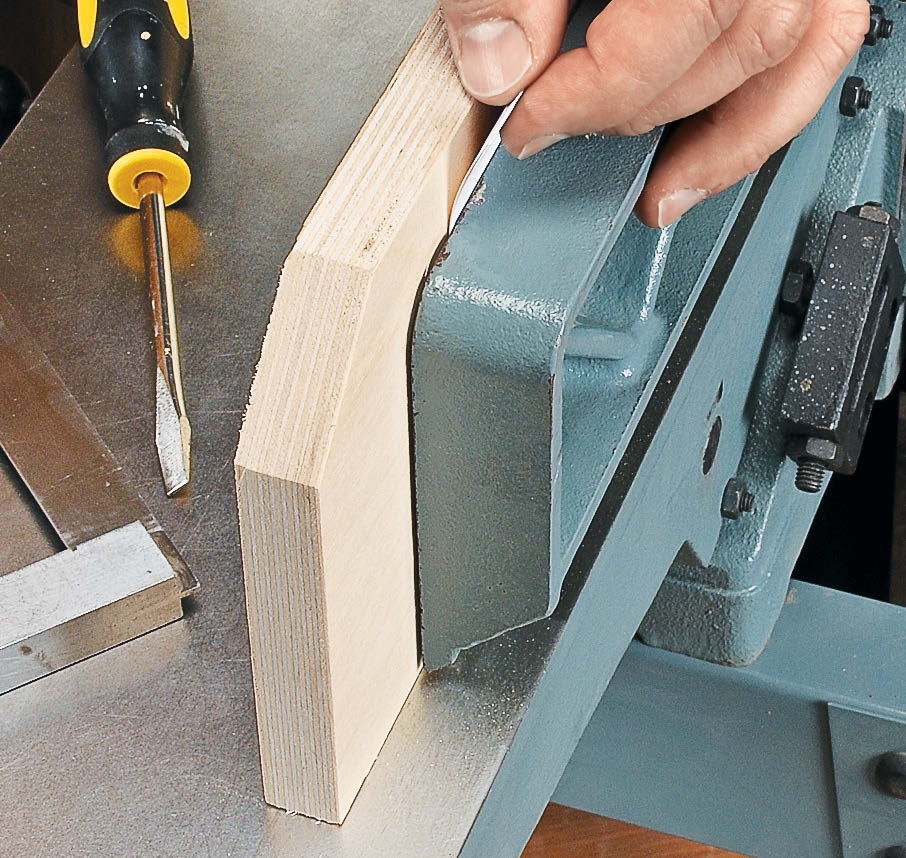
You may be able to take a warped fence to a machine shop to have it ground flat. But a less expensive option is to add an auxiliary face.

To do this, simply cut a piece of 3 ⁄ 4 " plywood or MDF slightly longer and taller than the fence of your jointer. Then just attach it to the fence with bolts (lower left photo). (You may have to drill a couple of holes in the fence to attach the face.) Then you can place paper or cardboard shims behind the auxiliary face to square it up with the jointer tables (right photo).
Surface Ridges
Sooner or later, you’re going to get a nick in your jointer knives, resulting in a ridge along the jointed surface of the workpiece. But rather than resharpening the knives, there are a couple of other options.
If you’re just edge jointing, it’s simple enough to move the fence over so that you’re using a different portion of the knives. But when you’re jointing the face of a board, that isn’t always possible.
OFFSET KNIVES. In this case, you can often eliminate the ridges by slightly shifting one of the knives in the cutterhead. This offsets the nicks in the blades just enough so that they’re no longer lined up, eliminating the ridge.
There’s just one thing to be aware of. If you use the rabbeting arm or ledge on your jointer for cutting rabbets, offsetting the knives will affect the width and accuracy of your finished rabbets.

How-To: Align the Tables
Most jointer problems can be remedied with a basic tuneup and some routine adjustments. But on occasion, you may run into a problem requiring more than a quick fix.
COPLANER TABLES. In order for a jointer to work properly, it’s essential for the outfeed and infeed tables to be perfectly parallel, or “coplaner.” If they aren’t, you can end up with one of a number of problems, from tapered cuts to cuts that are concave or convex.
Ideally, a jointer is checked for coplaner tables before it leaves the factory. However, over time, it’s possible for the infeed and outfeed tables to sag out of alignment. The good news is that as long as the table castings aren’t warped or twisted, most alignment problems can be remedied.

STRAIGHTEDGE. In order to check your jointer tables for coplaner alignment, you really need a quality, accurate straightedge — the longer the better.
Start by using the straightedge to check each table individually. Be sure to check at several spots, both diagonally as well as along its length. The goal here is to make sure that both tables are flat.
Once you’ve finished with this check, raise the infeed table so that it’s level with the outfeed table. Now, place the straightedge across both tables to see if they are coplaner across the entire length. (Here is where you really need a long straightedge.) Again, make this check near the edge of the tables and in the center. Then check diagonally as well.

If the tables aren’t coplaner, you’ll notice gaps between the straightedge and the surface of the table. Sometimes this misalignment can be caused by something as simple as sawdust and debris that has built up on the dovetailed ways that the tables slide on. You can clean the ways by lowering the tables and brushing out the debris with a nylon or brass bristle brush.
SHIMMING.
On older jointers, it’s fairly common for the tables to start to sag and droop over time, usually at the ends. If this is the case with your jointer, you can bring the tables back into alignment by shimming.
To do this, you can use brass shim stock (available from machinery supply dealers) or even aluminum cut from a soft drink can. Just loosen the gib screws along the edge of the table and slip the shim stock in place between the table casting and the dovetailed ways, as shown in the photos below.
You’ll need to shim the table along both sides. To raise the end of the table, place the shims near the bottom of the ways. To raise the table near the cutterhead, place the shims near the top of the ways.


