



How to Make a Locking Miter Joint with a Table Saw
Miter joints are a great way to join two workpieces at a right angle while creating a clean, seamless corner. But traditional miters have one drawback: They don't offer much strength on their own.
You can reinforce a miter with splines or biscuits, but there's another option that combines the attractive appearance of a miter with the mechanical strength of an interlocking joint.
It's called a locking miter joint.
This specialized woodworking joint is particularly useful for plywood cabinets, cases, and drawers. The interlocking tongue-and-dado construction provides additional glue surface and helps hold the pieces together during assembly.
Best of all, you can cut a locking miter joint entirely on the table saw. All you need is a dado blade, a standard saw blade, and a simple auxiliary fence.
The process involves six cuts, but the setup is easier than you might expect. After making the first cut, you can use the workpieces themselves to establish many of the remaining settings.
Here's how to make strong, tight-fitting locking miter joints in your own shop.
What Is a Locking Miter Joint?
A locking miter joint combines features of two familiar woodworking joints: a traditional miter and a locking rabbet.
Like a locking rabbet joint, it uses a tongue on one workpiece that fits into a dado cut in the mating piece.
The difference is that the outside corner is mitered.
This conceals the interlocking joinery and creates the appearance of a traditional 45° miter.
When assembled, the two pieces form a clean 90° corner without exposed plywood edges or end grain.

Why Use a Locking Miter Joint?
A locking miter offers several advantages over a standard miter joint.
Stronger corners. The interlocking tongue and dado provide a mechanical connection that helps reinforce the joint.
More glue surface. The additional mating surfaces provide more area for a strong glue bond.
Clean appearance. The outside corner looks like a traditional miter, with no exposed plywood edges.
Easier clamping. The interlocking construction allows you to clamp the joint in one direction rather than having to apply pressure from two directions.
Table saw construction. You can make the joint without a specialized lock-miter router bit.
Although it's not a joint you'll necessarily use every day, it's a useful option when building strong, mitered cases.
Where to Use Locking Miter Joints
Locking miter joints work especially well for plywood case construction.
The mitered outside corner conceals the plywood edges, while the interlocking tongue and dado strengthen the assembly.
They're also useful for drawers because the joint provides a mechanical lock in one direction.
Some good applications include:
- Plywood cabinets and storage cases
- Drawer boxes
- Small furniture cases
- Boxes with exposed corners
- Projects where a traditional miter needs additional strength
For the example shown here, the joint is cut in 3/4"-thick plywood with a 1/4"-wide tongue and dado.
The dimensions can be adjusted to suit other material thicknesses.
Before You Start: Prepare the Workpieces
Accurate locking miter joints begin with properly prepared stock.
Because the joint includes several interlocking surfaces, small errors can affect the final fit.
Start with Square Ends
Make sure all the workpieces have square ends before cutting the joinery.
If the ends aren't square, the joint may not close properly or the outside corner may develop a gap.
Check the pieces before setting up the table saw.
Make Test Cuts First
Cut a few extra pieces from the same material you'll use for the project.
These test pieces allow you to check the dado width, tongue thickness, and miter alignment before cutting the finished parts.
This is particularly important when working with plywood because its actual thickness may differ slightly from the nominal dimension.
Sneak Up on the Final Fit
Rather than trying to remove all the material in a single setup, make small adjustments where possible.
Test the fit after each critical operation.
Once the tongue and dado fit correctly, the remaining miter cuts are easier to dial in.
Woodsmith Tip: The workpieces themselves make useful setup gauges. After the first cut, you can use the dimensions of the mating parts to establish several of the remaining cuts without relying on layout measurements.
Step 1: Cut the Dado in the Side Piece
The first cut establishes the dado that receives the tongue on the mating workpiece.
Install a dado blade set in your table saw.
For the 3/4"-thick plywood shown here, use a 1/4"-wide dado blade setup.
Position the rip fence using one of the workpieces as a gauge, as shown in the drawing.
The dado is cut on the inside face of the side piece, near its end.
Make the cut, then check that the dado is clean and consistent.
This groove will receive the tongue formed on the front piece in the next step.

Woodsmith Tip: Make the first dado cut in a test piece. Its position and width establish the geometry for the rest of the joint.
Step 2: Cut the Slot to Form the Tongue
The second cut creates the tongue that fits into the dado.
Keep the dado blade installed.
Raise the blade to match the thickness of the stock, then position the rip fence to cut a deep slot in the end of the front piece.
This slot separates the inner tongue from the outer portion of the workpiece.
The inner tongue will eventually fit into the dado cut in Step 1.
The outer portion will be shaped into the mitered corner.

Check the Tongue Position
After cutting the slot, compare the workpiece with the dado in the mating side.
The tongue should be positioned to align with the dado when the two pieces form a right angle.
Don't worry about the final tongue thickness yet.
You'll trim it to fit in Step 4.
Step 3: Cut a Rabbet on the Side Piece
Next, cut a rabbet on the end of the side piece.
This rabbet creates clearance for the outer tongue on the front piece.
To make the cut, attach a simple auxiliary fence to your table saw's rip fence.
Position the auxiliary fence so it clears the dado blade and provides a suitable reference surface.
Use the outer tongue on the front piece as a gauge for setting the rabbet depth.
Make the cut, then test the fit.

Why the Rabbet Matters
The rabbet allows the outer portion of the front piece to overlap the side.
Later, the exposed edges of these two pieces will be mitered.
This is what creates the clean outside corner while retaining the interlocking connection underneath.
Table Saw Safety: Use an auxiliary fence and blade setup appropriate for the operation. Keep hands clear of the blade, use suitable workpiece support, and avoid trapping offcuts between the blade and fence.
Step 4: Trim the Tongue to Fit the Dado
With the main dado, slot, and rabbet complete, it's time to fine-tune the tongue.
Remove the dado blade and install a standard table saw blade.
Adjust the saw to trim the tongue on the front piece.
The goal is to create a tongue that fits snugly into the dado cut in the side.

Test the Fit Before Moving On
After trimming the tongue, bring the two pieces together.
The tongue should slide into the dado without excessive force.
If it's too tight, remove a small amount of additional material.
If it's too loose, the joint won't have as much contact between the mating surfaces.
Aim for a close-fitting joint that can be assembled easily once glue is applied.
Getting this fit right now makes the final miter cuts more predictable.
Step 5: Miter the Front Piece
Now it's time to create the visible mitered corner.
Tilt the table saw blade to 45°.
Adjust the rip fence to miter the end of the outer tongue on the front piece.
This cut creates one half of the finished outside corner.

Make the Miter Carefully
Because the miter will be visible on the finished project, accuracy is important.
Make a test cut first.
Check that the cut removes the correct amount of material without affecting the interlocking tongue.
The miter should form a clean edge that will meet the matching miter on the side piece.
Step 6: Miter the Side Piece
The final cut completes the outside corner.
Keep the saw blade tilted to 45°.
Reposition the rip fence to miter the end of the side piece.
This creates the matching bevel that meets the miter on the front piece.

Check the Completed Joint
Bring the two pieces together.
The tongue should seat fully in the dado, and the mitered edges should close to form a clean 90° corner.
Inspect the joint from both sides.
The outside corner should have a tight miter with no visible gaps.
The inside surfaces should align properly, and the interlocking parts should fit without excessive force.
If necessary, make small adjustments to the test pieces before cutting the final project parts.
Tips for Getting Tight-Fitting Locking Miters
A locking miter joint has more mating surfaces than a traditional miter, so accurate setup makes a noticeable difference.
Here are a few details worth checking as you work.
Use Consistent Material Thickness
The dado, tongue, and rabbet are all related to the thickness of the workpieces.
If the plywood varies in thickness, the joint may not fit consistently.
Whenever possible, use material from the same sheet or batch.
Check the Blade Angle
The two outside bevels need to form a 90° corner.
A small error in the 45° blade setting can create a visible gap.
Verify the blade angle with a reliable square or angle gauge before cutting the miters.
Keep the Cuts Clean
Use sharp blades and support the workpiece properly.
Tearout along the mitered edges can prevent the joint from closing cleanly.
This is especially important when working with plywood that has thin face veneers.
Test the Joint After Each Setup
Don't wait until all six cuts are complete to check the fit.
Test the relationship between the dado, tongue, and rabbet as you go.
Once those features fit properly, the miter cuts should complete the joint without requiring major adjustments.
Gluing and Clamping a Locking Miter Joint
One advantage of a locking miter is that the interlocking tongue and dado help align the pieces during assembly.
This also simplifies clamping.
Unlike a splined miter, which may require pressure in two directions, a locking miter can be pulled together with clamping pressure in one direction.
Dry-Fit the Joint
Before applying glue, assemble the pieces without adhesive.
Make sure the tongue seats fully and the mitered corner closes tightly.
Check that the assembly is square.
If the joint requires excessive force, correct the fit before glue-up.
Apply Glue Evenly
Spread a thin, even coat of woodworking glue on the mating surfaces.
Pay particular attention to the tongue and dado.
Avoid applying excessive glue, which can make assembly messy and interfere with a close fit.
Clamp the Joint
Bring the pieces together and apply enough clamping pressure to close the joint.
Check the outside miter for gaps and confirm that the corner remains square.
Allow the glue to cure according to the manufacturer's instructions before removing the clamps.
Locking Miter Joints vs. Splined Miters
Both locking miters and splined miters provide ways to strengthen a traditional miter joint.
However, they accomplish that in different ways.
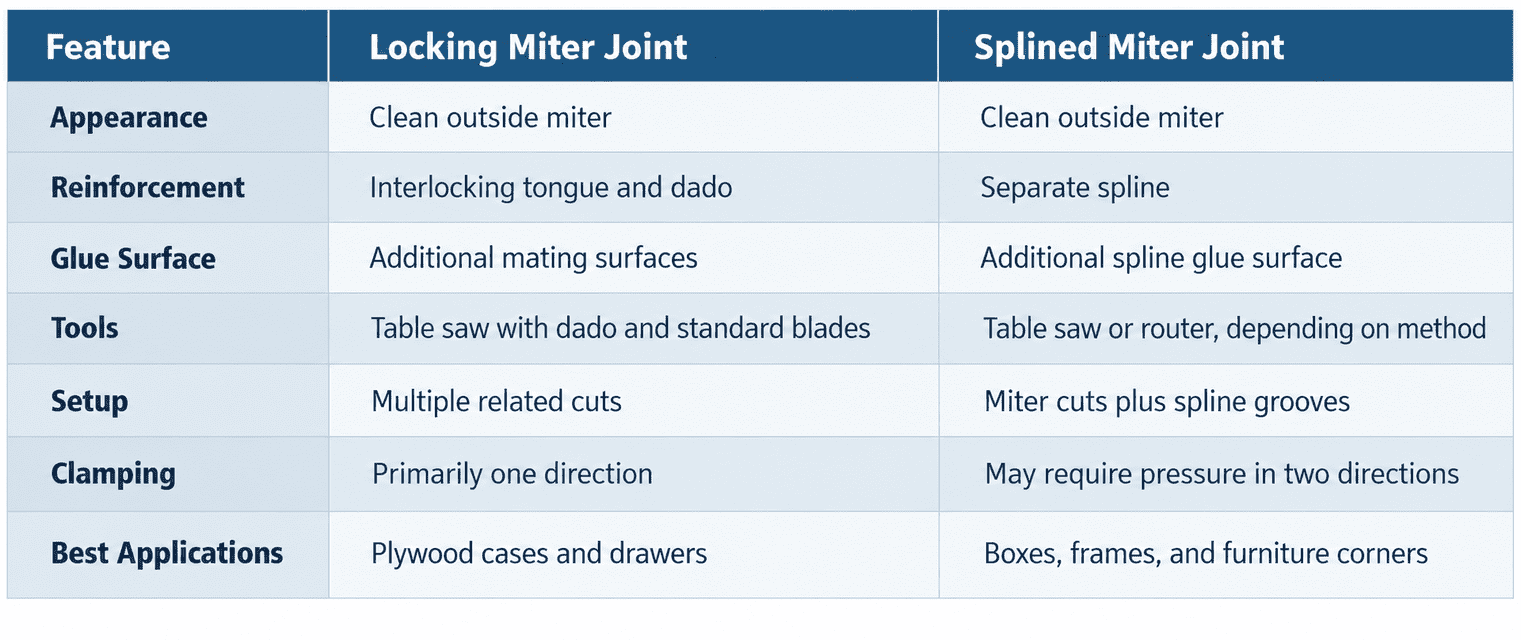
A splined miter is often simpler when you already have the mitered parts prepared.
A locking miter requires more setup, but the interlocking construction makes it particularly useful for casework.
A Stronger Way to Build Mitered Corners
A locking miter joint combines two desirable features: the clean appearance of a traditional miter and the strength of interlocking joinery.
The tongue-and-dado connection provides additional glue surface and helps hold the parts together during assembly.
Although the joint requires several cuts, you can complete the entire process with a table saw, a dado blade, a standard blade, and a simple auxiliary fence.
By starting with square stock, making test cuts, and using the workpieces to establish the setups, you can create accurate locking miters without complicated layout.
It's a useful technique to keep in mind whenever you're building plywood cabinets, drawers, or other projects that call for strong, attractive corners.
How to Cut Spline Slots in Miter Joints

Splines are another effective way to reinforce miter joints while maintaining a clean appearance. Learn how to cut accurate spline slots and create stronger corners for boxes, frames, and furniture projects.
LEARN HOW TO CUT SPLINED MITERS → Add Strength to Your Mitered Corners


