


Build a Router Table Guide for Small Round Workpieces
Routing decorative profiles on small, round workpieces can be a challenge. Unlike larger boards that provide plenty of room for your hands, small circular parts are difficult to control as they move past a spinning router bit.
This is especially true when making wooden toys, where small wheels and other round components often need a decorative edge.
To make these cuts easier to manage, I built this shop-made circular router guide.
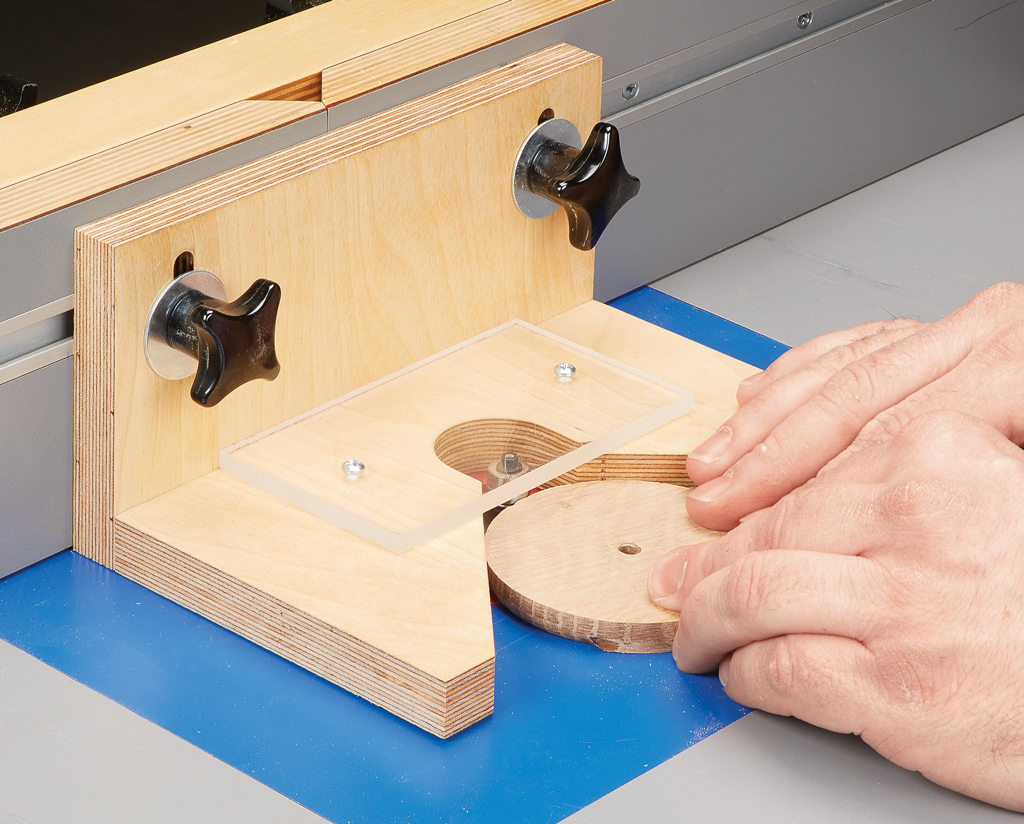
The jig attaches to the router table fence and features a V-shaped opening that helps position small round workpieces during routing. A clear polycarbonate guard provides a view of the cutting area while adding a barrier between your hands and the bit.
It's a simple router table accessory that makes working with small circular parts more controlled and convenient.
How the Circular Router Guide Works
The guide acts as an auxiliary fence for routing small, round workpieces.
Its most important feature is a V-shaped notch cut into the plywood base.
The notch provides clearance for the router bit while helping position the circular workpiece during the cut.
An elongated opening intersects the V-notch to provide additional clearance around the bit.
The guide also includes a clear polycarbonate guard positioned over the cutting area.
Because the guard is transparent, you can see the workpiece and router bit while maintaining a barrier above the opening.
The entire assembly mounts to the router table fence using threaded knobs and T-nuts.
This allows the guide to be adjusted for different workpiece diameters and thicknesses.
Building the Shop-Made Circular Router Guide
The guide is made primarily from plywood, with a few pieces of common hardware.
Its construction is straightforward, and the V-notch can be customized to suit the round parts you typically make.

Step 1: Make the Plywood Base
Start by cutting the plywood base to size.
The base serves as the main body of the guide and provides the surface that supports the workpiece during routing.
Lay out a V-shaped notch along the front edge.
The width of this notch can be adjusted to accommodate the diameter of the round workpieces you commonly rout.
For example, if you frequently make wooden toy wheels of a similar size, you can size the notch to suit those parts.
Step 2: Cut the V-Notch and Bit Clearance Opening
After laying out the V-notch, cut it into the front edge of the plywood base.
Next, make an elongated opening that intersects the notch.
Together, these openings provide clearance for the router bit.
The V-notch helps position the workpiece, while the elongated opening allows the guide to be adjusted relative to the bit.
Take care to keep the edges of the notch smooth and free of splinters.
Step 3: Add the Adjustable Mounting Hardware
The guide attaches to the router table fence using a pair of threaded knobs and economy T-nuts.
Cut slots along the back of the guide to allow vertical adjustment.
The T-nuts fit into the T-track on the router table fence, while the threaded knobs secure the guide in position.
Loosening the knobs allows you to move the guide up or down to accommodate different workpiece thicknesses.

Step 4: Install the Clear Polycarbonate Guard
The final component is a clear polycarbonate guard.
Attach the guard to the plywood guide using two panhead screws.
The guard covers the cutting area while allowing you to see the router bit and workpiece.
Polycarbonate is a good choice for this application because it's transparent and impact-resistant.
Position the guard so it doesn't interfere with the router bit or workpiece during operation.
How to Use the Router Table Guide
Once the guide is assembled, it's easy to install on your router table.
Start by sliding the economy T-nuts into the T-track on the router table fence.
Position the guide near the router bit and tighten the threaded knobs to secure it.
Adjust the router table fence to position the V-notch for the diameter of the workpiece.
The slots in the back of the guide allow you to raise or lower it to accommodate different material thicknesses.

Adjust the Guide for Different Round Parts
One of the advantages of this design is its adjustability.
The V-notch can be sized for the circular parts you work with most often.
The guide can also be repositioned on the fence to accommodate different workpiece diameters.
For woodworkers who frequently make toys, this makes it a handy accessory for routing profiles on small wooden wheels and other round components.
Keep Control of the Workpiece
The main purpose of the guide is to help control small round parts during routing.
The V-notch provides a reference for positioning the workpiece, while the polycarbonate guard helps separate your hands from the cutting area.
However, the guide doesn't eliminate the risks associated with routing small parts.
Shop Safety: Small round workpieces can catch or rotate unexpectedly when they contact a router bit. Use a suitable holding fixture or carrier that positively secures the workpiece, rather than relying on finger pressure alone. Check that the guide, guard, and holding fixture clear the bit throughout the operation. Use the proper feed direction and follow the router manufacturer's safety recommendations.
A Handy Router Table Jig for Small Parts
Routing small circular workpieces requires care, but a simple shop-made guide can make the job easier to manage.
This plywood jig combines a V-shaped opening, adjustable fence mounting, and a clear polycarbonate guard to provide a more controlled routing setup.
It's especially useful for woodworkers who regularly make wooden toys and other projects with small round components.
And because the guide uses basic materials and common hardware, it's an easy addition to your collection of router table jigs.
Build a Small Parts Router Table Sled

Small parts can be difficult to hold securely at the router table. This easy-to-build routing sled uses adjustable blocks and a toggle clamp to hold workpieces in place, providing better control while keeping your hands farther from the spinning bit.
BUILD THE ROUTING SLED → A Better Way to Rout Small Workpieces


