


You can tell how important tools are to a woodworker by how well they’re organized. It’s somewhat of an open secret that we workers of wood dislike the sanding process. As a result, sanding gear often lies jumbled in a dusty bin. I wager that mindset carries into the actual sanding as well.
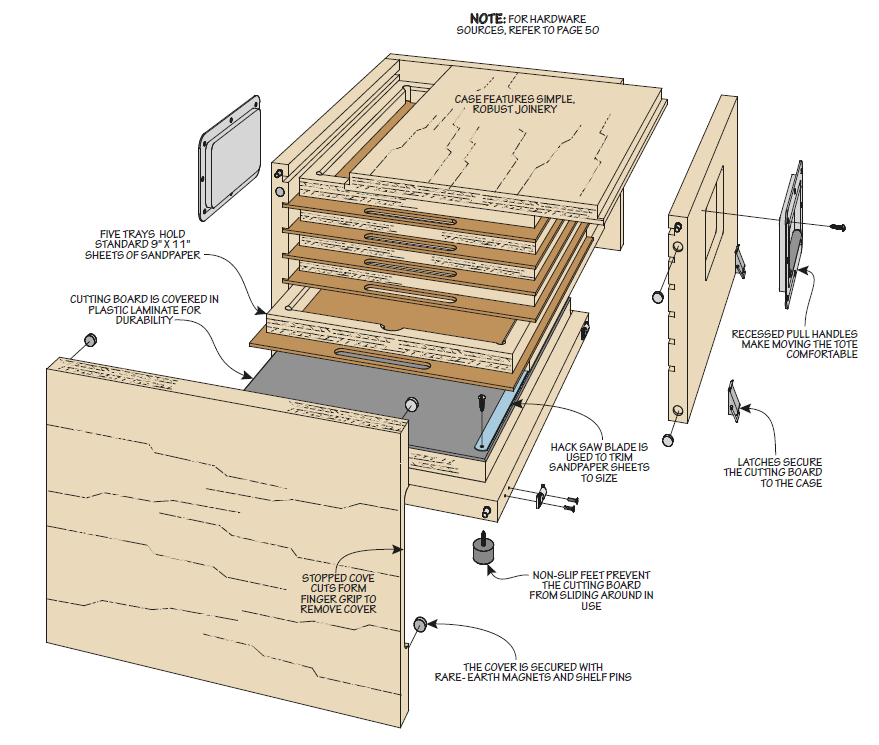
My own experience proves that when I put care into a set of tools, my use of them improves. Design editor Dillon Baker and I talked about this idea and he came up with this compact tote. Shallow trays store and organize sheets of sandpaper. Underneath you’ll find a stowaway cutting platform for making clean, straight cuts — no more tearing a sheet along the edge of your table saw. Handles let you move it around as needed.
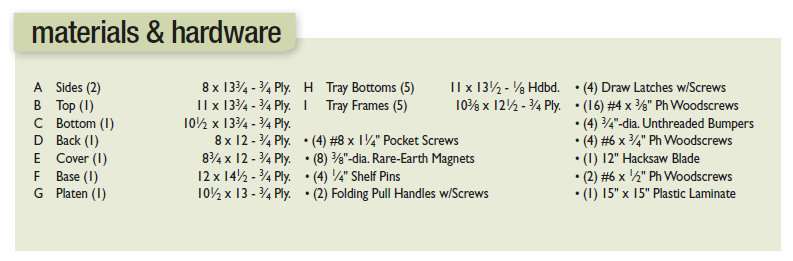
The project is small enough you could likely get all the materials by shopping your cutoff bin. Even if you have to head to the home center, the material list (and overall cost) is minimal.
 Custom Cutter. At the bottom of the tote is a laminate-covered cutting board. An attached hack saw blade helps you trim sandpaper to any size.
SANDING BLOCK.
Several years ago we featured a shopmade sanding block from two-by material. It’s the perfect companion for this tote. You can find free plans for the block at WoodsmithPlans.com.
Casework from Cutoffs
The main part of the project is a plywood case. It houses the trays and stands atop the cutting board. It’s made from five pieces of ¾" plywood.
For most shop projects, I prefer Baltic birch plywood due to its flat, stable nature. It’s what we used here. I get it; Baltic birch can be tough to find and expensive. However the small size of the pieces needed for this project means that you can use any sheet material. In fact, you may be able to scrounge up enough parts from your cutoff bins. It still pays to find the flattest pieces possible.
SIDES COME FIRST.
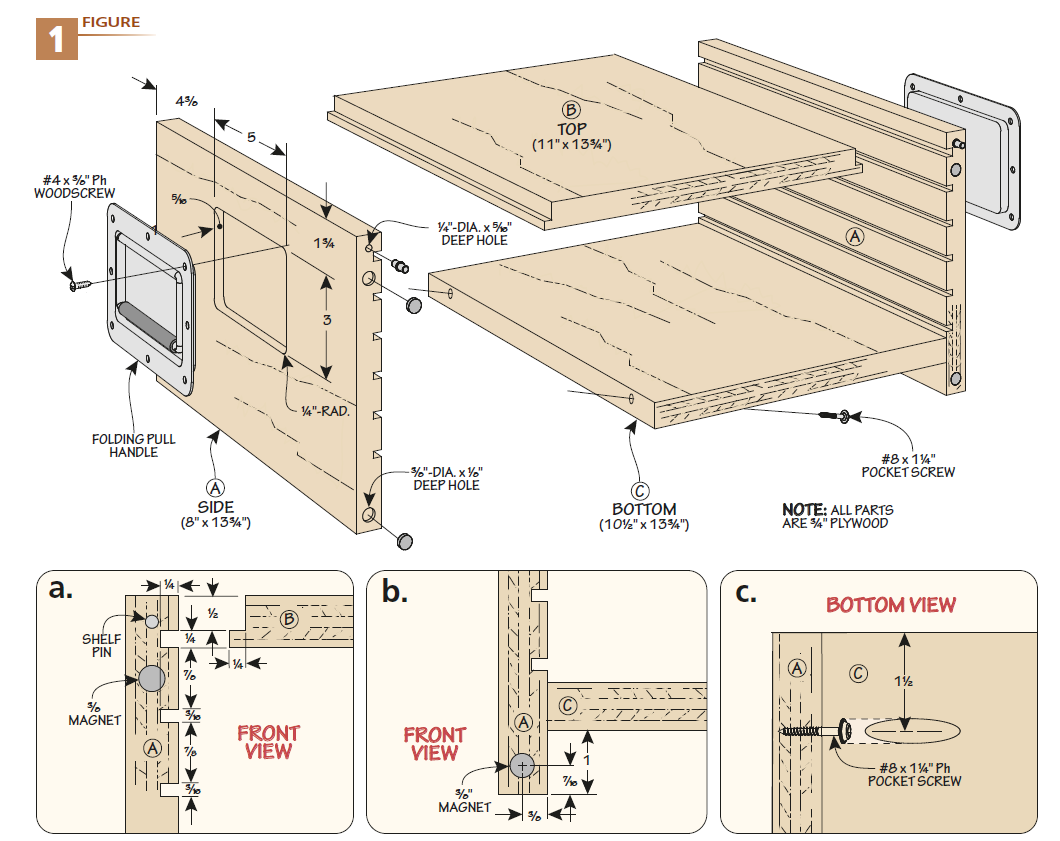
We’ll kick things off with making the sides, as shown in Figure 1. These have a series of dadoes cut on the inside faces.
The top dado accepts the case top. The goal here is for the top and sides to be flush at assembly. So locate this dado so that the distance from the top of the side to the lower edge of the dado matches the thickness of the plywood you’re using for the top.
TRAY DADOES.
The remaining five dadoes are equally spaced, as you can see in Figure 1a. These create tracks for the bottoms of the sandpaper trays (which are made from 1/8" hardboard). All the dadoes are cut with a regular saw blade in two passes. Most dado blades can’t be set for anything narrower than a 1/4"-wide cut. (Another option is to use the router table.)
TOP & BOTTOM.
The top and bottom each connect to the sides in different ways. For the top, a tongue and dado joint is used. You need to cut a rabbet along each edge of the top. This forms a tongue that slips into the upper dado in the side.
I cut this rabbet with a straight bit in the router table. Take your time here so that you can get both the length of the tongue and its thickness just right, filling the dado and creating a tight seam at the shoulder of the joint. Glue the sides to the top using clamping squares to keep the sides perpendicular to the top.
Where the top is flush with the sides, the bottom is inset forming a cavity for the cutting board we’ll get to in a short time. The bottom piece is secured to the sides with pocket screws, as shown in Figure 1c. There are two pocket holes drilled along each edge on the lower face of the bottom.
In order to register the bottom, I cut a pair of spacers that fit between the top and bottom. With a couple clamps to prevent the sides from splaying outward, you can drive the screws. Glue isn’t necessary here, but you can certainly add a bead.
GET A GRIP.
With the case assembled, it’s time to make some hardware additions. The first is a pair of folding handles for carrying the tote around the shop. The style I selected is recessed into the sides, as shown in Figure 1. I laid out the location and size of the recesses needed based on the body of the lift.
To create the recess I taped four strips of plywood around the lines pinwheel style. With a small pattern bit fitted to my router, I then cleared away the waste, leaving a flat-bottomed pocket. Each handle is secured with a bevy of screws around the outer flange.
COVER HARDWARE.
The other bits of hardware to add on the case are used to secure the cover. Figures 1a and 1b show the locations of a set of rare-earth magnets. I used a Forstner bit to drill a recess for the magnets. The magnets should be flush with the front edge of the case sides. A small dab of epoxy anchors them.
BACK TO FRONT
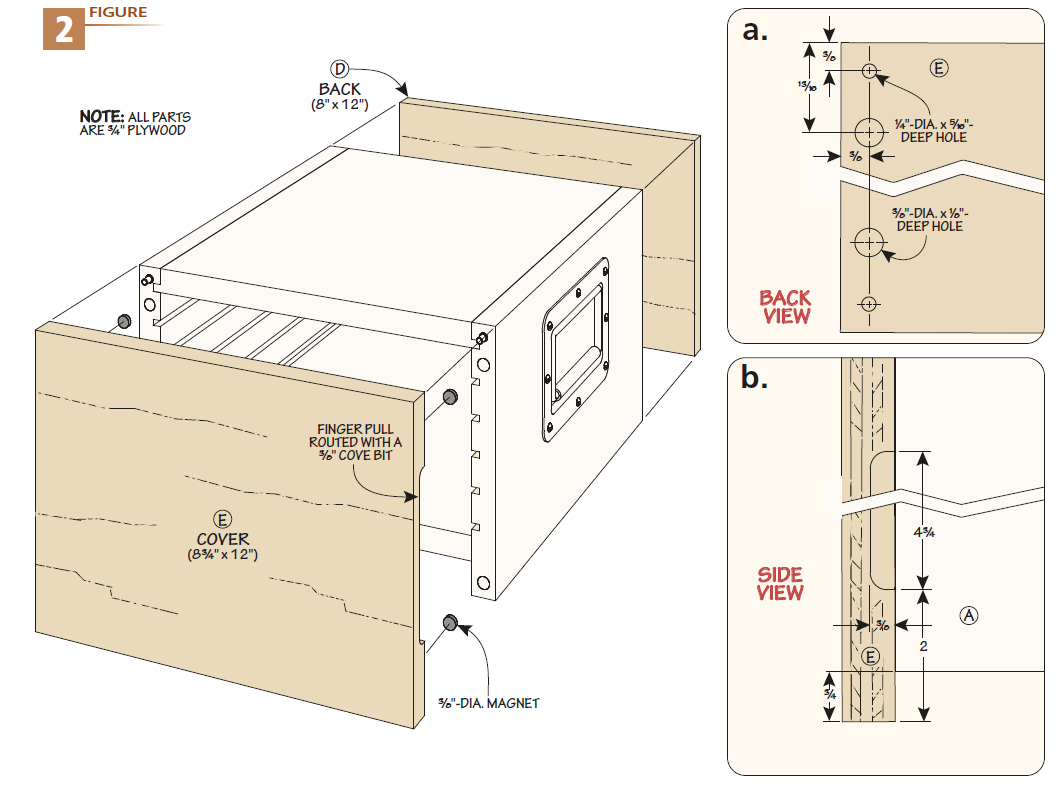
The remaining two parts of the case are the back and cover. They’re pretty much the same. The application is what sets them apart. The case back is sized to be flush with the outer edges of the sides and top. It gets glued in place. This is shown in Figure 2 below.
FINGER PULL.
The cover is a slightly larger size. It’s removable — otherwise it’s tough to get to the sandpaper inside. To allow for access, a stopped cove is routed along the sides on the inside face, as you can see in Figure 2b.
At the router table, I installed a cove bit and marked its edges on the fence. Mark the ends of the cove on the front face of the cover. These two sets of marks serve as guides to create the finger pulls.
Turn on the router, then align the left (starting edge) of the pull with the mark for the left side of the bit. Pivot the work-piece into the bit and slide it along the fence until the right marks are aligned. Pivot the cover away from the bit.
MORE HARDWARE.
We’ve already talked about the magnets installed in the front of the case. At this point, you can install a matching set in the cover, as in Figure 2a. Just watch the magnet’s polarity.
As strong as the magnets are, they don’t keep the cover from sliding with gravity. Holding the cover in place falls to a set of shelf pins. A pair of pins located near the top of the case do the trick, as you can see in Figure 2a.
The idea is for the cover to align perfectly with the lid. To make this happen, I drilled the holes in the case, then used dowel centers to transfer the hole locations to the cover.
POP OF COLOR.
Recently, I’ve taken to painting my shop projects. Beyond the protection that paint affords, I like having some color in the shop instead of a lot of “plywood beige” surfaces.
Tuck Under Cutting Board
Sheets of sandpaper are rectangles of potential. Making full use of that potential requires cutting the sheet into an appropriate size. Scissors don’t work (for long). Too often I just fold and tear the sheet.
Rarely does it cut cleanly, or even along the line I folded. The next part of the project is a convenient solution — a cutting board. It uses a hack saw blade as a durable cutter. All you need to do is slide the sandpaper sheet underneath and line up where you want the cut. Press down on the blade and tear away the sheet, ta-da!
CUTTING BOARD CONSTRUCTION.
 In the kitchen, you don’t want a cutting board sliding around during use. The same holds true here. One way to keep it steady is solid construction. The board is made up of two layers of plywood: a base and a platen, as you can see in Figure 3 above. There’s more going on than just gluing two pieces of plywood together. The base is sized to be flush with the perimeter of the case.
LAMINATED PLATEN.
The platen is smaller in size. It fits into the pocket formed by the case sides, back, and bottom. I had some plastic laminate leftover from another project, so I covered the platen with it. To apply the laminate, use spray contact adhesive. Spray a coat on both the platen and an oversize piece of laminate. Once the adhesive is dry to the touch, you can bring them together.
The laminate is trimmed flush with a router and flush-trim bit. Then ease the edges with a small chamfer, as shown in Figure 3c. At this point, you can center the platen over the base and glue it down. A pair of roundhead screws secures the hack saw blade (Figure 3c).
I added a set of rubber feet to the cutting station to keep it from sliding around while in use. As I said earlier, the station tucks under the case. A set of latches keeps it in place for transport. The locations for these are shown in Figures 3a and 3b. One last thing: I added another pair of shelf pins to the front edge of the base to register the cover. Drill the holes as shown in Figure 3b, then transfer the locations to the cover just as before.
ORGANIZER TRAYS
Five trays fill the case and provide warm fuzzies when looking over your stash of organized, well cared for sandpaper sheets. Making the trays offers a fun exercise in making multiples without going overboard.
TRAY BOTTOMS.
 The starting point is creating the bottoms from hardboard, as shown in Figure 4. Use your case as a guide for sizing the parts so they slide in the dadoes with a minimum amount of side-to-side play. A slot at the front edge serves as a pull (Figures 4a and 4b). I formed this at the router table with a straight bit. Mark the edges of the bit on the fence. Then using layout marks on the bottom, plunge the bottom over the spinning bit, routing from one line to the next.
FRAMED.
The sandpaper fits into a frame cut from a single piece of plywood. To make the frames, I sized the blanks and marked the corners of the opening and the fi nger notch, as in Figure 4b. Creating the opening starts at the drill press. I set up a stop block on the fence to register each hole consistently.
With a single block, you can drill all four corners just by flipping and turning the blank as needed. Reposition the stop block to drill the larger finger notch at the front of the frame, as in Figure 4a. The corner holes do more than add some visual punctuation to the frames.
They provide a starter hole for a jig saw to rough out the waste. All you need to do is connect the dots. Be sure to stay to the waste side (inside) of your lines. To clean up the blade marks, I set up a straight bit in the router table. Nestle the bit in the corner hole and clean up the inside edges on all the pieces.
For this step, you’ll rout from left to right in order to avoid back routing You’ll need to reposition the fence to rout the side edges. Before stepping away from the router table, swap in a chamfer bit and rout a small chamfer on the inside edge of the frame for comfort. The frame is glued to the bottom. It’s centered side to side and flush with the back, as in Figures 4b and 4c.
I won’t guarantee that by making this tote your sanding skills (or interest) will improve. What is true is that by creating a dedicated place for tools and equipment you’re more likely to use that same care while you work.
 Neat & Tidy. When the tote is buttoned up, it’s easy to tuck away on a shelf until you need it.


