


Sandpaper gets most of the attention when it's time to prepare a woodworking project for finish. But there are plenty of situations where a card scraper can get you to a smooth surface faster.
A card scraper is simply a thin, flexible piece of steel with a small cutting burr formed along its edge. Instead of scratching away wood fibers like an abrasive, the scraper cuts away extremely thin shavings.
That distinction makes a card scraper particularly useful for removing machine marks, leveling small areas, smoothing difficult grain, and handling jobs where you'd otherwise spend a lot of time working through several grits of sandpaper.

Why Reach for a Scraper Instead of Sandpaper?
A card scraper isn't a replacement for sandpaper. Each tool does a different job.
Sandpaper is excellent for progressively refining an entire surface and preparing it for finish. A scraper shines when there's actual material that needs to be cut away or leveled before that final sanding begins.
I often reach for one when I need to:
- Remove planer or saw marks
- Smooth a glued-up panel
- Flush plywood edging
- Remove a localized high spot
- Work wood with difficult or changing grain
- Reduce the amount of sanding needed afterward
Instead of starting with coarse sandpaper and creating a new set of scratches that must then be removed with finer grits, a sharp scraper can cut directly through many surface defects.
A Scraper Cuts Instead of Abrades
That's the important difference.
Sandpaper uses abrasive particles to scratch away material. As you progress through finer grits, each grit removes the scratches left by the one before it.
A properly prepared card scraper behaves more like a cutting tool. Its tiny burr engages the wood and produces thin shavings.
Those shavings are also a useful diagnostic tool. If you're producing fine curls of wood rather than mostly dust, you know the scraper is cutting effectively.

Bow the Scraper for Better Control
To use a card scraper effectively, hold it with both hands and use your thumbs to flex the center into a slight bow.
The curved shape concentrates the cutting action near the middle of the edge rather than across its entire width. It also lifts the corners slightly away from the workpiece, reducing the chance of digging a corner into the surface.
You only need a slight bow. Excessive pressure makes the scraper more tiring to use without necessarily improving the cut.
Push or Pull — Either Works
There's no single correct direction for using a card scraper.
You can bow the blade away from your body and push it across the surface, or reverse the bow and pull the scraper toward you.
The pull stroke can make it easier to see what's happening directly in front of the cutting edge. A push stroke may feel more natural to other woodworkers.
Try both and use whichever gives you the best control.

Adjust the Cutting Angle by Feel
The scraper's cutting angle is another place where feel matters more than an exact setting.
A useful starting point is roughly 45° to 60° from vertical. From there, alter the angle until you feel the burr engage the surface and begin producing fine shavings.
The exact angle can vary because the size and shape of the burr won't always be identical.
Woodsmith Tip: Don't chase a specific angle. Watch the shaving. When you're getting thin, consistent curls and the scraper moves smoothly across the surface, you've found an effective cutting angle.
Skew the Scraper Across the Grain
The scraper can also be held at a slight skew to the grain rather than running its edge straight across the board.
This helps the cutting edge contact high areas while passing over slight low spots. As you work across a larger surface, alternate the direction of the skew. This helps prevent the scraper from repeatedly following the same path and creating ridges.

When to Scrape and When to Sand
I'd add a simple comparison here because this is what makes this article meaningfully different from the video article:
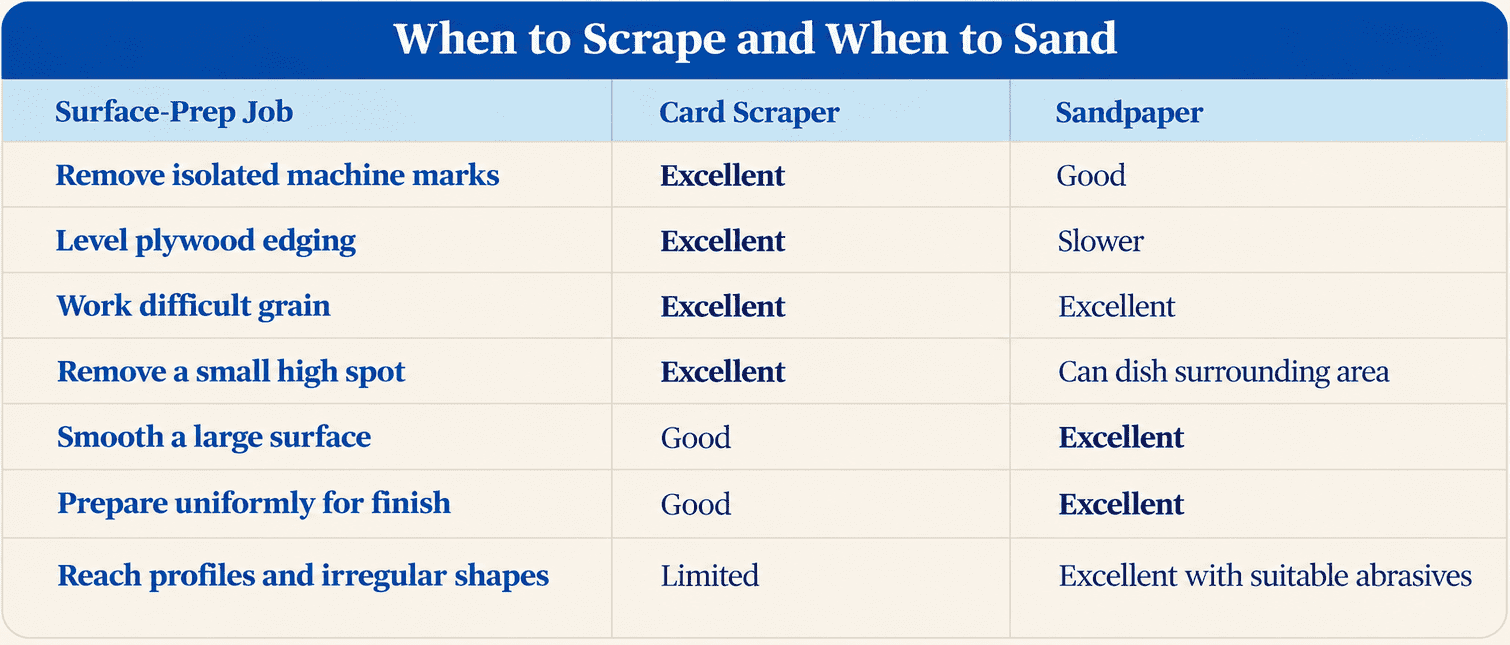
The two methods also work well together. Use the scraper for the heavier surface correction, then switch to fine sandpaper as needed to create a consistent surface before applying finish.
Scrape First, Sand Less
That's really the advantage of adding a card scraper to your surface-prep routine.
Instead of asking sandpaper to do everything, use the scraper where a cutting tool makes more sense. Remove machine marks, level high spots, clean up edging, and deal with troublesome grain first. Then use sandpaper for the final refinement.
A simple piece of steel can save a surprising amount of sanding.
Learn How to Use a Card Scraper
Ready to put one to work? Watch Phil demonstrate how to bow, angle, push, and pull a card scraper to produce fine shavings and a smooth surface.
MASTER THE CARD SCRAPER → How to Use a Card Scraper for Smooth Wood Surfaces


