


Plywood is a practical choice for large furniture projects. It’s more dimensionally stable than solid wood, and saves a lot of time over gluing up large panels. The only downside is you’ll have to deal with the problem of exposed plywood edges. There are several options for covering the edges, but I usually opt for making my own 1 ⁄ 4 "-thick hardwood edging in the shop. This allows me to make sure I get a good match for the color and grain of the plywood. And, if you follow a few simple principles, it’s easy to do.
STOCK SELECTION. Attractive edging should blend in as seamlessly as possible with the plywood. So I start by choosing the stock carefully. I often cut a test strip and wipe it and the plywood with mineral spirits to get an idea of what they’ll look like after finishing.

SIZING THE EDGING. Generally, you can make edging from common 4/4 stock by planing it slightly thicker (about 1 ⁄ 16 ") than the plywood and then cutting strips from the edge. This way, you won’t need to worry about trimming it flush, just a light sanding is all it takes.
After planing the stock to thickness, you’re ready to move to the table saw. While cutting the edging is a pretty straightforward operation, there are a few things to keep in mind. First, make sure to install a good rip blade in the table saw. A high-quality rip blade will leave a surface that needs little follow-up work. Combination blades are not as well-suited for these cuts and can often result in burn marks that take a lot of sanding or planing to remove (top photo at left).

The next step is to set the rip fence. For most applications, 1 ⁄ 4 "thick edging is sufficient, and you can make this cut safely by setting the fence for a 1 ⁄ 4 " cut and using a thin push block (lead photo).
For edging thinner than 1 ⁄ 4 ", I prefer to cut the strips on the “outside” of the blade instead. A ripping guide in the miter slot can make short work of this. The illustration at the top of the opposite page shows you how it works.
Now you can make the cuts. If you’re not satisfied with the quality of the surface after the cut, you can always joint the edge of the board after each cut. This results in one perfectly clean face for each strip. The other side is still good enough for a glue surface. It’s also a good idea to cut a couple of extra pieces while you have the table saw set up. These pieces can be a lifesaver if you make a mistake later.

PREPARING THE PLYWOOD. Making the edging is only the start of the process. Before installing it, I like to make sure the plywood edges are straight and smooth. A smooth edge allows the glue to adhere properly and maintain its strength throughout the life of the project. After that, you’re ready to cut the edging to fit and attach it to the plywood. This is where a little patience and a few easy techniques pay off.
INSTALLING THE EDGING. Normally, gluing the edging to the plywood is simply a matter of spreading glue on the edging, adding a caul, and clamping it in place. Sometimes, however, the glue can make the surfaces slippery and difficult to hold the edging in position while clamping. Fortunately, there are a couple easy fixes for this problem.
TAPE. The first thing to try is to simply tape the edging in place before clamping. Usually, this will keep the piece straight. In fact, if you’re working on an assembled project, tape might be all the clamping power you need.
BRADS. You may run into situations when tape doesn’t prevent slipping. This often happens on longer workpieces or when applying edging to an angled surface. For these situations, I use brads to hold the edging. I don’t nail them through the outside, which would spoil the appearance. Instead, I tap them into the edge of the plywood and cut the heads off. The sharp end of the brad grabs the edging and holds it in place while you add clamps. The drawing below shows what I mean. SANDING. With the edging installed, the last step is to make sure it’s flush with the plywood. For this, all you need is a simple sanding block like the one shown in the far right drawing below. Simply cut a notch in the block to match the thickness of the edging. This way, you don’t have to worry about accidentally sanding through the thin plywood veneer as you dress the edge.
These techniques make adding edging to plywood a simple task. And that frees you to use plywood creatively in your projects.
Shop Tip: Beveled Trim

Cutting the beveled edging for the dropfront desk on page 32 is just a matter of tilting the blade on your table saw.
How-To: Apply Edging

Clamping Strategies. When possible, use a caul and clamps to attach the edging. When adding edging to an assembled project, masking tape can take the place of clamps.

Brads. Clipping the heads off of a series of brads in the plywood helps hold the edging.
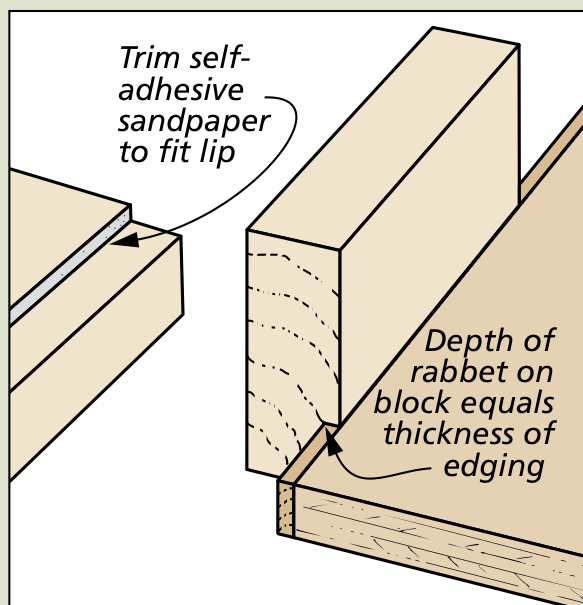
Sanding Block. A block with a rabbet cut to match the thickness of the edging makes short work of sanding.


