


How to Sand Curved Wood, Profiles & Contours
A random-orbit sander makes quick work of smoothing flat boards and panels. But when it comes to sanding curved wood, carved details, and intricate profiles, a flat sanding pad isn't much help.
That's when the job usually turns into a lot of hand sanding. And while sandpaper wrapped around a block works well for some shapes, complicated curves and tight corners can make the process tedious.
Fortunately, there are several specialized woodworking sanding tools designed to handle these challenging surfaces. From flexible sanding mops to aggressive flap wheels, these accessories make it easier to smooth contours, refine carvings, and prepare detailed woodwork for finishing.
The key is choosing the right abrasive for the shape of the workpiece and the amount of material you need to remove.
Choosing Sanding Tools for Curved Wood
When sanding a curved or irregular surface, the goal is to remove scratches and tool marks without changing the shape of the workpiece.
A conventional sanding block works well on flat surfaces, but it can't conform to every curve or reach into small recesses.
Flexible abrasive accessories solve this problem by allowing the sanding surface to follow the contours of the wood.
Many of these accessories can be used with tools already found in most woodworking shops, including:
- A handheld electric drill
- A drill press
- A rotary tool
- An angle grinder
Each provides a different combination of speed, control, and material removal.
Most of the sanding accessories discussed here use durable cloth-backed abrasives. Unlike ordinary paper-backed sandpaper, the flexible cloth backing helps the abrasive conform to irregular shapes while resisting tearing.
Let's look at several options and where they work best.
Sanding Mops for Curves and Detailed Profiles
One of the most versatile accessories for sanding irregular wood surfaces is a sanding mop.
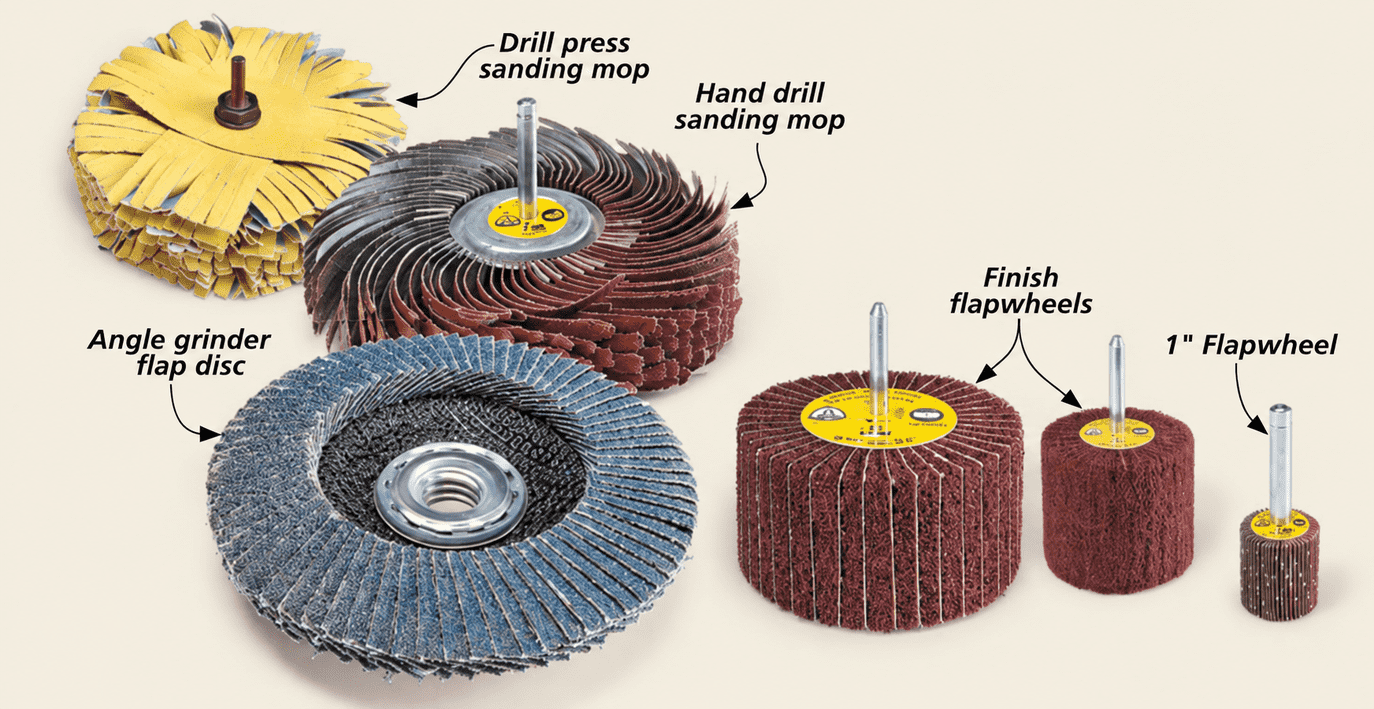
A sanding mop consists of multiple strips of cloth-backed abrasive arranged around a central spindle. As the mop rotates, the flexible abrasive strips conform to the surface of the workpiece.
This makes sanding mops especially useful for smoothing curved edges, decorative profiles, and carved details.

Using a Sanding Mop in a Drill Press
Some sanding mops are assembled by stacking individual abrasive strips onto a mandrel.
This allows you to build up the mop to the thickness needed for a particular project.
After securing the abrasive strips and installing the mop in a drill press, it's helpful to break in the abrasive by running it against a scrap of hardwood.
This softens the edges of the abrasive strips and allows the mop to conform more easily to curved surfaces.
Use the operating speed recommended for the sanding accessory, and make sure the workpiece is controlled securely.
Sanding Tight Corners with Flexible Abrasive Fingers
Another style of sanding mop uses long, narrow abrasive fingers.
These flexible strips can reach into tight corners, recesses, and other areas that are difficult to sand by hand.
They're particularly useful for detailed moldings and irregular shapes where a conventional sanding drum would be too rigid.
Some versions are designed for use in a handheld drill, allowing you to bring the abrasive to the workpiece rather than maneuvering the workpiece around a stationary sanding tool.
Flap Wheels for Sanding Wood Profiles
Flap wheels are another useful option for sanding curves and contours.
Like sanding mops, they use flexible abrasive material mounted around a rotating spindle. However, the abrasive sections are generally packed more tightly, creating a firmer sanding surface.
This makes flap wheels useful when you need to remove more material or smooth rough surfaces before final sanding.

Standard Flap Wheels for Shaping and Smoothing
A standard flap wheel consists of overlapping sections of stiff, cloth-backed abrasive attached to a spindle.
These wheels can remove material fairly aggressively, depending on the abrasive grit and wheel construction.
They're useful for tasks such as:
- Smoothing rough carvings
- Refining sculpted furniture parts
- Removing coarse tool marks
- Blending curved surfaces
- Preparing irregular shapes for finer sanding
Because these wheels can remove wood quickly, it's important to work carefully and avoid lingering in one spot.
Start with a suitable grit and use light, controlled passes to maintain the intended shape of the workpiece.
Finishing Flap Wheels for Irregular Surfaces
For a less aggressive approach, consider a finishing flap wheel.
These accessories combine cloth-backed abrasive flaps with sections of nonwoven abrasive material.
The abrasive cloth removes surface imperfections, while the nonwoven material provides a gentler smoothing action.
This combination works particularly well on irregular surfaces, including carved bowls and sculpted woodworking projects.
Finishing flap wheels are available in different diameters and can be used with compatible handheld drills or drill presses.
They're a good choice when you want to refine a curved surface without removing as much material as a standard flap wheel.
Angle Grinder Flap Discs for Aggressive Wood Shaping
Sometimes sanding isn't just about smoothing a surface. You may need to remove a substantial amount of material to create a curved or sculpted shape.
For these jobs, an angle grinder flap disc can be useful.

Flap discs feature overlapping abrasive sections arranged around a backing plate.
Some discs use zirconia alumina abrasive and durable resin backing plates, making them suitable for demanding material-removal tasks.
On wood, these discs can be useful for shaping broad contours, such as the dished surface of a chair seat.
However, an angle grinder removes material quickly and requires careful control.
Use only discs specifically rated for your grinder and approved for the intended application. Follow the manufacturer's instructions for guarding, operating speed, and personal protective equipment.
Work gradually, checking the shape frequently to avoid removing too much material.
Once the rough shape is established, switch to a less aggressive sanding accessory to refine the surface.
Rotary Tool Abrasive Brushes for Fine Details
At the opposite end of the spectrum are small abrasive brushes designed for rotary tools.
These accessories are particularly useful when sanding detailed carvings, narrow grooves, and intricate molding profiles.
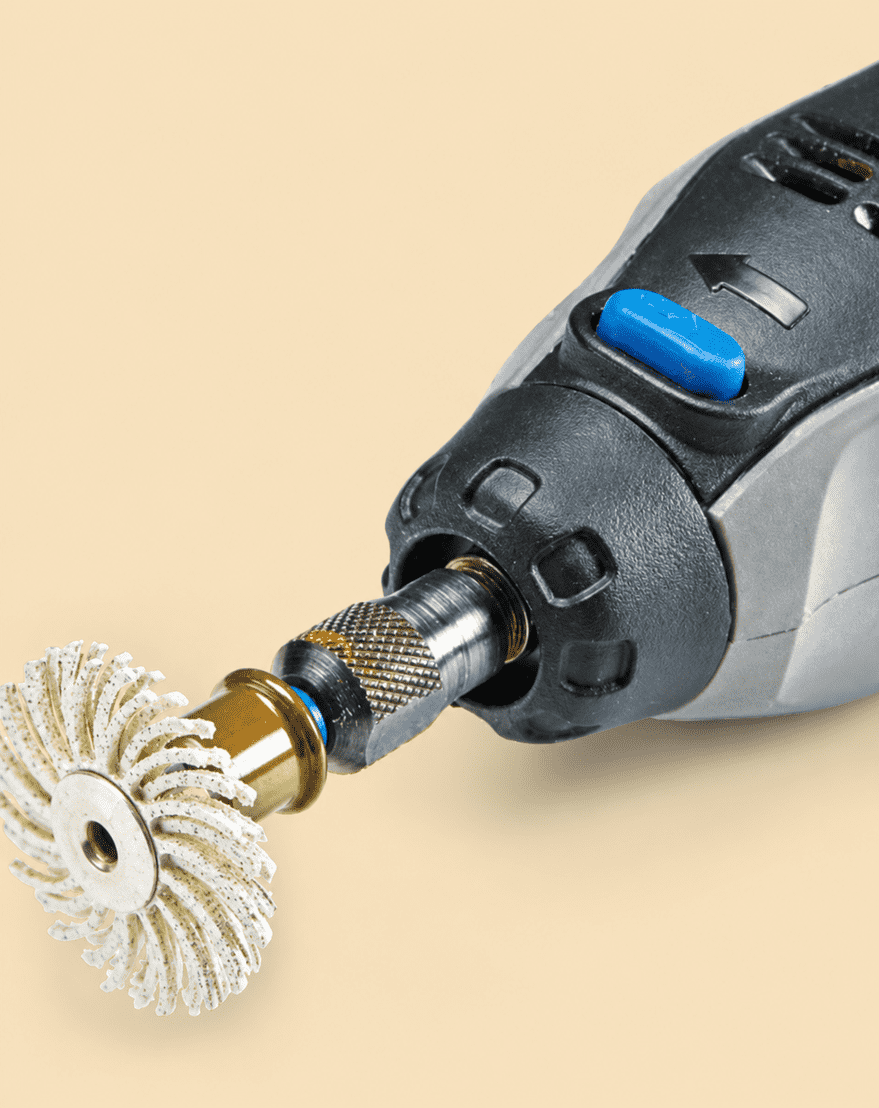
Dremel Abrasive Brushes
A Dremel abrasive brush resembles a miniature flap sander, but its flexible fingers are made from rubber impregnated with abrasive particles.
The brushes are available in different abrasive grades, allowing you to select the amount of cutting action needed for the project.
Because the abrasive fingers are small and flexible, they can reach into areas that would be difficult to sand with ordinary sandpaper.
They're useful for refining delicate carved details and smoothing small, irregular surfaces.
As with any powered abrasive, use a light touch. It's easy to soften crisp details or round over sharp edges if you apply too much pressure.
Tips for Sanding Curved and Irregular Wood Surfaces
Regardless of which sanding accessory you choose, a few basic techniques will help you get better results.
Start with the Least Aggressive Tool That Will Do the Job
Choose an abrasive that removes material at a controlled rate.
For light sanding, a flexible sanding mop or finishing flap wheel may be all you need.
Reserve aggressive flap wheels and grinding discs for situations where substantial shaping is necessary.
Work Through the Sandpaper Grits
As with sanding flat surfaces, gradually progressing from coarser to finer abrasives helps remove scratches and prepare the wood for finishing.
Avoid jumping directly from aggressive shaping to fine sanding.
Deep scratches left by coarse abrasives can become more noticeable after applying a stain or finish.
Keep the Abrasive Moving
Powered sanding accessories can remove material unevenly if held in one location for too long.
Use smooth, controlled movements and inspect the surface frequently.
This is especially important when sanding curved furniture parts where maintaining a consistent shape is critical.
Protect Sharp Edges and Fine Details
Flexible sanding accessories are great for following contours, but they can also soften edges and fine details.
Use a light touch around crisp profiles, corners, and carved features.
For areas that require precise control, traditional hand sanding may still be the best choice.
Control Dust and Secure the Workpiece
Sanding creates fine airborne dust, particularly when using powered accessories.
Use appropriate dust collection or extraction where practical, along with suitable respiratory and eye protection.
Make sure the workpiece is secure and follow the tool and accessory manufacturers' instructions.
Make Sanding Profiles and Contours Easier
Sanding curved wood doesn't have to mean spending hours working through complicated profiles with folded sheets of sandpaper.
Sanding mops, flap wheels, angle grinder discs, and rotary tool abrasive brushes each offer advantages for different woodworking tasks.
The important thing is matching the accessory to the job.
Use flexible abrasives for delicate curves and intricate details, firmer flap wheels for smoothing rough surfaces, and more aggressive accessories when substantial shaping is required.
With the right sanding tools and techniques, you can spend less time sanding and more time enjoying the finished project.
Finishing & Sanding
Sanding and finishing don't have to be tedious. A few clever techniques and handy shop tips can make preparing wood surfaces and applying a finish easier and more efficient.

Explore our collection of finishing and sanding tips to discover practical ways to save time, improve your results, and put the finishing touches on your next woodworking project.
EXPLORE FINISHING & SANDING TIPS → Simple Tips for Smoother Surfaces and Better Finishes


