



How to Make Concave Cuts with a Router: DIY Dishing Jig
Creating a smooth, concave surface in a piece of wood can add an interesting detail to a woodworking project. Whether you're shaping a comfortable drawer pull, making a recessed furniture handle, or experimenting with a dished-out chair seat, the challenge is producing a consistent curve without spending hours shaping and sanding by hand.
This clever router dishing jig makes the process much easier. By guiding a router along a pair of curved rails, you can cut a smooth, concave profile into a workpiece. A rotating platform beneath the router allows you to reposition the workpiece between passes, gradually creating the desired shape.
We used this shop-made jig to create the scooped-out fronts of the handles on the Dashing Dresser featured in Woodsmith Issue 261. The same basic setup can be adapted for other woodworking projects that call for a dished-out surface.
How the Router Dishing Jig Works
The jig uses a simple combination of curved guide rails and a rotating workpiece platform.
Two matching side pieces have curved upper edges that support a router fitted with a wide auxiliary baseplate.
As the router moves along the curved rails, the cutting bit follows the same arc. This allows it to remove material in a controlled, concave profile.
A turntable positioned between the sides and the base supports the workpiece. By rotating the turntable between passes, you can create a smooth, dished-out surface rather than a single curved groove.
The shape of the finished cut is determined by the curvature of the guide rails and the movement of the workpiece.
This arrangement is particularly useful for creating matching concave profiles on multiple furniture parts.
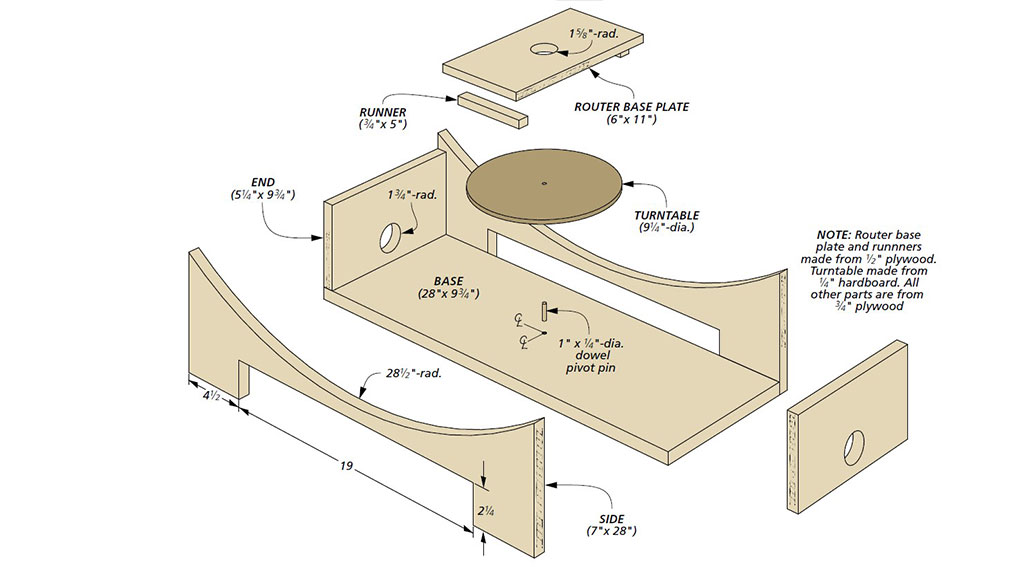
Build the Router Jig for Concave Cuts
The jig consists of a base, two curved sides, a turntable, and a wide auxiliary router baseplate.
The curved sides are the most important components because they determine the profile of the finished cut.
Cut the Jig Parts and Drill the Openings
Start by cutting the individual pieces to the dimensions shown in the construction drawings.

Before assembly, drill the dust collection ports in the ends of the jig, as shown in detail 'b'.
You'll also need to make an opening for the router bit in the auxiliary baseplate, shown in detail 'c'.

Finally, drill the corresponding dowel holes in the jig base and turntable. These allow the turntable to rotate while maintaining its position beneath the router.
Completing these operations before assembly makes the parts easier to handle and helps ensure the openings are properly located.
Lay Out the Curved Guide Rails
The curved sides guide the router through its cutting path, so both pieces need to have smooth, matching profiles.
For this jig, the rails are shaped to a 26 1/2" radius.
A simple beam compass made from scrap wood makes it easy to lay out this large curve.
Mark the radius on one side piece, then cut the curve at the band saw, staying just outside the layout line.
Use a spindle sander to smooth the sawn edge, taking care to maintain a consistent curve.
Once the first side is finished, use it as a template to lay out the second side.
Cut and sand the second piece to match the first as closely as possible.
Matching the two curved rails is important because the auxiliary router baseplate needs to ride smoothly along both sides throughout the cut.
Assemble the Router Jig
With the parts cut and shaped, assemble the jig using #8 wood screws.
Attach the curved side pieces to the base according to the construction drawing, making sure they're aligned and properly spaced to support the auxiliary router baseplate.
Install the turntable so it can rotate beneath the router.
Before making a cut, check that the router base moves smoothly along the curved rails without rocking or binding.
The router should remain supported by both rails throughout its travel.
How to Cut a Concave Profile with the Router Jig
Once the jig is assembled, you're ready to create the dished-out surface.
Step 1: Secure the Workpiece to the Turntable
Attach the workpiece to the turntable using double-sided tape.
Make sure the tape provides a secure hold and that the workpiece sits flat against the platform.
For small parts such as drawer pulls, a secure mounting method is especially important.
Step 2: Position the Router on the Curved Rails
Install the router in the wide auxiliary baseplate and place it on the curved guide rails.
The baseplate bridges the two sides of the jig, allowing the router to follow the curved path as it moves across the workpiece.
Before starting the router, verify that the bit has adequate clearance and that the router can travel through its intended path without contacting the jig.
Step 3: Make Light Cutting Passes
Move the router along the curved rails to begin forming the concave surface.
Take shallow cuts rather than attempting to remove all the material in one pass.
This provides better control and helps produce a smoother surface.
Step 4: Rotate the Workpiece Between Passes
After completing a pass, switch off the router and wait for the bit to stop.
Rotate the turntable slightly to reposition the workpiece, then make another pass.
Continue alternating between routing and rotating the workpiece until the concave surface has been formed.
The combination of the curved router path and rotating turntable gradually produces the dished-out profile.
Step 5: Smooth the Finished Surface
Once the routing is complete, inspect the concave surface for any remaining tool marks.
Light sanding can smooth the surface and prepare it for finishing.
The result is a clean, consistent recessed profile that would be much more difficult to shape entirely by hand.
Uses for a Router Dishing Jig
Although this jig was designed for shaping furniture handles, the same technique can be useful for other woodworking projects.
Drawer pulls and furniture handles. Create comfortable, recessed finger pulls that add a distinctive detail to cabinets and dressers.
Decorative furniture details. Use shallow concave profiles to add visual interest to doors, panels, and other furniture components.
Dished-out seating surfaces. The curved-rail concept can be adapted to larger workpieces, such as chair seats, with appropriately sized and supported jig components.
The versatility comes from the relationship between the curved rails and the rotating workpiece. By changing the dimensions and curvature of the jig, you can create different dished-out profiles for a variety of projects.
A Clever Router Jig for Custom Furniture Details
A router is already one of the most versatile tools in a woodworking shop, and a simple jig can expand its capabilities even further.
This shop-made router dishing jig provides a practical way to create smooth, concave surfaces using curved guide rails and a rotating workpiece platform.
Whether you're making recessed drawer pulls for a dresser or experimenting with decorative furniture profiles, the jig offers a repeatable approach to shaping curves that would otherwise require extensive handwork.
It's another example of how a straightforward woodworking jig can make a challenging operation easier and more accurate.
Featured Project: Dashing Dresser Woodworking Plans
Put your router dishing jig to work building this eye-catching Dashing Dresser. Combining Baltic birch plywood, rich cherry hardwood, and vibrant blue accents, this modern dresser makes the most of contrasting colors and materials. The distinctive round drawer pulls feature smooth, dished-out fronts created with the router jig, adding a custom detail that's both attractive and comfortable to use. Get the step-by-step woodworking plans to build this unique furniture project for your home.
GET THE STEP-BY-STEP PLANS → Build the Dashing Dresser Woodworking


