


Build a Multipurpose Circular Saw and Router Guide
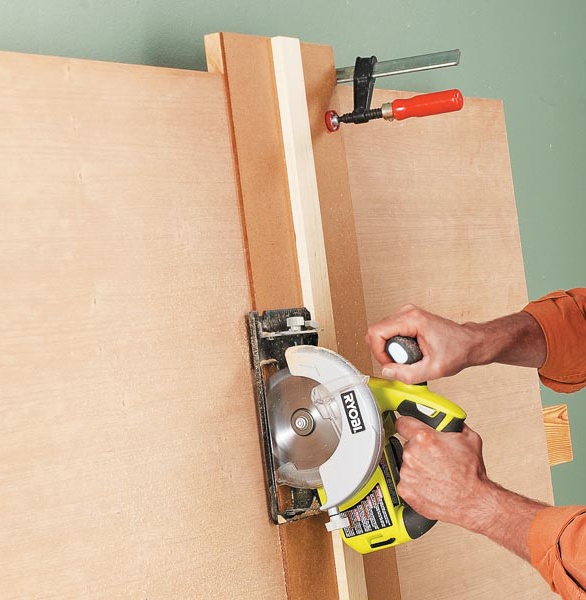
When it comes to breaking down large sheets of plywood or MDF, a circular saw and a straightedge guide are hard to beat. The setup is easy to use, doesn't require a large table saw, and makes handling sheet goods much more manageable.
But why limit a good straightedge guide to just one tool?
This multipurpose plywood cutting jig works with both a circular saw and a router. One edge guides the saw for straight cuts in sheet goods, while the opposite edge works with a router for cutting accurate dadoes and grooves.
Best of all, the guide is simple to build from hardboard and a straight hardwood strip.
Make the Hardboard Base
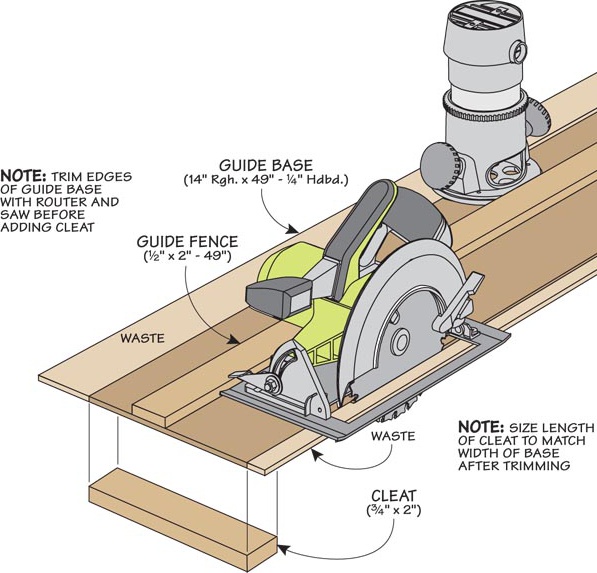
The jig starts with an extra-wide hardboard base. The extra width is important because both edges will eventually be trimmed to create accurate cutting references.
One edge will be sized to match your circular saw, while the opposite edge will be trimmed with your router.
This gives you a dedicated reference edge for each tool.
Add the Hardwood Guide Strip
Attach a straight hardwood strip down the center of the hardboard base.
This strip serves as the fence that guides both tools. The edge of your circular saw's shoe rides against one side, while the router's base follows the opposite side.
Take care to position the strip straight and secure it firmly to the hardboard.
The accuracy of every cut depends on the guide strip providing a consistent reference.
Trim the Circular Saw Reference Edge
With the hardwood guide strip attached, it's time to customize the jig to your circular saw.
Place the saw on the hardboard base with the edge of its shoe resting against the guide strip.
Then run the saw along the fence to trim away the excess hardboard on that side.
The freshly cut edge now shows exactly where the saw blade will cut.
Instead of measuring the distance between the saw blade and the edge of the shoe, you can simply align the hardboard reference edge with your layout marks.
This makes positioning the guide faster and helps eliminate setup errors.
Trim the Router Reference Edge
The opposite side of the jig works the same way, but it's customized to your router.
Place the router on the hardboard with its base against the hardwood guide strip. Then make a pass along the fence to trim the opposite edge.
This creates a reference edge that matches the cutting path of your router bit.
Now you can use that edge to position the router accurately for dadoes, grooves, and other straight cuts.
WOODSMITH TIP: Match the Router Bit to the Guide. The router reference edge is accurate for the specific bit and router setup used to trim it. Changing the bit diameter or the position of the router base relative to the fence can change the cutting offset. For the most reliable results, use the same bit and setup whenever you rely on that reference edge.
Add a Cleat for Square Crosscuts
There's one more detail that makes this guide especially useful.
Attach a cleat at one end of the jig, perpendicular to the hardwood guide strip.
The cleat registers against the edge of the workpiece, helping position the jig squarely for crosscuts.
With the cleat resting against the panel, you can quickly align the guide and make a straight, square cut without laying out a full line every time.
For cuts where the cleat can't be used, simply position the appropriate reference edge on your layout marks and clamp the guide securely.
Use the Jig for Plywood Cuts, Dadoes, and Grooves
Once both reference edges are trimmed, the jig is ready to work.
For cutting plywood or MDF panels, position the circular saw edge along your layout marks, secure the guide, and make the cut.
When you need to rout a dado or groove, turn the jig around and use the router reference edge.
The guide is especially handy for cabinetmaking and other projects that require both accurate panel sizing and straight joinery cuts.
And because the jig works with two common portable power tools, it's a useful solution for small shops that don't have room for a large collection of stationary machines.
One Jig, Two Useful Tools
A straightedge guide is one of the simplest ways to improve the accuracy of a circular saw. By making the base a little wider and trimming the opposite edge with a router, you can get even more use from the same jig.
The result is a compact, inexpensive guide that helps you make straight plywood cuts, accurate dadoes, and clean grooves without complicated setups.
It's the kind of shop-made accessory that's worth keeping close at hand.
Build a Better Sheet-Goods Cutting Station
A good cutting guide is only part of the equation. Large plywood panels also need solid, stable support.
The Low-Profile Cutting Rack provides a convenient work surface for breaking down full sheets of plywood and other sheet goods with a circular saw or router.

Its low working height makes large panels easier to handle, while the open design provides clearance for cutting.
GET THE STEP-BY-STEP WOODWORKING PLANS → Build a Low-Profile Cutting Rack
Cut Plywood Without a Table Saw
A shop-made cutting guide is just one option for working with plywood and MDF. Explore circular saw accessories, straightedge guides, and dedicated track saws to find the best method for your workshop.
EXPLORE PLYWOOD CUTTING METHODS → More Ways to Get Accurate Cuts in Sheet Goods


