A miter saw makes quick work of cutting angles for picture frames, molding, and other mitered projects. But a perfect 45° angle won't help much if matching parts aren't exactly the same length.
This simple miter saw stop block jig solves the problem. Once the stop is set, you can cut matching parts to a consistent length without measuring and marking every workpiece.
How the Miter Saw Jig Works
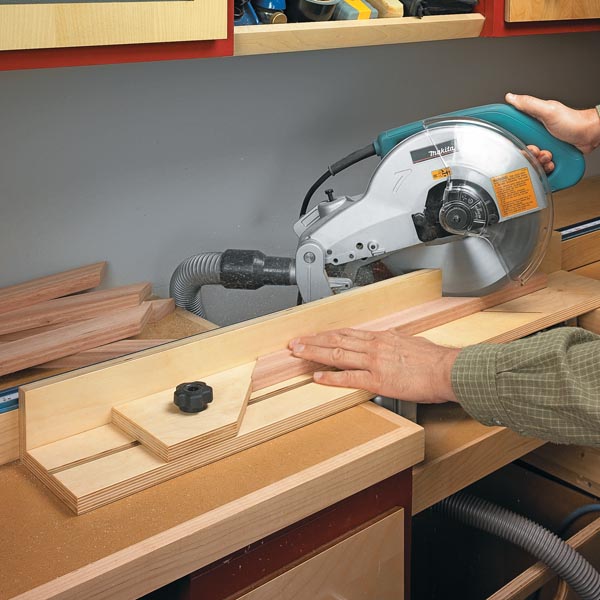
The jig consists of an L-shaped auxiliary fence and base that attaches to the existing miter saw fence. An adjustable stop block slides along the jig so it can be positioned for the desired finished length.
The end of the stop block is angled to accommodate the mitered end of the workpiece. Once everything is adjusted, the jig provides two important reference surfaces: The fence keeps the workpiece properly positioned, while the stop establishes its finished length.
Make Repeatable Miter Cuts
Using the jig is straightforward.
First, cut a miter on one end of all your workpieces. Then position the adjustable stop block for the finished length you need and lock it in place.
Place the first mitered end against the stop block while keeping the workpiece seated against the fence and base. Make the second miter cut to bring the part to its final length.
Repeat the process for the remaining matching pieces.
There's no need to measure each workpiece individually. As long as you don't move the stop, each part references the same setup. That's especially useful when making picture frames, where opposite sides need to match in length for the corners to come together properly.
Build the Adjustable Stop Block
The stop block rides in a groove routed into the jig.
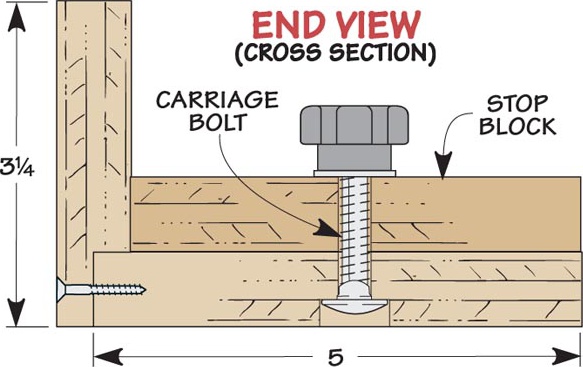
A carriage bolt, washers, and star knob secure the block. Loosen the knob and the stop slides along the groove for adjustment. Tighten it to lock the setting.
The auxiliary fence should also be securely fastened or clamped to the miter saw fence before making any cuts.
A Simple Upgrade for More Accurate Miters
For picture frames and other projects with matching mitered parts, consistent length is just as important as an accurate angle.
This simple jig adds an adjustable reference point to your miter saw, allowing you to establish a length once and reproduce it across multiple workpieces. It's an inexpensive shop-made upgrade that can save time while improving the fit of your finished miter joints.