


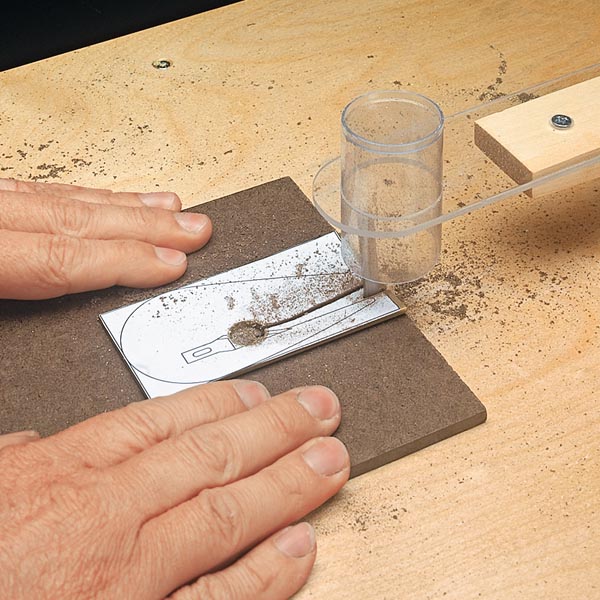
How to Build a DIY Jigsaw Table for Cutting Small Parts
Cutting small, curved parts can be challenging if you don't have a band saw or scroll saw in your workshop. A handheld jigsaw can make the cuts, but trying to hold a small workpiece while guiding the saw often leads to awkward setups and less-than-accurate results.
This shop-made jigsaw table offers another option. By mounting a handheld jigsaw upside down beneath a plywood tabletop, you can guide the workpiece past the blade instead of moving the saw.
The compact design clamps to your workbench and includes a removable jigsaw mounting system and an overhead blade guard.
It's a practical way to expand the capabilities of a tool you may already own.
How the Jigsaw Table Works
The idea behind this jig is straightforward.
Instead of holding the jigsaw and moving it through the workpiece, the saw is secured beneath a small table with its blade extending through a slot in the top.
The workpiece rests on the tabletop and is guided through the blade.
This arrangement provides support close to the cut and can make it easier to follow curved layout lines.
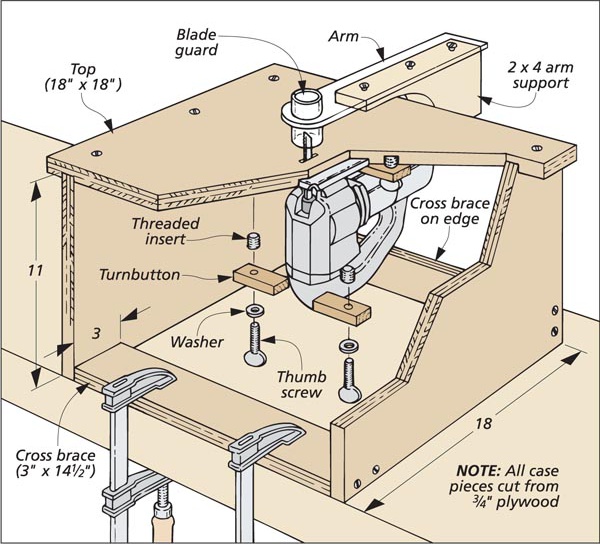
The table consists of a plywood top, two sides, and a pair of cross braces. Four hardwood turnbuttons hold the jigsaw in place beneath the top.
An overhead arm supports a clear blade guard.
Build the Plywood Table
The main structure is made from plywood, making it an inexpensive project that doesn't require much material.
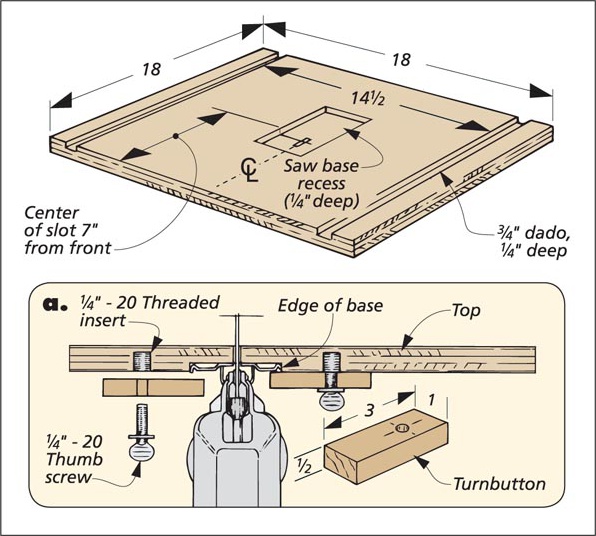
Start by cutting the tabletop and two sides to the dimensions shown in the construction drawing.
Before assembling the table, prepare the top to accept the jigsaw.
Rout a Recess for the Jigsaw Baseplate
The jigsaw mounts upside down beneath the tabletop.
To accommodate the saw, rout a shallow recess in the underside of the top that matches the shape of its baseplate.
The recess helps locate the saw and keeps it from shifting during use.
Since jigsaw baseplates vary by manufacturer and model, size the recess to fit your particular saw.
Cut the Blade Slot
With the baseplate recess complete, cut a narrow slot through the tabletop for the jigsaw blade.
The slot needs to provide clearance for the blade throughout its stroke.
Check the alignment carefully before mounting the saw.
The blade should move freely without contacting the tabletop.
Cut the Dadoes and Assemble the Table
Next, cut the dadoes that locate the two side panels.
Fasten the sides to the tabletop with screws.
A pair of cross braces connects the sides at the bottom and along the back edge.
These braces stiffen the assembly and prevent it from racking.
They also provide convenient surfaces for clamping the completed table securely to a workbench.
Secure the Jigsaw with Hardwood Turnbuttons
One of the handiest features of this design is the removable jigsaw mounting system.
Instead of permanently fastening the saw to the table, four hardwood turnbuttons hold the baseplate in position.
The turnbuttons rotate over the edges of the jigsaw baseplate to secure it in the recess.
Thumb screws and threaded inserts keep the turnbuttons tight.
When you want to remove the jigsaw, simply loosen the thumb screws and rotate the turnbuttons out of the way.
This allows you to use the saw for ordinary handheld cutting without dedicating it permanently to the table.
Woodsmith Tip: Make sure the turnbuttons securely capture the baseplate and cannot loosen or rotate into the blade's path. Disconnect the saw from power whenever installing, removing, or adjusting it.
Add an Overhead Blade Guard
The final part of the project is the overhead blade guard.
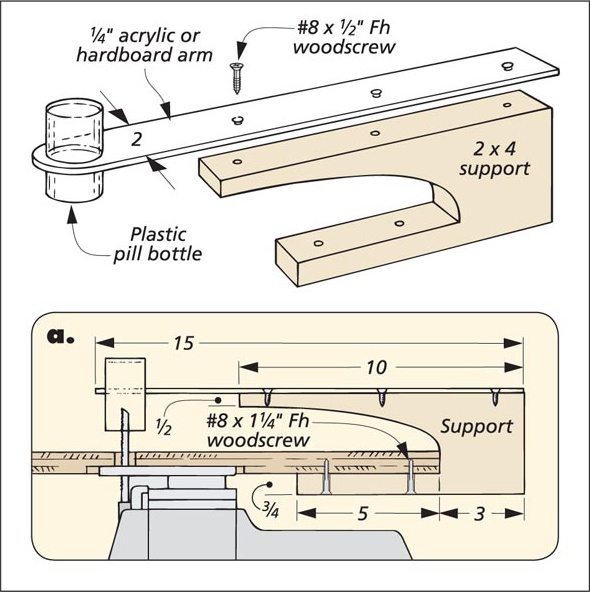
The support begins with a short piece of 2×4 lumber.
An arm extends from the support and positions the guard directly above the jigsaw blade.
Clear acrylic is a good choice for the arm because it provides visibility around the cutting area.
You can also use 1⁄4"-thick hardboard.
Make the Guard from a Plastic Bottle
An empty plastic pill bottle makes a simple guard for the exposed blade.
Drill a hole in the support arm sized to fit the bottle.
Then secure the bottle in place with a couple of drops of cyanoacrylate (CA) glue.
The bottle surrounds the blade while allowing you to see the cutting area.
Position it so the blade has adequate clearance throughout its full stroke.
Safety Note: This homemade guard is a chip and contact barrier, not a certified blade guard. An inverted jigsaw has an exposed, upward-facing reciprocating blade and may lack the workpiece hold-downs found on purpose-built scroll saws. Confirm that your jigsaw's manufacturer permits inverted mounting. Never use the setup without a secure mount, suitable blade guarding, and a reliable way to control the workpiece. A scroll saw or band saw is the safer choice for very small parts.
Tips for Cutting Curves with a Jigsaw Table
A few simple techniques can help you get better results from this setup.
Use a Fine-Tooth Blade
A fine-tooth jigsaw blade generally produces a smoother cut and can help reduce the tendency of the workpiece to jump or chatter.
Choose a blade suited to the material and the radius of the curves you're cutting.
Support Small Workpieces
Very small pieces can be difficult to control.
One option is to attach a small workpiece to a larger carrier board with suitable double-sided tape.
The carrier provides more surface area for guiding the piece while keeping your hands farther from the blade.
However, don't use a carrier board as a substitute for proper guarding and workpiece control. If the workpiece can't be held securely throughout the cut, use a different cutting method.
Cut with the Finished Face Up
For the blade arrangement described here, cutting with the finished face up can help minimize chipout on the visible surface.
Blade tooth direction varies, so test your particular blade on scrap material to confirm which face produces the cleanest cut.
Let the Blade Do the Cutting
Avoid forcing the workpiece into the blade.
Use a steady feed rate and allow the blade to follow the curve without excessive side pressure.
For tight curves, make relief cuts where appropriate to reduce the chance of binding or bending the blade.
A Compact Cutting Station for the Shop
This shop-made jigsaw table provides a way to tackle curved cuts without adding another large stationary tool to your workshop.
The plywood construction is straightforward, and the hardwood turnbuttons make it easy to install or remove the saw.
With the table clamped securely to a workbench, it provides a dedicated surface for guiding workpieces through curved cuts.
For occasional small-part work, it's a useful example of how a simple shop-made jig can expand the versatility of a handheld power tool.
Build a Multipurpose Clamp-On Workbench Table

Protect your workbench while making curved cuts, routing parts, and securing small workpieces. This versatile clamp-on table features a V-notch for jigsaw cutting, built-in clamping slots, and convenient openings for resting your router and other tools.
SEE THE WORKBENCH TABLE → A Handy Cutting Station for Jigsaw and Router Work


