


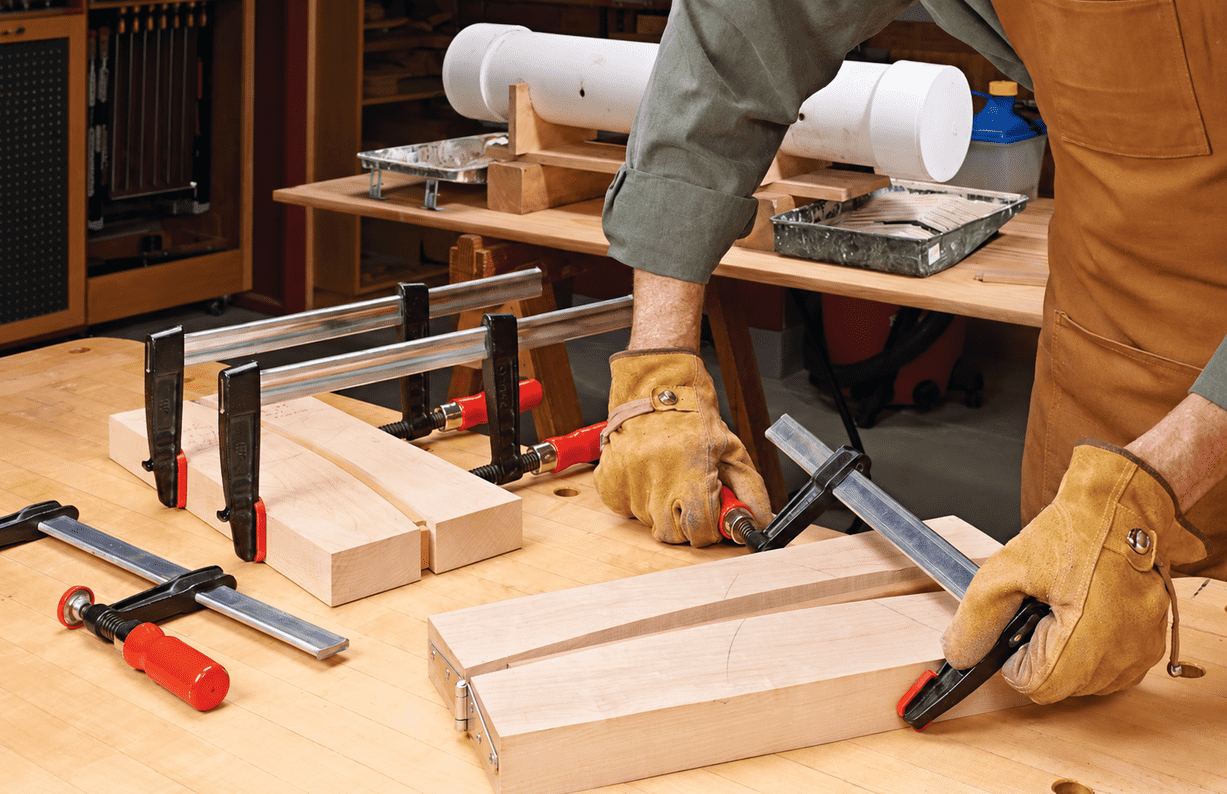
How to Steam Bend Wood: A Beginner's Guide
Adding curved parts to a woodworking project can transform an ordinary design into something special. Curved chair backs, furniture rails, and decorative components introduce flowing lines that would be difficult to achieve with straight pieces alone.
There are several ways to make curved wooden parts, but steam bending wood offers some distinct advantages.
Instead of cutting a curve from a thick board or gluing together thin laminations, steam bending allows you to shape a single piece of solid wood.
The result is a smooth, continuous curve with uninterrupted grain.
It's also an efficient way to make multiple matching parts. For example, when building dining chairs with gently curved back slats, you can cut the joinery and sand the blanks while they're still straight. After bending, only minor cleanup is needed.
Steam bending has been used for centuries in boatbuilding and furniture making. And with the right equipment and a simple bending form, it's a technique you can put to work in your own shop.
Here's what you need to know to get started.
What Is Steam Bending?
Steam bending is a woodworking technique that uses heat and moisture to make solid wood temporarily flexible.
As the wood absorbs heat and moisture, its structure becomes more pliable, allowing it to bend around a form without breaking.
Once the wood cools and dries in its new shape, much of the curve remains.
Unlike bent lamination, which creates a curved part by gluing together thin strips, steam bending produces a curve from a single piece of wood.
That means there are no visible glue lines running through the finished part.
Advantages of Steam Bending Wood
Steam bending offers several benefits for furniture making.
Continuous grain. The grain follows the curve of the part rather than being cut across it.
No visible glue lines. A single solid-wood blank creates the entire curved component.
Less shaping and sanding. You can prepare much of the workpiece before bending.
Repeatable curves. A well-made bending form helps produce matching parts.
Efficient use of lumber. Bending a straight blank can create less waste than cutting a curved part from thick stock.
These advantages make steam bending particularly useful for chair parts, curved rails, and other furniture components.
Choosing Wood for Steam Bending
Successful steam bending starts with the right material.
Not every board bends equally well, and grain direction can make a significant difference.
Look for Straight Grain
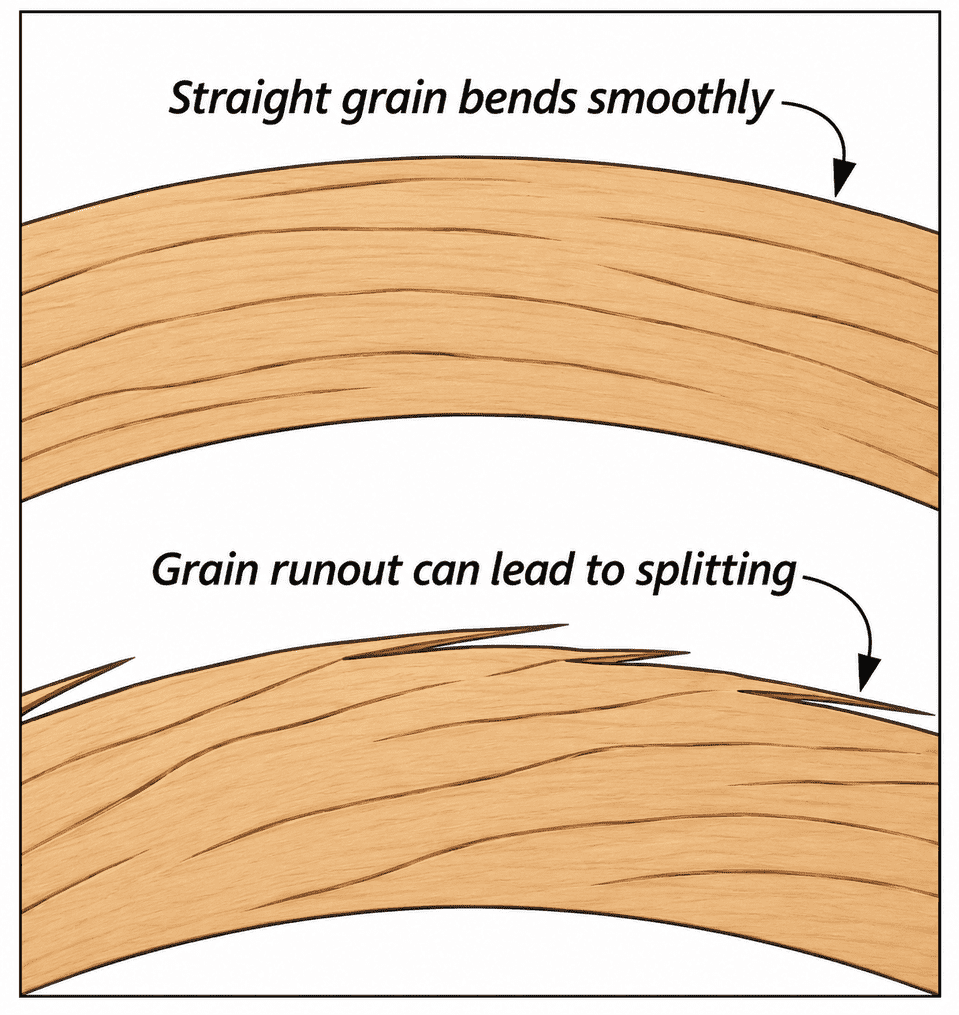
The most important characteristic is straight, continuous grain.
Avoid boards with knots, severe grain runout, or other defects in the area that will be bent.
Grain runout occurs when the wood fibers angle toward the surface and exit the edge of the board.
During bending, these short fibers are more likely to separate or split.
Straight-grained stock provides longer, more continuous fibers that can better withstand the bending process.
Choose Suitable Wood Species
Some hardwoods are better suited to steam bending than others.
Oak, ash, and hickory are commonly used because they can tolerate substantial bending when the grain and moisture conditions are suitable.
Other species may also work, particularly for gentle curves.
The best choice depends on the radius of the bend, the thickness of the stock, and the appearance you want.
For your first attempts, choose straight-grained material and begin with a relatively gentle curve.
Woodsmith Tip: Prepare a few extra blanks when steam bending multiple parts. They'll give you an opportunity to test the steaming time and bending form before working with the final pieces.
Step 1: Set Up a Wood Steaming Chamber
The first part of the process is creating a way to heat the wood evenly with steam.
A basic steam bending setup consists of two components:
- A steam generator that supplies a continuous flow of steam.
- A heat-resistant chamber that contains the workpieces while allowing steam to circulate.
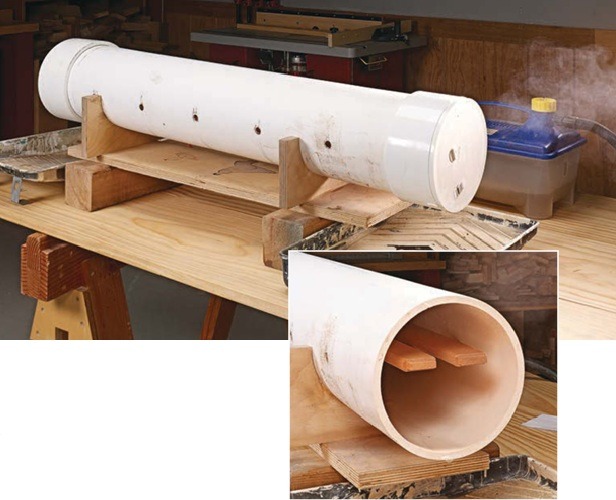
A compact woodworking steam generator can provide enough steam for many furniture projects.
Choosing a Steam Generator
A dedicated woodworking steam generator simplifies the process.
It provides a consistent source of steam without requiring a large boiler or complicated equipment.
The steam generator used for the chair slats in this project provides nearly two hours of continuous operation.
That is sufficient for many small and medium-sized furniture components.
Follow the generator manufacturer's instructions for filling, operating, and maintaining the unit.
Building a Safe Steam Chamber
The steam chamber needs to withstand prolonged exposure to heat and moisture.
A purpose-built wooden steam box or another chamber specifically rated for steam service is a practical choice.
Avoid ordinary PVC plumbing pipe for a steam chamber. PVC can soften at temperatures encountered during steam bending and may deform or fail.
The chamber must also remain continuously vented.
Never seal a steam chamber airtight or allow pressure to build inside it.
Provide a steam outlet and a way for condensation to drain safely.
Position the chamber so hot water cannot collect around electrical equipment or create a slipping hazard.
Support the Wood Inside the Chamber
The workpieces should be suspended above the bottom of the chamber rather than resting in collected water.
Wooden dowels installed across the chamber make convenient supports.
Arrange the dowels so the parts remain elevated and steam can circulate around them.
Leave some space between the workpieces.
Packing the chamber too tightly can interfere with even heating.
Step 2: Make a Steam Bending Form
The second major component of the setup is the bending form.
The form establishes the curve and holds the wood in position while it cools and begins to dry.
For gentle curves, a simple two-piece form works well.
Two-Piece Bending Forms
A two-piece form consists of matching curved blocks.
One block follows the inside radius of the bend, while the other supports the outside.
The workpiece fits between them.
A hinge at one end connects the two halves and keeps them aligned as the form closes.
Clamps draw the two pieces together, bending the wood into the desired shape.
This arrangement is particularly convenient when making several identical parts.
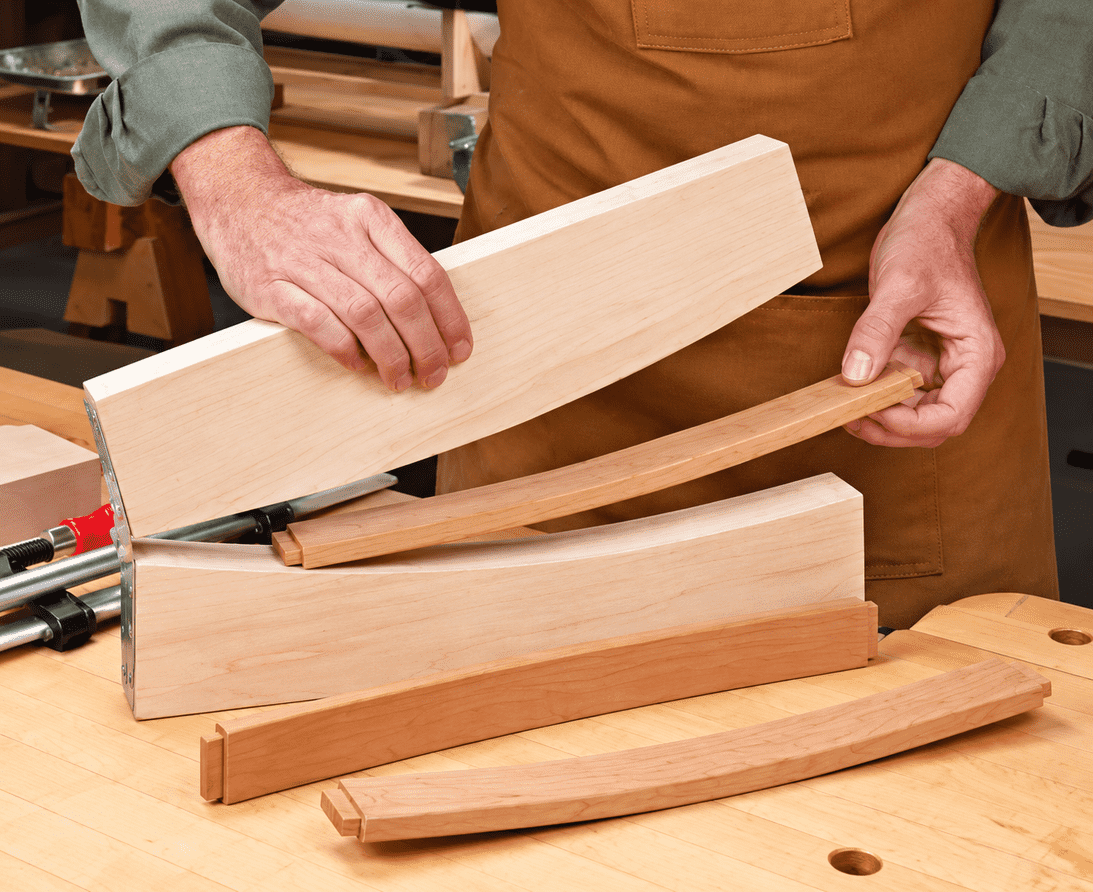
A hinged, two-piece bending form makes it easy to align the workpiece and apply even pressure while forming a gentle curve.
Why Supporting the Outside of the Bend Matters
When wood bends, the fibers on the inside of the curve are compressed.
The fibers on the outside are placed under tension.
Excessive tension can cause splitting, particularly where the grain runs out toward the surface.
A form that supports the outside of the bend helps reduce the chance of failure.
For tighter bends, a properly designed compression strap with suitable end restraints can provide additional support.
This helps control stretching on the outside of the curve.
Single-Sided Forms for Larger Parts
For larger workpieces, a single-sided bending form may be more practical.
In this arrangement, the inside form establishes the curve.
A bending strap supports the outside of the workpiece, while pegs and wedges hold the wood against the form.
This approach provides flexibility when working with longer parts or shapes that are difficult to clamp between two matching forms.
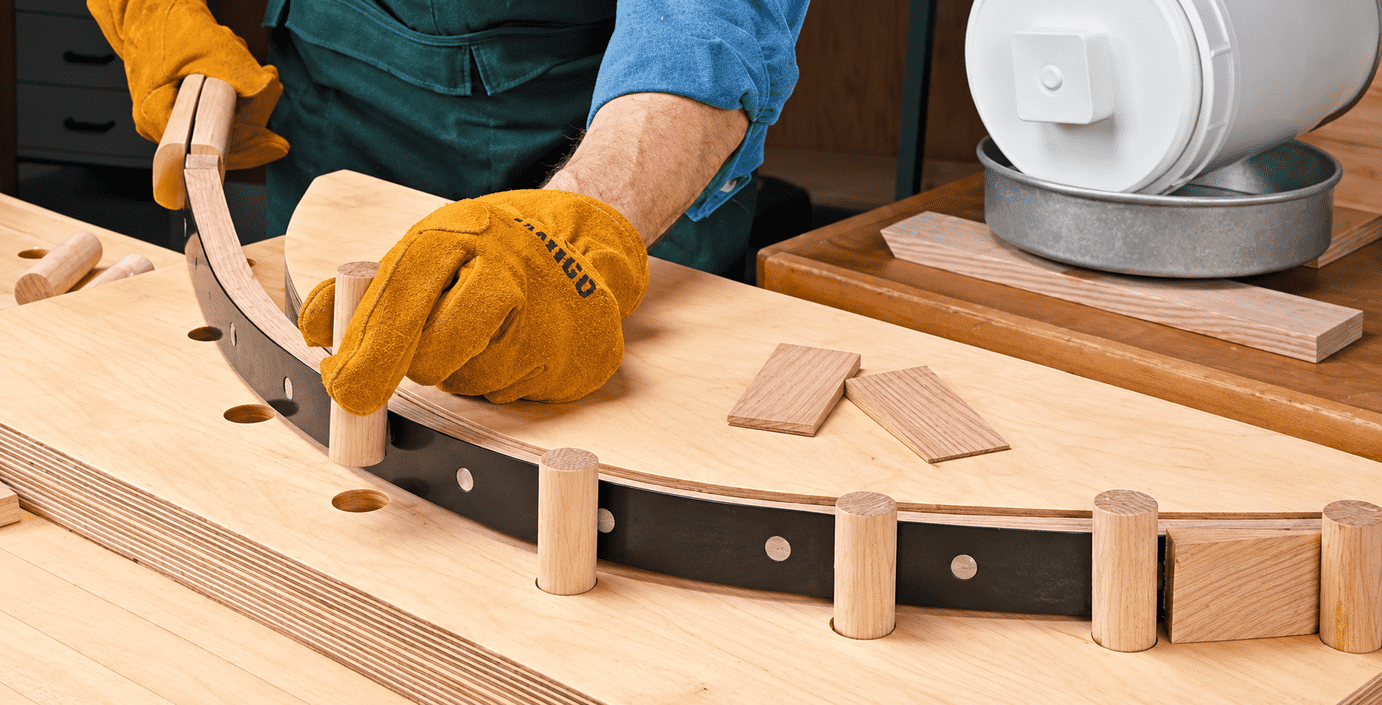
A single-sided form uses a curved support and a bending strap to shape the workpiece. Dowels and wedges hold the wood securely against the form.
Step 3: Steam the Wood
Once the steam chamber and bending form are ready, the actual bending process is straightforward.
The most important consideration is preparation.
Have your bending form, clamps, and other supplies ready before turning on the steamer.
The wood needs to be transferred to the form and bent promptly after steaming.
Load the Steam Chamber
Place the prepared blanks on the supports inside the chamber.
Leave gaps between the pieces so steam can circulate freely.
Close the chamber according to its design, keeping the required venting and drainage openings unobstructed.
Start the steam generator.
Monitor the Temperature
For effective steam bending, the wood needs to be heated thoroughly.
Steam chambers commonly operate near the boiling point of water, approximately 212°F at sea level.
A suitable thermometer can help you monitor conditions inside the chamber.
The original chair-building setup used a thermometer inserted through an opening in the top of the chamber.
Avoid opening the chamber unnecessarily during steaming.
Every time the chamber is opened, heat and steam escape, slowing the process.
How Long Should You Steam Wood?
A traditional starting guideline is about one hour of steaming for each inch of wood thickness.
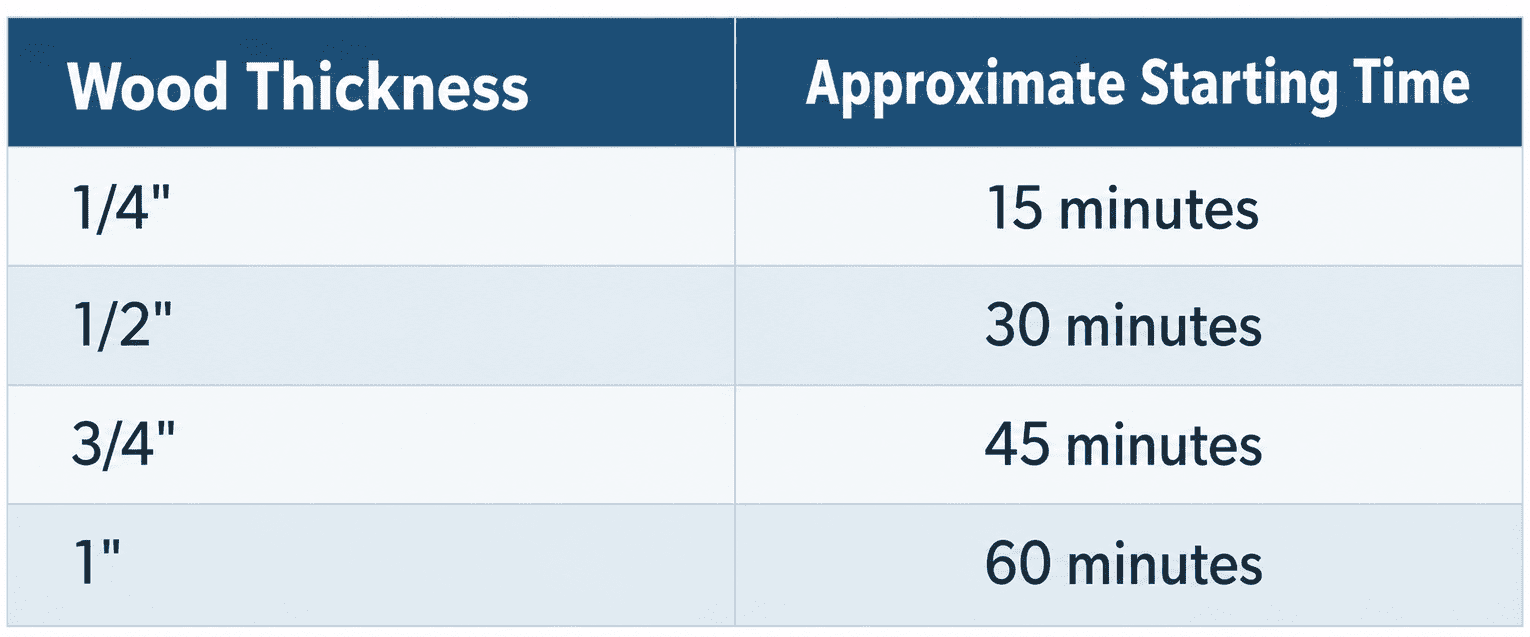
These times are guidelines, not guarantees.
The actual time required depends on the wood species, moisture content, thickness, and steam chamber conditions.
The wood also needs time to reach an appropriate temperature throughout its thickness.
Use test pieces to determine what works best for your setup.
Woodsmith Tip: More steaming isn't always better. Excessive exposure can affect the wood's condition without improving the bend. Start with the traditional guideline and adjust based on test results.
Step 4: Bend the Wood While It's Hot
Once the wood has been heated sufficiently, it's time to transfer it to the bending form.
This step needs to happen quickly.
As the wood cools, it becomes less flexible and more difficult to bend without damage.
Protect Yourself from Heat and Steam
Wear suitable heat-resistant gloves when handling the workpieces.
Hot wood, steam, and condensation can cause serious burns.
Open the chamber carefully and keep your face and hands out of the escaping steam.
Use the proper tools and protective equipment to remove the blanks safely.
Clamp the Wood in the Form
Remove one workpiece and immediately position it in the bending form.
For a hinged two-piece form, place the blank between the curved surfaces and close the form.
Apply clamps progressively to bring the wood into the desired curve.
For a single-sided form, position the workpiece and bending strap against the curved support, then secure them with the wedges or other clamping hardware.
Work smoothly and avoid sudden movements that could split the wood.
If the blank begins to crack, stop rather than forcing the bend.
Step 5: Allow the Wood to Cool and Dry
After the workpiece has been bent, it needs time to stabilize.
Keep the wood clamped in the bending form while it cools.
For gentle bends, the original chair project kept the parts in the form for at least a few hours.
However, cooling and drying are not the same thing.
Wood can remain significantly wetter than its normal shop moisture content after steaming.
For the most consistent results, allow the bent parts to dry thoroughly before final fitting or assembly.
Depending on the thickness, species, and shop conditions, this may take considerably longer than overnight.
Understanding Springback
Springback is the tendency of a bent workpiece to straighten slightly after it's removed from the form.
Some springback is normal.
The amount depends on the wood, the bend radius, the steaming process, and how thoroughly the piece has dried.
For projects requiring an exact curve, make test bends first.
You may need to adjust the bending form to create a slightly tighter curve than the final shape.
Final Sanding and Fitting
Once the bent parts have dried and stabilized, inspect them for cracks or other defects.
Check the curve against your project layout.
Then give the parts a light final sanding.
One advantage of steam bending is that much of the machining and sanding can be completed while the blanks are straight.
That means the curved parts often need only minor cleanup before installation.
Common Steam Bending Problems and How to Avoid Them
Steam bending becomes more predictable with experience, but a few common problems can affect the results.
Wood Splits During Bending
Possible causes: Grain runout, knots, an overly tight radius, inadequate heating, or insufficient support on the outside of the curve.
Solution: Select straighter-grained stock, test the bend radius, and use a properly designed bending strap when needed.
The Wood Springs Back Too Much
Possible causes: The workpiece was removed before it stabilized, or the bending form didn't account for springback.
Solution: Allow more drying time and experiment with a slightly tighter form.
The Wood Doesn't Bend Easily
Possible causes: The blank may not have heated sufficiently, the wood species may be unsuitable, or the bend may be too severe for the stock.
Solution: Verify the chamber temperature, test the steaming time, and begin with a gentler curve.
Matching Parts Have Different Curves
Possible causes: Variations in wood grain, moisture content, or drying conditions.
Solution: Select similar blanks, use the same bending form, and allow the pieces to dry under consistent conditions.
When Should You Use Steam Bending?
Steam bending is especially useful when you want a smooth curve made from a single piece of solid wood.
It's a good choice for:
- Curved chair backs and slats
- Furniture rails
- Curved handles
- Decorative furniture components
- Boatbuilding and other traditional woodworking applications
For projects where visible glue lines would be distracting, steam bending can offer a cleaner appearance than bent lamination.
And when several matching curved parts are required, a reusable form can make the process more efficient than cutting each curve from thick lumber.
RELATED PROJECT: Build a Stylish Cherry Dining Chair
Add Natural Curves to Your Woodworking Projects
Steam bending opens up design possibilities that are difficult to achieve with straight boards.
With a reliable steam generator, a properly vented chamber, and a well-made bending form, you can create curved parts from solid wood while preserving continuous grain.
The key is choosing suitable stock, supporting the wood fibers during the bend, and allowing the finished parts enough time to dry and stabilize.
Start with a gentle curve and a few test blanks.
Once you're comfortable with the process, you'll have another valuable technique for adding graceful curves to your furniture projects.
How to Bend Wood: 3 Proven Techniques
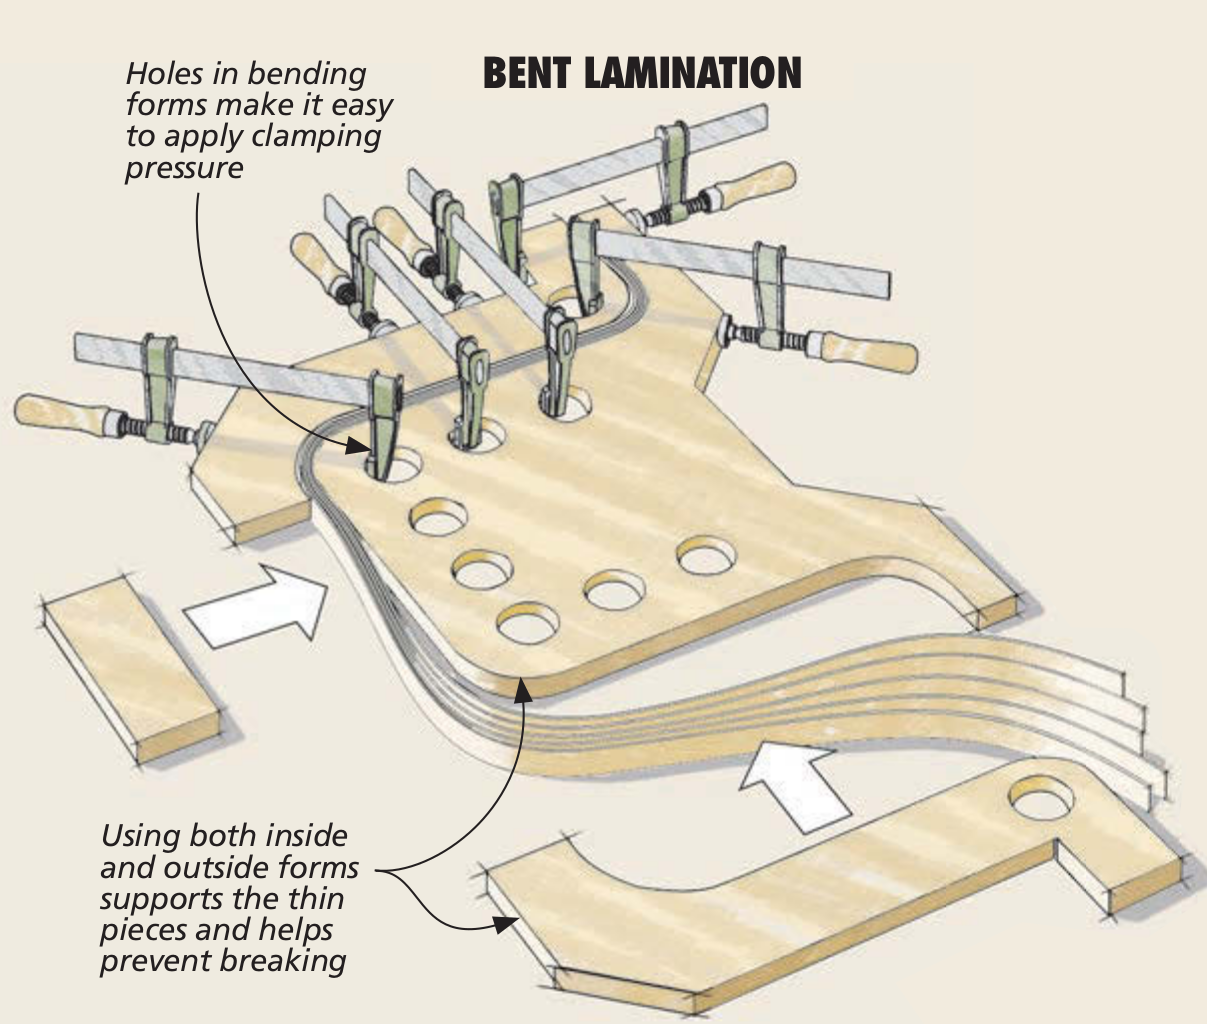
Steam bending is just one way to shape wood. Discover how bent lamination and kerf bending compare, and learn which technique works best for your next woodworking project.
EXPLORE WOOD BENDING TECHNIQUES → Find the Right Way to Add Curves to Your Projects


