How do you get a straight, rigid piece of wood to bend into a smooth, flowing curve? One way is with a woodworking technique called bent lamination.
The process involves cutting wood into thin, flexible strips, applying glue between the layers, and clamping them around a curved form. Once the glue cures, the strips become a single, rigid piece that retains the shape of the form.

Bent lamination opens up all sorts of possibilities for furniture making. You can use it to create curved chair legs, armrests, table aprons, and other parts that would be difficult or wasteful to cut from solid stock.
The technique is straightforward, but a successful glue-up takes preparation. Thin strips can slide against one another as they're bent, glue squeezeout gets everywhere, and you'll need enough clamps to maintain consistent pressure along the curve.
The payoff is worth the effort. With a little cleanup and final shaping, you're left with a strong, attractive curved component that can become a distinctive feature of your next woodworking project.
Here's how to select and prepare the wood, build a bending form, pre-bend the strips when necessary, and complete the final glue-up.
What Is Bent Lamination?
Bent lamination is a woodworking technique that uses several thin layers of wood to create a thicker, curved component. Instead of trying to bend a full-thickness board, you divide the material into strips thin enough to flex around a form. Glue holds the layers together, and the form establishes the finished shape. After the adhesive cures, the individual strips act as a single laminated piece.
Depending on the project, bent lamination can create simple curves in one plane or more complex compound curves that bend in multiple directions. For this guide, we'll focus on simple curves. They're a useful starting point for learning the technique and can be used for a wide range of furniture components.

Why Bent-Laminated Wood Can Be Stronger Than a Cut Curve
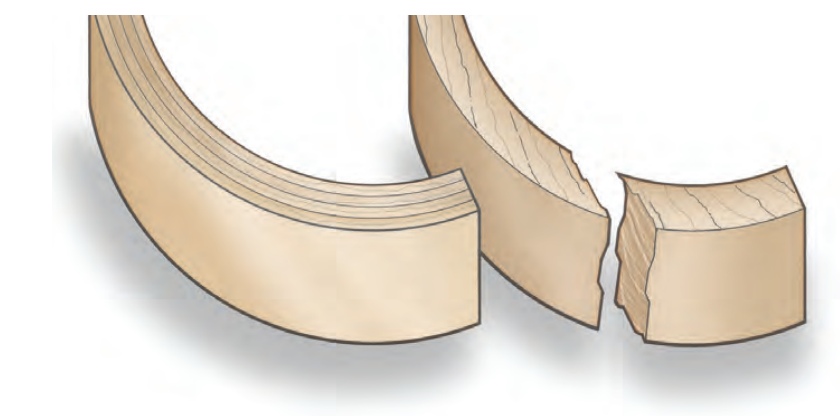
One of the biggest advantages of bent lamination is the way it preserves the wood's grain direction. When you cut a tight curve from a solid board, the grain may run off the edge of the finished piece. These areas of short grain can become weak points that are susceptible to breaking under load.
With bent lamination, the grain follows the curve instead. The long wood fibers remain continuous around the bend, helping reinforce the finished component. This can make a properly glued bent lamination considerably stronger than a comparable curved piece cut from solid stock, particularly where the solid piece would have significant grain runout. It's one reason bent lamination is useful for structural furniture parts such as curved chair legs and armrests.
Choosing the Best Wood for Bent Lamination
The success of a bent-lamination project begins with selecting suitable wood. Not every board will bend equally well. Grain direction, defects, and strip thickness all affect how easily the material conforms to the bending form. For the most predictable results, start with clear, straight-grained lumber.
Look for Straight Grain
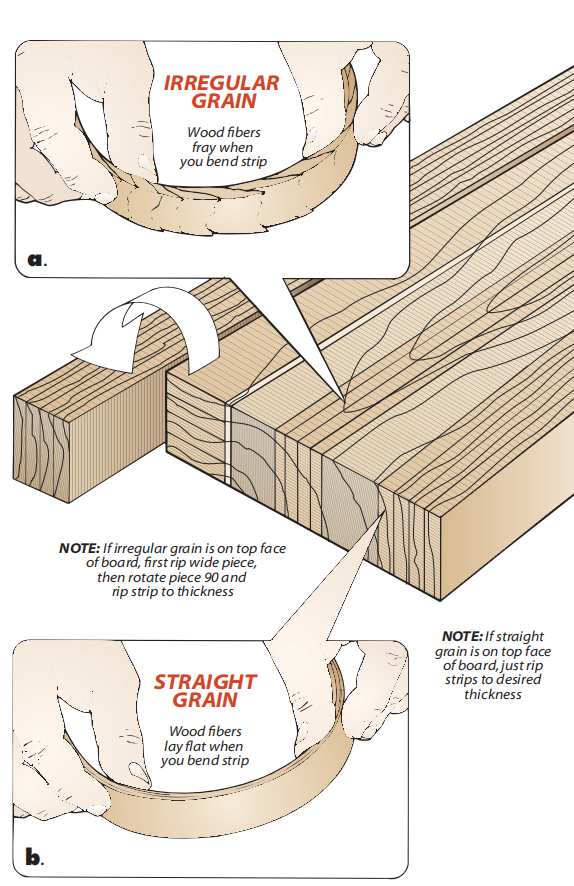
The grain on the edge of each strip is especially important. When the grain runs straight along the strip, the wood fibers can bend smoothly around the form. Irregular grain creates a different situation. As the strip bends, the fibers may begin to separate or fray, increasing the risk of a fracture.
Think of it like smoothing the fur on a cat. Moving in the direction of the fibers is smooth, while moving against them creates resistance. Avoid boards with knots, pronounced grain changes, or other defects in the areas that will be bent.
For the curved legs of our lounge chair, we selected straight-grain walnut. In addition to bending well, its uniform appearance helps conceal the individual layers in the finished lamination.
How Thick Should Bent-Lamination Strips Be?
Strip thickness determines how easily the wood will bend. Thinner strips are more flexible and can conform to tighter curves. Thicker strips require more force and are more likely to break. As a general rule, I use the thickest strips that will bend around the form without breaking.
Depending on the wood species and the radius of the curve, that may be anywhere from approximately 1/16" to 1/4" thick. There's no single thickness that works for every project, so the best approach is to cut a test strip and try bending it around the form before preparing all the laminations.
If the strip begins to fracture or requires excessive force, try reducing its thickness by about 1/32". That small difference can be enough to make a difficult bend manageable.
How to Cut Thin Wood Strips for Bent Lamination
Once you've selected the lumber, the next step is preparing the individual strips. A table saw can be used for this process, but I prefer the band saw. Its thinner blade removes less material, which is especially helpful when cutting several strips from a single board. It also makes it easier to maintain a consistent grain pattern across the finished lamination.
Rip the Strips with the Grain Oriented Correctly
If the straightest grain is visible on the face of the board, you can rip the strips directly to the required thickness. But what if the straightest grain is on the edge?
In that case, start by ripping a piece to the finished strip width, allowing an extra 1/16" for cleanup. Then flip the piece on edge and cut the individual strips with the straight grain facing upward. This orientation helps keep the wood fibers running continuously along the edge that will form the curve.
Between cuts, I use a hand plane to smooth the edge of the remaining blank. The strips can then be planed or sanded to achieve consistent thickness and smooth glue surfaces.
Five Tips for Preparing Bent-Lamination Strips
1. Select clear wood: Choose straight-grained lumber without knots or major defects that could cause a strip to break.
2. Cut for straight grain: Orient the blank so the straightest grain runs along the edges of the strips.
3. Cut the strips oversize: Allow approximately 2" of extra length and 1/16" of extra width for trimming and cleanup.
4. Keep the strips in order: Arrange the strips in the order they're cut from the board to maintain a consistent grain pattern.
5. Make a few extras: Prepare additional strips in case one breaks during bending or glue-up.
Building a Bending Form for Wood Lamination
The bending form is what gives the laminated wood its shape. It also distributes clamping pressure along the curve, helping prevent gaps between the individual layers. A bending form can be as simple as a single curved block or a two-part setup with matching inner and outer forms.
For narrow furniture components, such as the curved legs of our lounge chair, a single form with strategically placed clamps works well. Wider components, such as a curved plywood seat or backrest, benefit from a two-part form that spreads pressure across the entire surface.
Making an MDF Bending Form
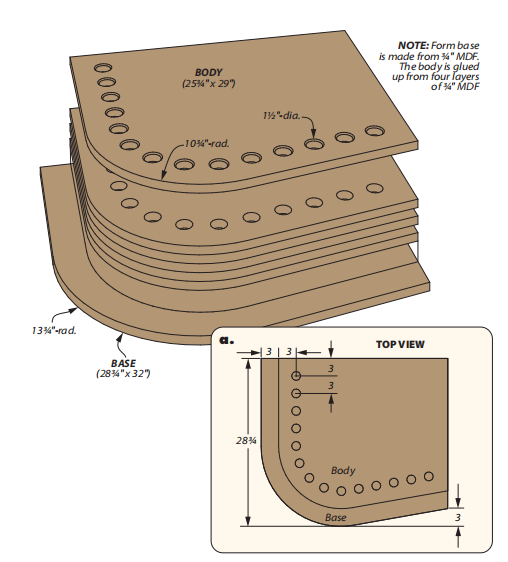
I prefer using 3/4" MDF for bending forms. It's easy to shape, relatively inexpensive, and provides a smooth surface for the laminations. Start by laying out the desired curve on a piece of MDF, then cut the first layer to shape and smooth the edge. This becomes the template for the remaining layers.
Glue additional oversized layers to the first, then trim them flush with a router and flush-trim bit. Build up the form until it's approximately as thick as the width of the wood strips you'll be bending. This helps distribute clamping pressure across the full width of the workpiece rather than concentrating it along one edge.
Adding Clamp Holes and Preventing Glue Adhesion
Once the form is complete, drill a series of holes parallel to the curved edge. Size the holes to accommodate the heads of your clamps, allowing you to apply pressure at intervals along the curve.
Before using the form, cover the curved surface with packing tape. This creates a barrier that prevents glue squeezeout from bonding the laminations to the MDF. It's a simple step, but one you don't want to overlook.
How to Soak and Pre-Bend Wood Strips
For some bends, thin wood strips will conform to the form without additional preparation. But when making the curved legs for our lounge chair, I found that some of the walnut strips were still too stiff. To make them more flexible, I soaked the strips in water and pre-bent them around the form before the final glue-up.
This isn't necessary for every project, but it can make a challenging bend easier to manage.
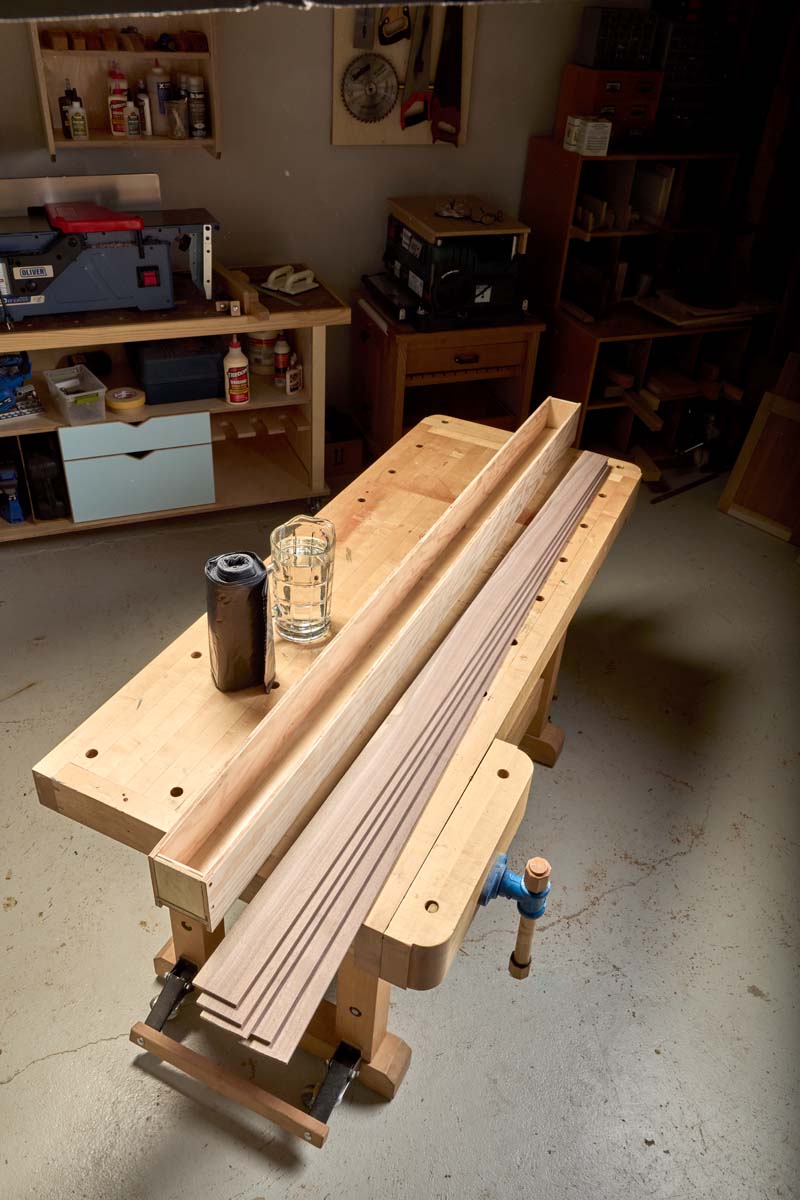
Step 1: Make a Soaking Trough
For small pieces, a plastic tub or a length of PVC pipe fitted with end caps may be all you need. For the long strips used in the chair legs, I made a simple trough from scrap plywood. The trough only needs to be slightly larger than the strips, so you don't have to use more water than necessary.
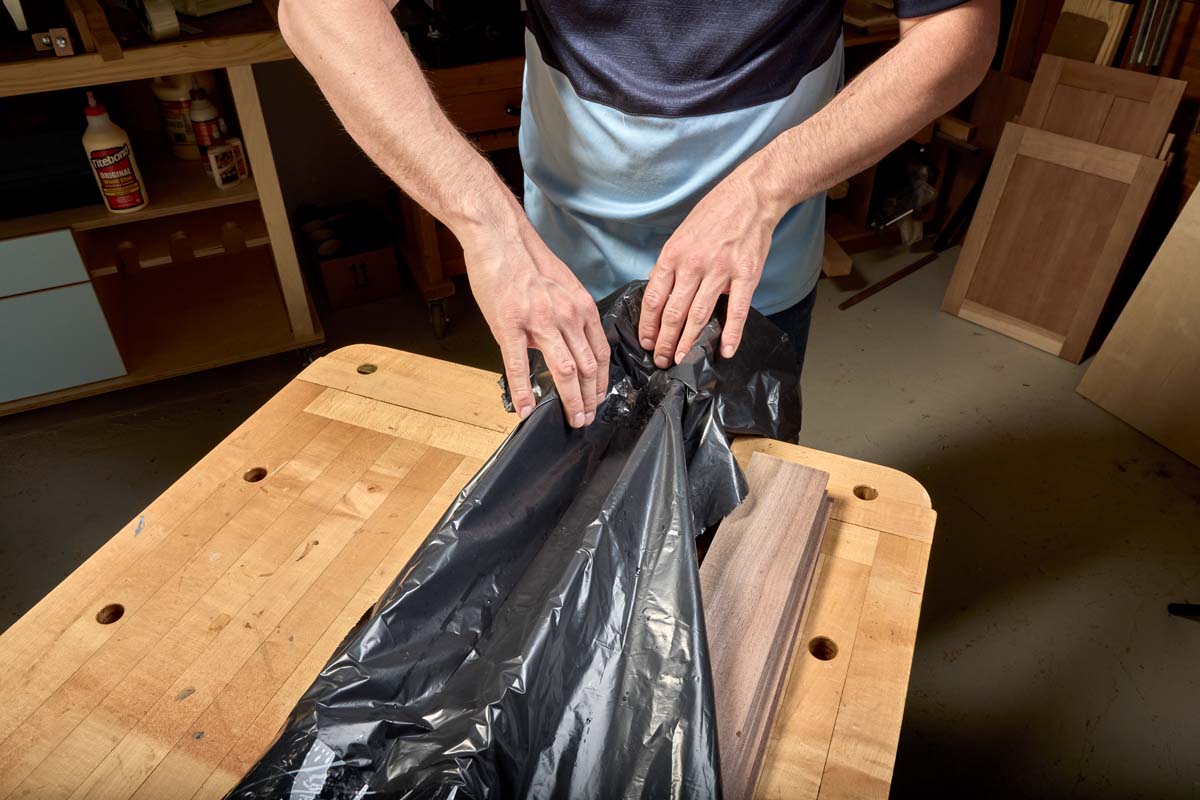
Step 2: Line the Trough with Plastic
Line the trough with heavy plastic to make it watertight. I used a pair of 50-gallon garbage bags taped together at the seam. Heavy-duty painter's plastic is another option. Make sure the liner is large enough to extend over the edges of the trough.
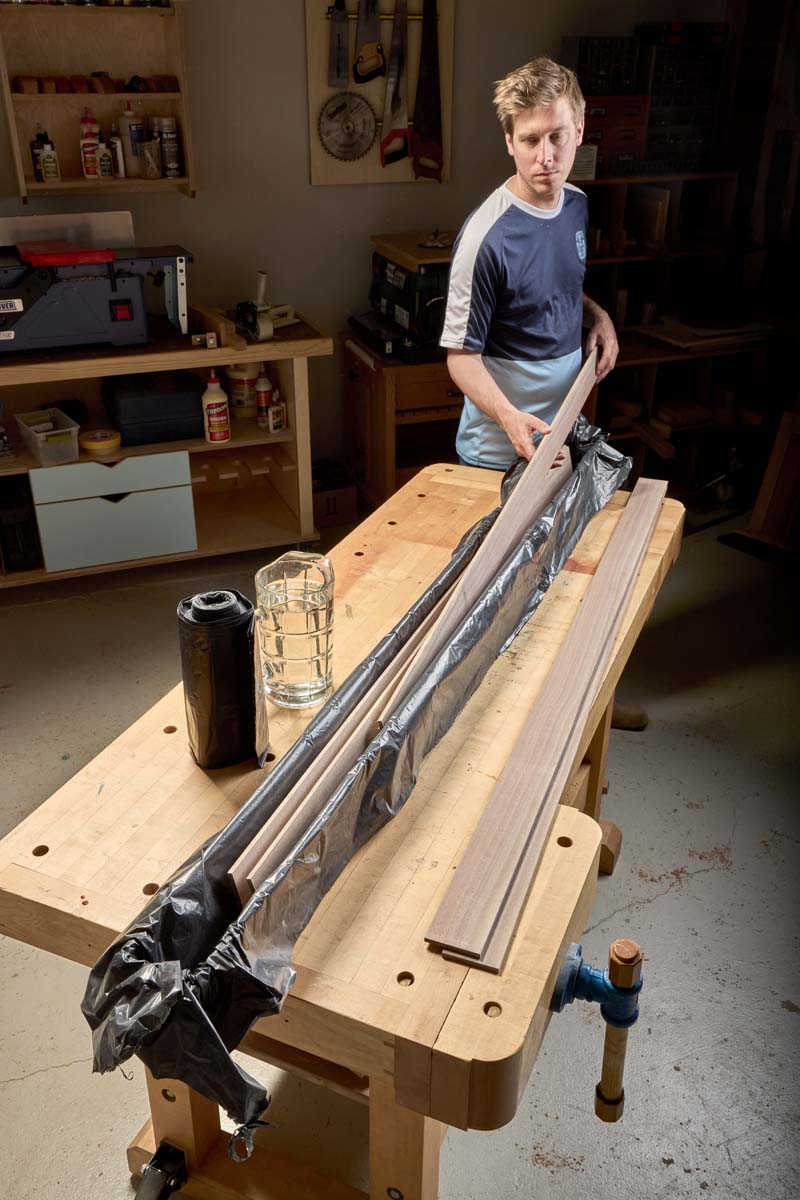
Step 3: Soak the Wood Strips
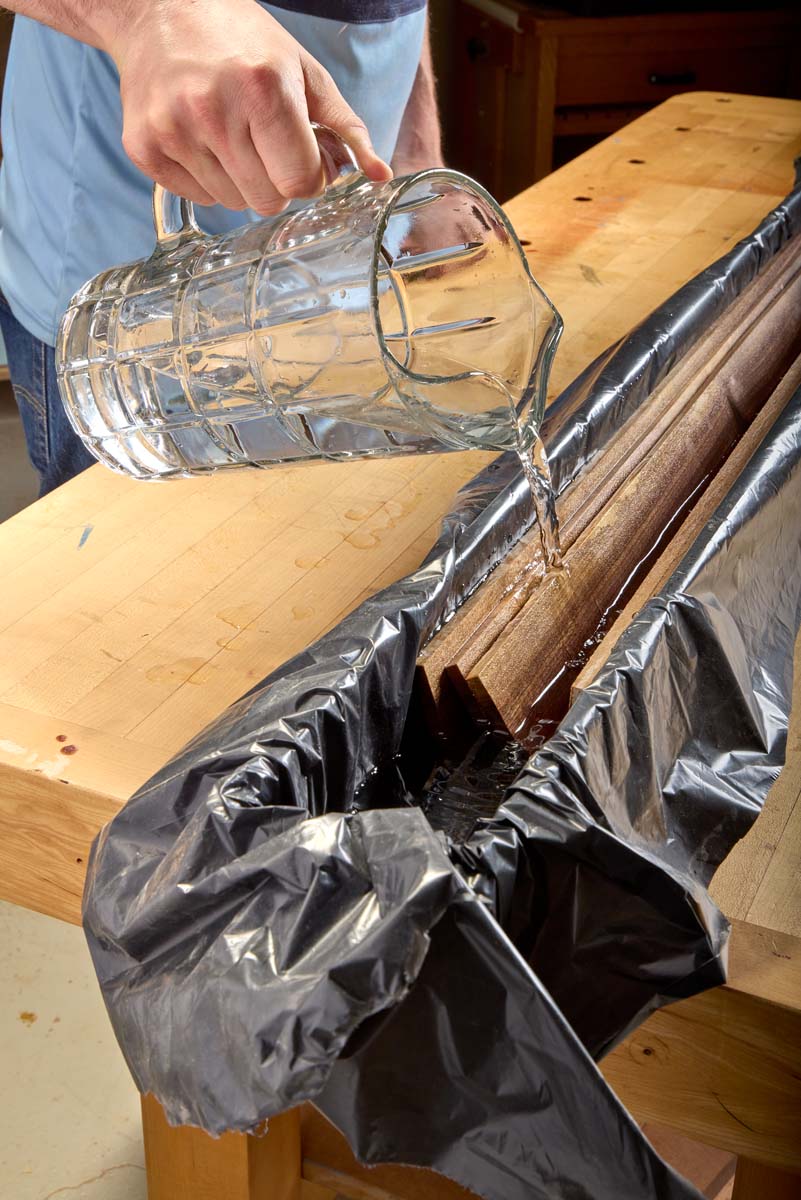
Place the laminations in the trough, laying them on their sides and spacing them so water can reach as much of the surface as possible. Add enough water to cover the strips, then allow them to soak for approximately 30 minutes to an hour before testing their flexibility.
The soaking time will vary depending on the wood species, strip thickness, and tightness of the bend.
Step 4: Test the Bend
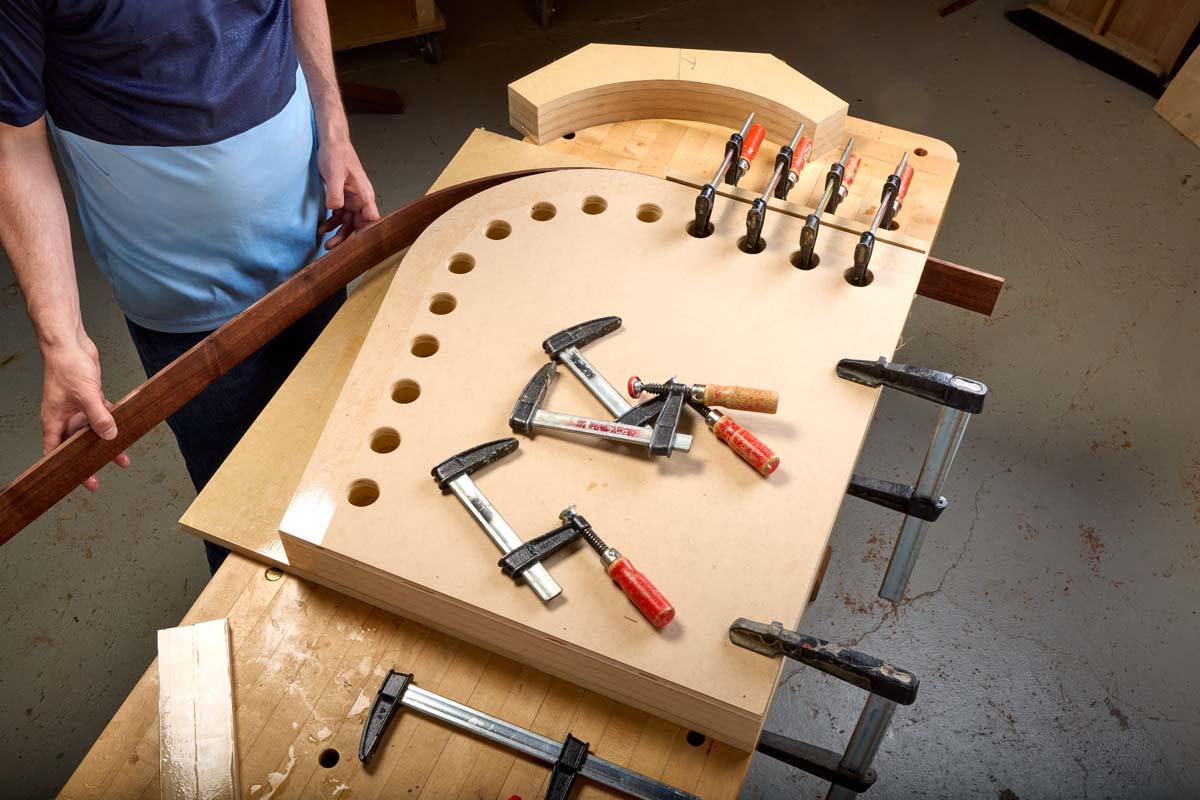
Testing the flexibility of a wood strip before bent lamination
After soaking, carefully bend a strip around the form. If it still resists bending, allow it to soak longer. When the strip bends easily without showing signs of cracking, it's ready for pre-bending.
Step 5: Clamp the Strips to the Form and Let Them Dry
Gather the soaked strips and clamp them around the bending form. Start at one end and work progressively along the curve, adding clamps as you go. As the clamps are tightened, use a block of wood and hammer to gently tap the strips into alignment. The goal is to position the strips as close as possible to their final shape.
Leave them clamped to the form until they've dried. Depending on the thickness of the strips and how much water they absorbed, this may take a day or two. The pre-bending process gives the strips a head start on the final curve and provides a useful practice run for the glue-up.
Important: Allow the wood to dry sufficiently before gluing. Excess moisture can interfere with some adhesives, so follow the glue manufacturer's requirements for wood moisture content.
Choosing the Right Glue for Bent Lamination
A successful bent lamination depends on creating strong, consistent glue bonds between the strips. Regular woodworking glue can be used for many bent-lamination projects, provided the strips are properly prepared and the adhesive is suitable for the application.
For our curved lounge chair legs, I used epoxy. The longer open time gave me more opportunity to spread the adhesive, position the strips, and tighten the clamps before the glue began to set. This was especially helpful when working with the longer strips and more demanding curves.
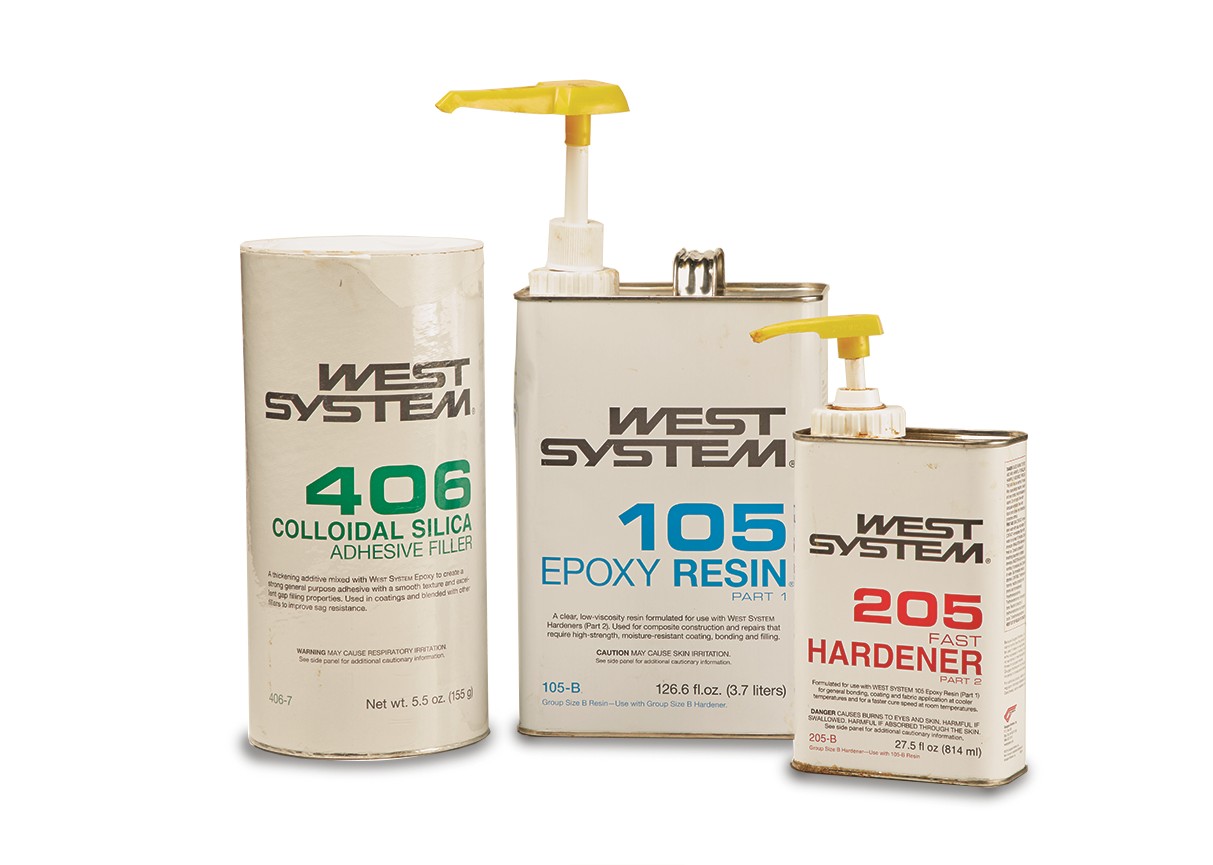
Epoxy provides additional working time when assembling and clamping multiple wood strips.
Whichever adhesive you choose, make sure it's appropriate for the wood, expected service conditions, and the demands of the finished part. Follow the manufacturer's mixing, application, clamping, and curing instructions.
Gluing and Clamping Bent-Laminated Wood
With the strips prepared, the bending form ready, and the adhesive selected, it's time for the final glue-up. This is often the messiest part of the process, but the earlier pre-bending and dry-fitting steps make it much easier.
Apply Glue to the Wood Strips
Arrange the strips in their original order. Apply an even layer of glue to the mating surfaces, making sure there's adequate coverage across the full width and length of each strip. Stack the strips together, keeping their ends aligned as closely as possible.
Wear appropriate gloves and have cleanup supplies ready. Use a cleanup method compatible with the adhesive you've selected.
Clamp the Lamination Around the Form
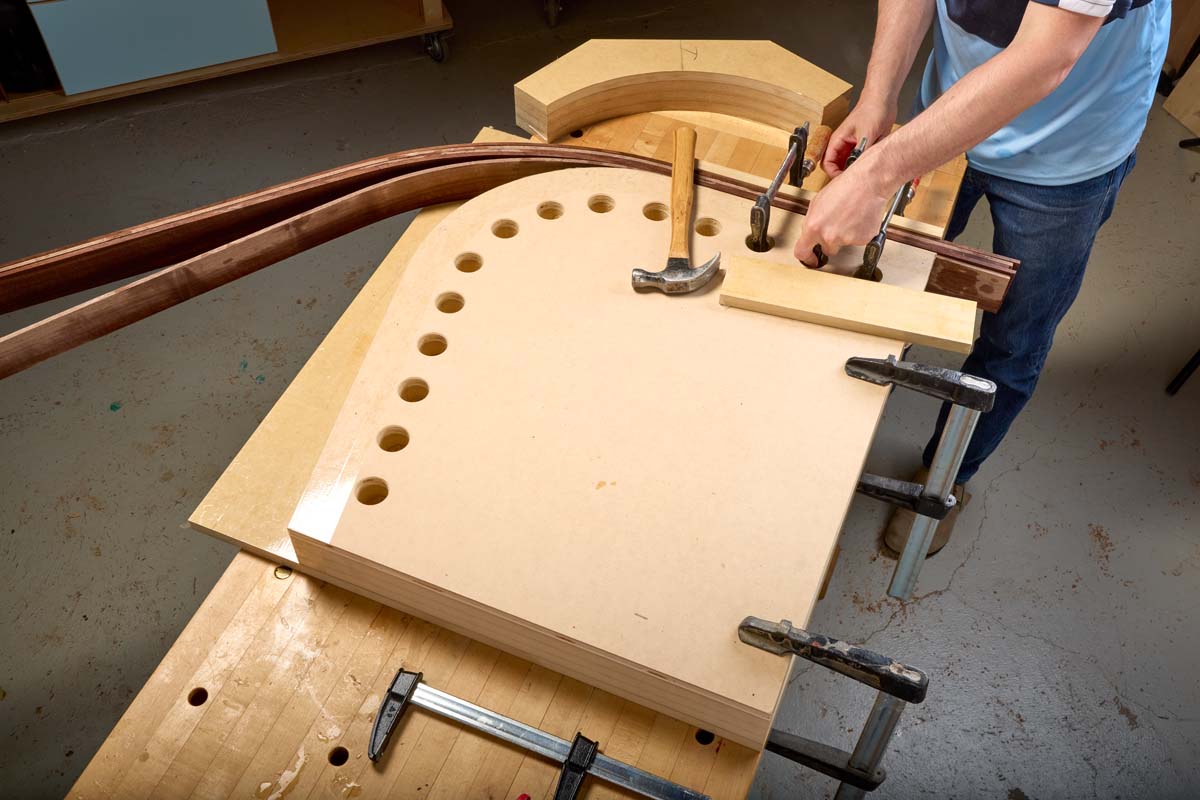
Position the stacked strips against the bending form. Starting at one end, gradually work around the curve, adding clamps and bringing the strips into contact with the form.
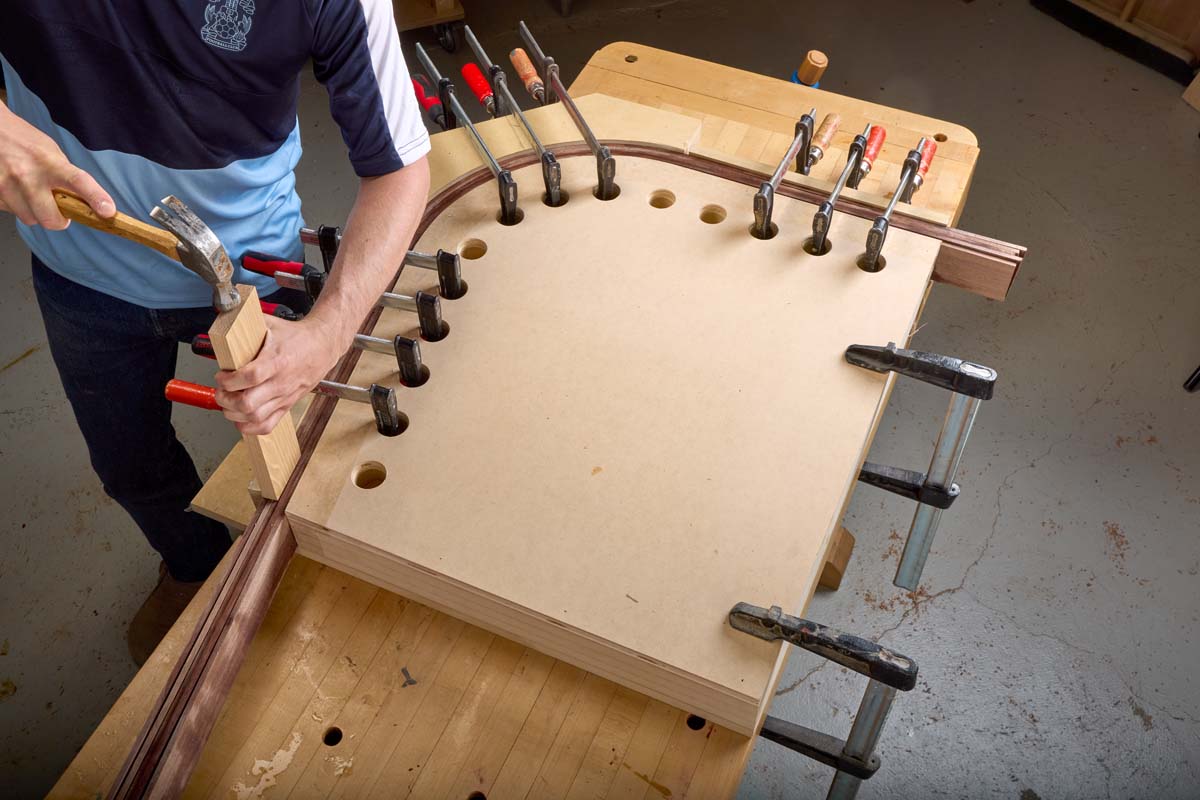
Because the glue acts as a lubricant, the strips may slide against one another as pressure is applied. Take your time and keep checking their alignment. Once the clamps are installed, use a block of wood and hammer to gently tap the strips into position. This helps maintain a flat reference surface for the final milling operations.
Allow the Glue to Cure
Leave the laminated assembly clamped until the adhesive has cured sufficiently to retain the curve. Don't rush this step. Removing the clamps too early can allow the piece to spring back or compromise the glue bond.
Follow the adhesive manufacturer's recommended cure time before removing the workpiece from the form or machining it.
Cleaning Up and Shaping the Finished Bent Lamination
Once the glue has cured, remove the clamps and lift the laminated piece from the form. At this point, it probably won't look particularly impressive. Dried glue squeezeout may cover the surfaces, and the edges may be uneven. That's normal.
I start by using a carbide scraper to remove the larger areas of dried glue. A block plane works well for cleaning up the edges, while sanding removes any remaining glue from the faces.
Depending on the project, you may also need to joint or plane the laminated piece to establish clean, flat reference surfaces. Finally, trim the component to its finished length and width.
The result is a smooth, rigid curved piece with continuous grain that follows the bend. It's now ready to become part of your furniture project.
Put Bent Lamination to Work in Your Next Woodworking Project
Bent lamination is one of those woodworking techniques that opens up new design possibilities once you've tried it. Instead of being limited to straight stock or cutting curves from thick lumber, you can create smooth, flowing shapes with thin strips of wood and a shop-made bending form.
The technique takes some planning, particularly when selecting the wood, preparing the strips, and organizing the glue-up. But the individual steps are manageable, and the finished results can be both strong and attractive.
For a practical example, take a look at our Curved-Leg Lounge Chair from Woodsmith Issue 286. The project uses bent-laminated walnut for the sweeping front legs and laminated plywood for the curved seat and backrest.
It's a great example of how the same basic technique can be adapted to create several different components in one furniture project.