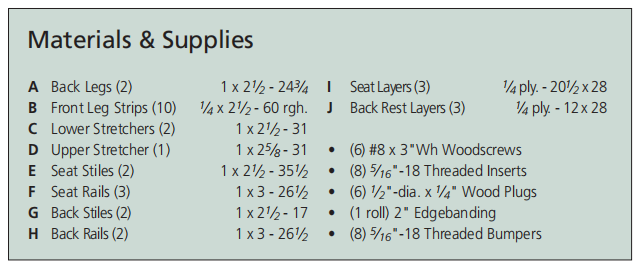
Some woodworking projects begin with a design. Others start with a technique you want to master. This contemporary curved-leg lounge chair brings the two together.
Dillon has become something of our resident chair guy here at Woodsmith. For his latest project, he wanted to create a wooden lounge chair with flowing curves, clean lines, and a contemporary appearance. To achieve that look, he turned to one of woodworking's most versatile techniques: bent lamination.
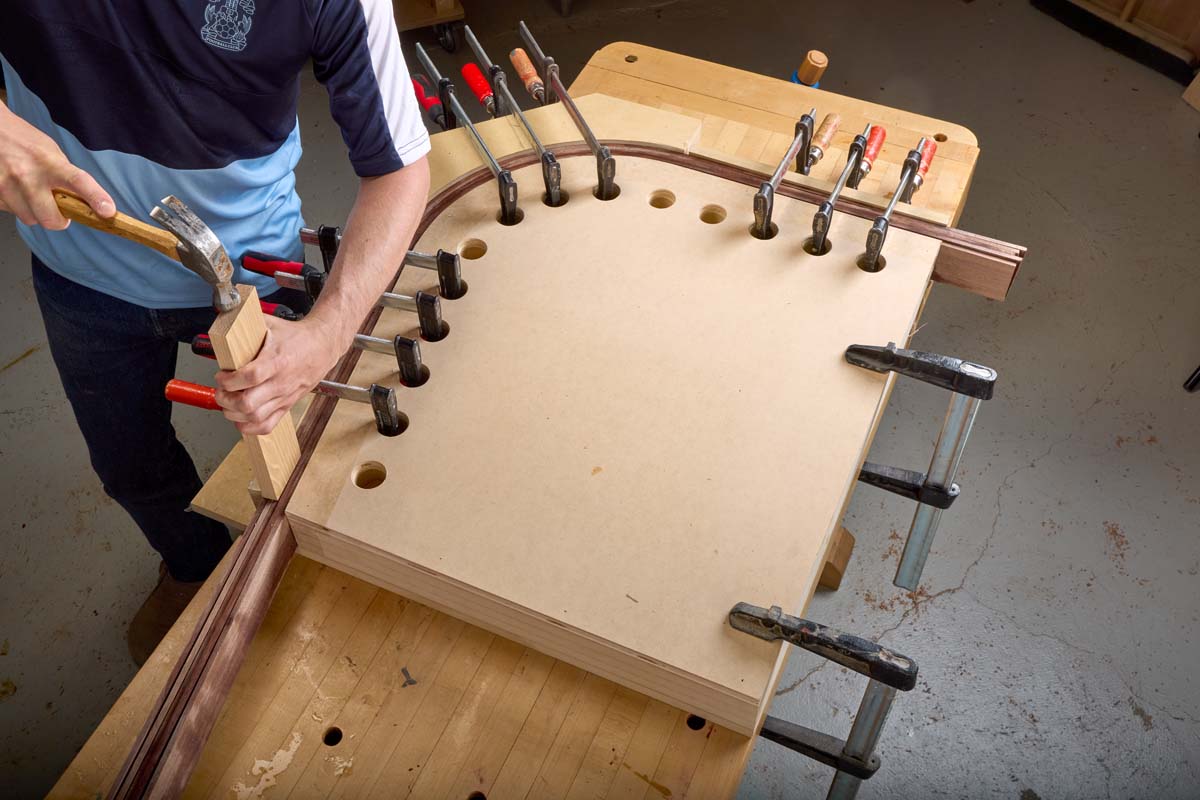
Rather than cutting the curved legs from thick lumber, Dillon glued thin, flexible strips of walnut around a bending form. Once the glue dried, the laminated pieces retained their shape, creating the sweeping front legs that extend upward to form the armrests.
The same basic technique creates the gently curved plywood seat and backrest. Combined with traditional mortise-and-tenon joinery, these laminated components produce a chair that's both sturdy and comfortable.
Let's take a closer look at how the chair comes together, from building the bending forms and laminating the legs to assembling the frame and shaping the seat and back.

Designing a Contemporary Wood Lounge Chair
The most distinctive feature of this lounge chair is its curved front legs. They rise from the floor and sweep backward to form the armrests, giving the chair its flowing appearance.
But the curves aren't limited to the legs. The seat and backrest also feature gentle contours that cradle the sitter and help distribute weight.
The design separates the chair's structural components from the surfaces that provide comfort. The legs, stretchers, and frames form a sturdy foundation, while the laminated seat and backrest create the chair's comfortable profile.
Choosing Wood for Bent Lamination
Material selection plays an important role in the appearance of a bent-laminated project.
Because the curved legs are made from several thin strips glued together, the individual layers can become visible along the edges.
To minimize this effect, Dillon selected straight-grain walnut for the legs. The consistent grain helps disguise the individual strips and gluelines, creating the appearance of a continuous curved piece.
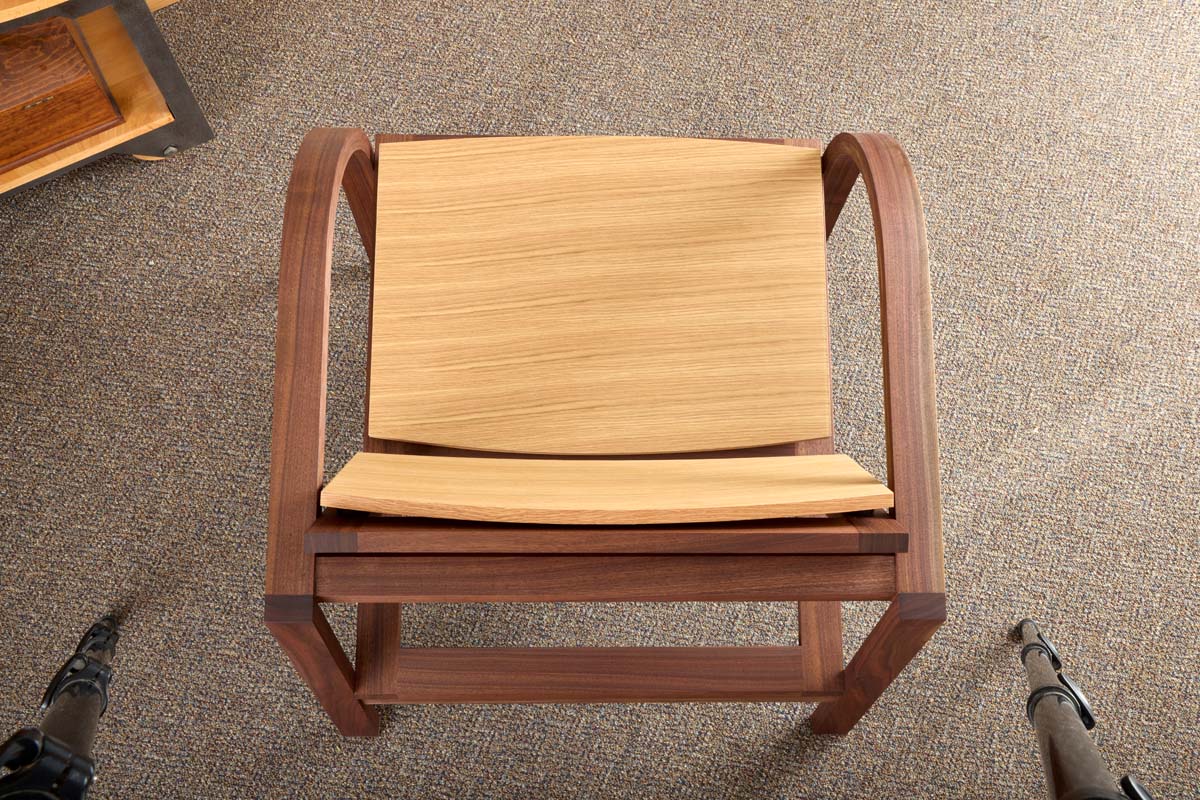
For the seat and backrest, he chose riftsawn oak plywood. Its relatively uniform grain complements the walnut and provides a clean, understated appearance.
The exposed plywood edges are concealed with veneer edgebanding, and an oil finish brings out the warmth of both materials.
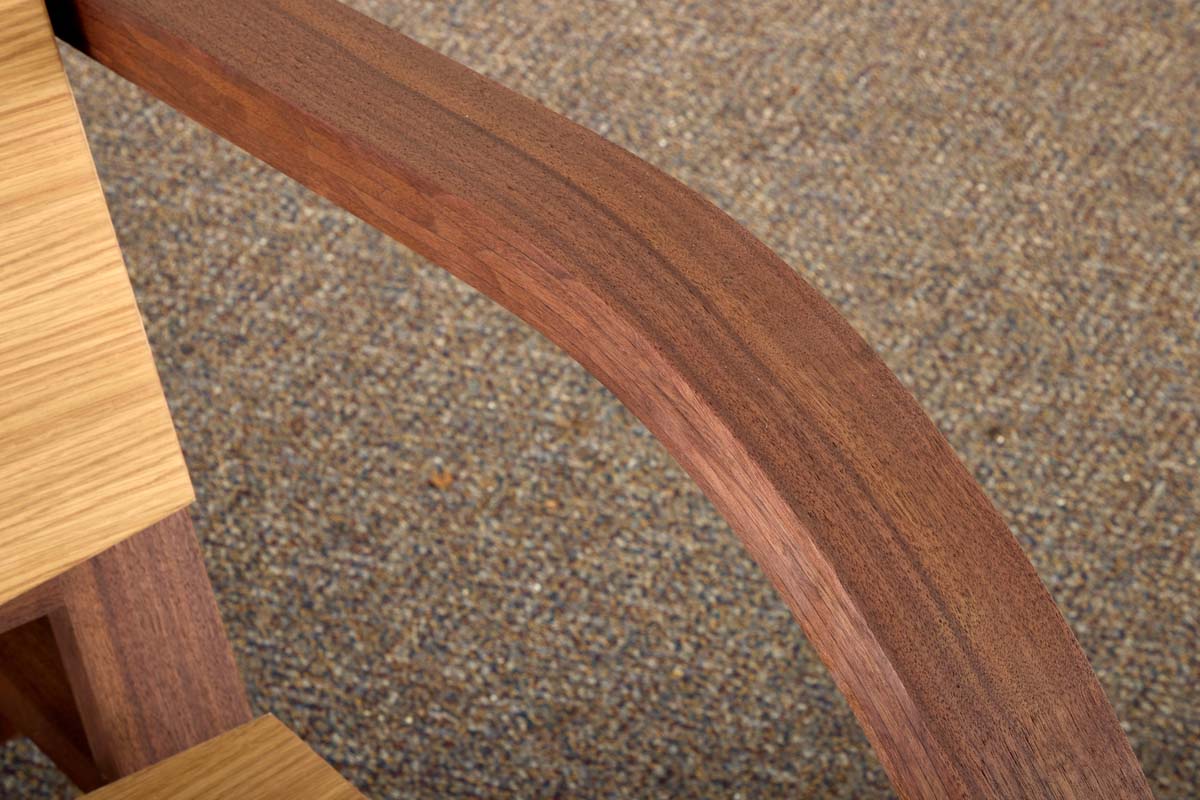
Straight-grain walnut helps conceal the individual strips and gluelines that make up the curved front legs.
Building the Curved Legs with Bent Lamination
The four legs provide the chair's primary structure, but the front legs also define its appearance.
Unlike the relatively straightforward rear legs, the front legs require a bending form and a series of thin wood strips to create their distinctive shape.
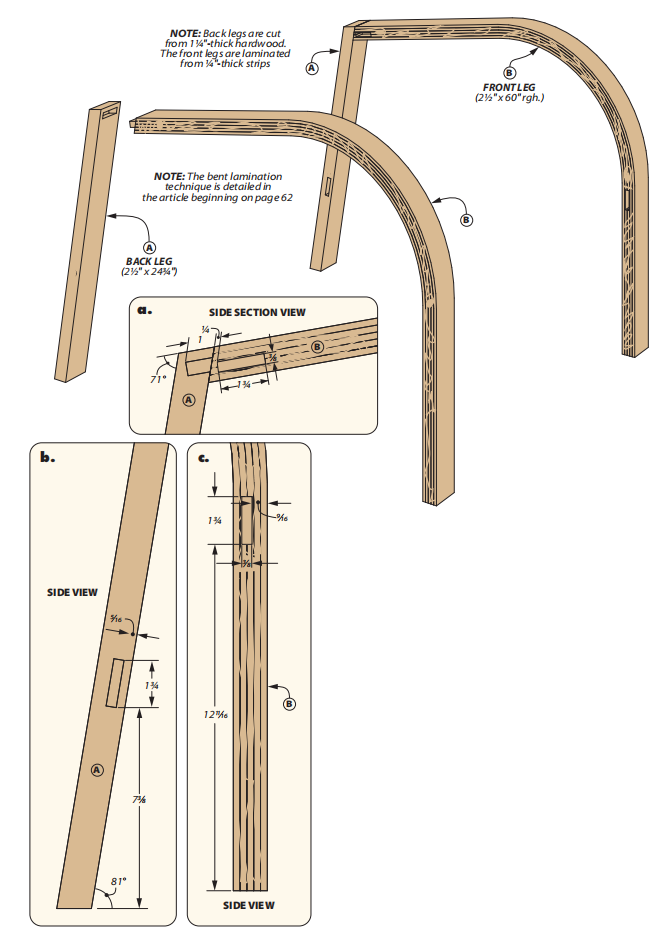
Making the Rear Legs
I started with the rear legs because they're simpler to make and provide a good introduction to the chair's joinery.
The rear legs lean forward to meet the curved front legs. This requires cutting an angle on each end, as shown in the construction drawing.
Once the legs are cut to their final dimensions, the next step is forming the mortises that connect them to the other chair components.
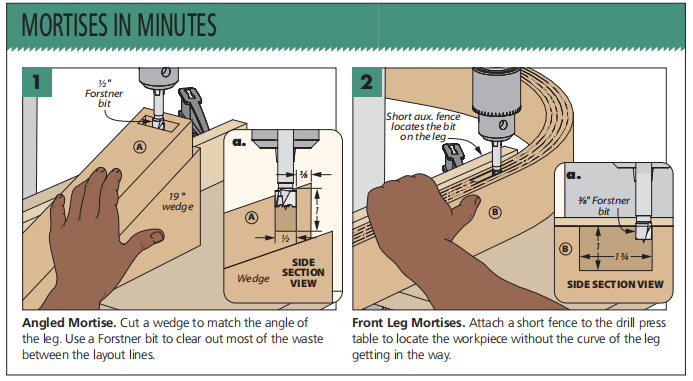
Most of the chair relies on traditional mortise-and-tenon joinery.
A mortise on the inside face of each rear leg accepts a stretcher. Another mortise at the top of the leg connects it to the curved front leg.
Because the upper mortise is cut at an angle, I used a matching wedge to support the workpiece during machining.
After cutting the mortise, a little chisel work squares the corners and cleans up the edges.
Preparing the Walnut Strips for the Front Legs
With the rear legs complete, it's time to tackle the chair's signature feature.
Each curved front leg is made from five thin walnut strips. The strips are cut from a long blank at the band saw, then cleaned up before lamination.
I planed the face of the blank smooth between cuts. After cutting each strip, I ran it through the planer to clean up the opposite face.
The goal is to produce thin, uniform strips that bend easily and fit together without gaps.
Consistent thickness is important because the strips need to conform to the bending form while maintaining even glue contact across their surfaces.
Building the MDF Bending Form
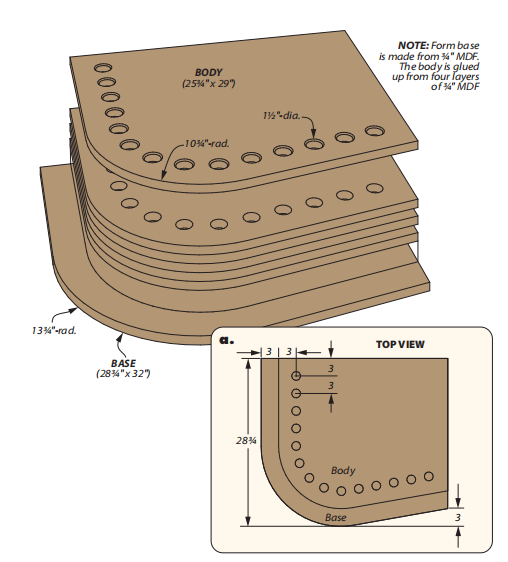 The bending form determines the final shape of the laminated legs.
For this project, I built the form from four layers of MDF. I shaped the first layer to match the required curve, then used it as a template for the remaining layers.
Each additional layer starts slightly oversized. After gluing it to the previous layer, I trimmed it flush with a router and flush-trim bit.
The completed form includes a series of holes along the curved edge. These provide locations for the clamp heads during lamination.
A wide base allows the form to be secured to the workbench.
Before gluing the walnut strips, cover the curved edge of the form with packing tape. This prevents glue squeezeout from bonding the workpiece to the MDF.
Gluing and Clamping the Bent-Laminated Legs
With the strips prepared and the bending form ready, spread glue on the mating surfaces of the walnut strips.
Stack the strips, position them against the form, and gradually add clamps along the curve.
Work progressively to bring the strips into full contact with the form, maintaining even pressure throughout the bend.
Once the glue has cured according to the manufacturer's instructions, remove the laminated leg from the form.
The glued strips now act as a single curved component that retains the shape of the form.
Repeat the process to make the second front leg.
Cutting Mortise-and-Tenon Joints in the Curved Legs
Mortise-and-tenon joinery for the curved lounge chair legs
Once the laminated legs come out of the bending forms, the next step is cutting the joinery that connects them to the rest of the chair.
The curved shape makes some of these operations more challenging than cutting joints in straight stock.
Mortises on the inside faces of the front legs accept the chair's stretchers. Additional joinery at the rear connects each curved front leg to its matching back leg.
The rear end of each front leg receives a tenon that fits into the upper mortise of the back leg.
I used the band saw to cut the wide faces of the tenon, guiding the workpiece with the rip fence.
The sides of the tenon can be cut in a similar manner, with the curved portion of the leg extending upward from the saw table.
A backsaw is useful for trimming the angled shoulders of the tenon.
Assembling the Front and Rear Legs
Once the joinery is complete, test-fit each front leg to its matching rear leg.
The tenons should fit snugly without requiring excessive force.
During glue-up, I secured a handscrew clamp to the curved front leg. This acts as a temporary clamping block, providing a surface for pulling the front and rear legs together.
It's a useful trick whenever a curved workpiece doesn't offer a convenient surface for a conventional clamp.
After the glue cures, the assembled leg pairs are ready to be connected with the chair's stretchers.
Building the Chair Frame with Traditional Joinery
With the curved legs complete, the next stage feels a little more like conventional cabinetmaking.
The stretchers and frames are mostly straight components joined with traditional mortise-and-tenon joints.
Only a few carefully placed bevels are needed to accommodate the chair's angled seat and backrest.
Making the Chair Stretchers
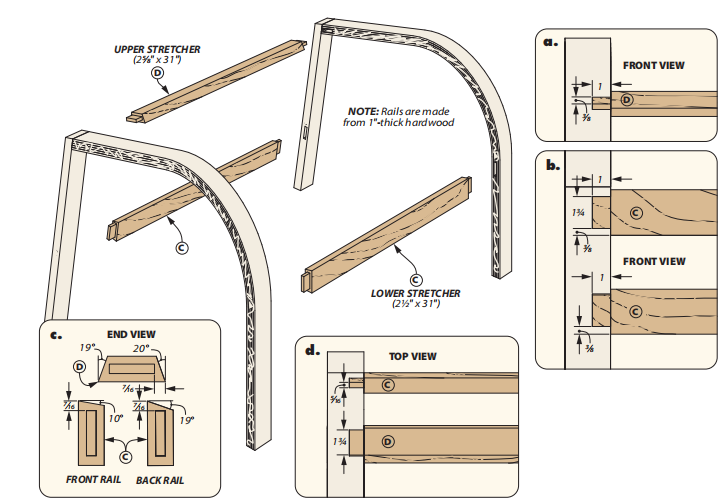
Three stretchers connect the leg pairs into a single chair assembly.
Although the stretchers look similar, they aren't identical. The upper stretcher is slightly wider than the lower two.
Each stretcher has a tenon on both ends that fits into the corresponding mortises in the legs.
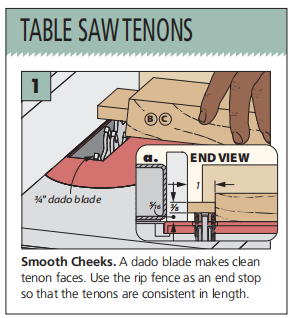
I cut the tenons at the table saw, leaving them slightly oversized. Then I used a shoulder plane to fine-tune each tenon for a snug fit.
This approach makes it easier to match the tenons to the actual mortises rather than relying entirely on nominal dimensions.
Cutting Bevels for the Angled Seat and Back
The stretchers also need a few bevels to accommodate the chair's geometry.
The upper edges of the lower stretchers are beveled to match the tilt of the seat and their positions relative to one another.
I like to form these angles with a hand plane.
After cutting the bevels, temporarily install the stretchers and use a straightedge to check that their surfaces align.
The upper stretcher requires a bevel along both edges. The rear bevel matches the slope of the legs, while the front bevel accommodates the lean of the backrest.
Once the parts fit correctly, glue the stretchers into their mortises.
Making and Installing the Seat and Back Frames
The seat and backrest are supported by two separate frames that rest on the stretchers.
These frames provide mounting locations for the curved laminated panels while maintaining the chair's structural rigidity.
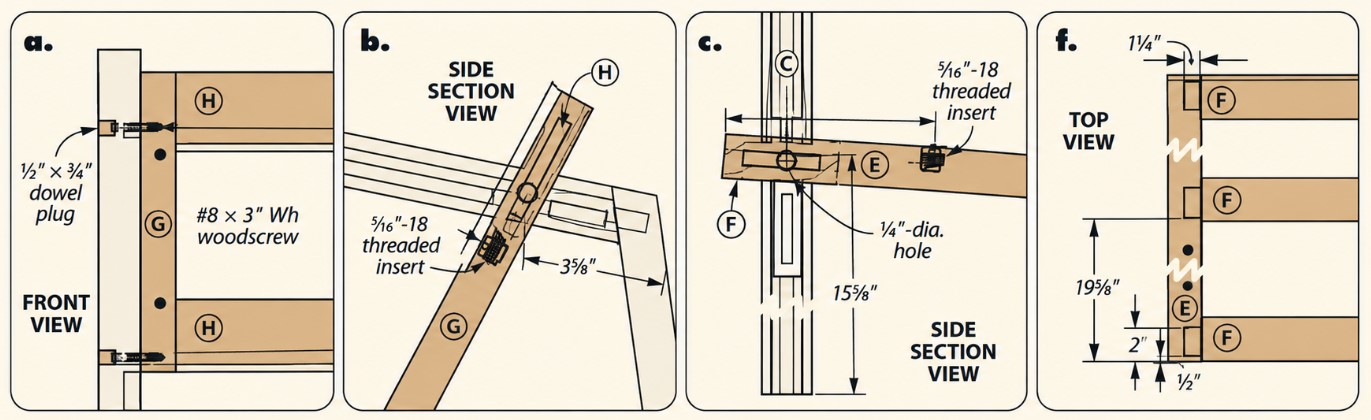
[Seat and back frame construction details]
Building the Seat Frame
The seat frame consists of two stiles joined by three rails.
Start by cutting the mortises in the stiles, then form matching tenons on the rails.
Before assembly, drill the mounting holes and install the threaded inserts that will support the finished seat.
Once the frame is glued together and the clamps are removed, position it on the chair's stretchers.
The frame should be flush with the rear legs. Mark any excess material and plane it away to achieve the proper fit.
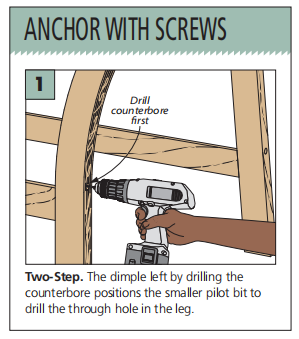
The seat frame is secured with glue along the stretchers and long wood screws driven through the legs.
Building and Attaching the Back Frame
The back frame is constructed much like the seat frame, except that it has two rails rather than three.
The lower ends of the back-frame stiles are mitered to meet the seat frame when the back frame rests against the upper stretcher.
Clamping these angled parts together presents a challenge.
My solution was to make a pair of simple clamping blocks.
One block has an angle that matches the tilt of the back frame and is clamped to its rear surface. The other fits below the seat frame and provides a parallel surface for a bar clamp.
With the blocks in place, you can pull the two frames together securely during glue-up.
The upper portion of the back frame is glued to the upper stretcher and secured to the legs with another pair of screws.
Making the Curved Plywood Seat and Backrest
With the chair's structural frame complete, it's time to focus on comfort.
A comfortable wooden chair doesn't necessarily require upholstery or thick cushions. A gently curved seat and backrest can cradle the sitter and distribute weight across a larger surface.
For this chair, Dillon used bent lamination to create both components.
Choosing Plywood for the Laminated Panels
The seat and backrest use the same general bent-lamination technique as the front legs, but the materials are different.
Instead of narrow walnut strips, these components are made from wide, thin plywood panels.
Dillon selected thin oak plywood because it's flexible enough to conform to the desired curves.
You could also use thin solid wood, although the width of the seat and back would require gluing narrower pieces into larger sheets.
If using solid wood, riftsawn or quartersawn material would help minimize wood movement.
Building a Two-Part Bending Form
 The wide seat and backrest panels require a different type of bending form than the narrow front legs.
Because the glue surfaces are much larger, you need a way to distribute clamping pressure evenly across the entire panel.
The solution is a two-part bending form.
One half has a convex profile, while the other has a matching concave profile. Together, they create a clamping sandwich that presses the plywood into the desired curve.
I made the convex form first, starting with a series of ribs.
After shaping the first rib, I used it as a template to make the remaining ribs. These are glued to a base, then covered with a thin layer of plywood.
The plywood creates a continuous surface that prevents the ribs from leaving impressions in the laminated panel.
Cover the form with packing tape to keep glue squeezeout from bonding the workpiece to it.
The concave form is built in the same way, using the complementary curve.
Laminating the Seat and Backrest
With both forms complete, cut the three plywood layers needed for each laminated panel.
Leave the pieces square during glue-up. They'll be trimmed to their final shapes afterward.
Spread glue evenly across the mating surfaces, then stack the plywood layers.
I used tape to keep the layers aligned while positioning them on the convex form.
Place a couple of thick blocks beneath the form to provide clearance for the clamps. Then position the concave form over the plywood stack.
Start adding clamps around the edges, placing one at the end of each rib. Add additional clamps along the sides to distribute pressure.
Allow the glue to cure fully before removing the laminated panel from the forms.
Trimming and Finishing the Curved Panels
After the glue has dried, remove the laminated panel from the form.
A carbide scraper works well for removing larger areas of dried glue squeezeout.
Next, lay out the final shape of the seat or backrest using the project drawing.
Cut the panel to shape at the band saw, keeping the workpiece supported against the table near the blade.
Remove the saw marks and refine the edges with an edge sander.
To conceal the exposed plywood layers, apply iron-on veneer edgebanding.
I used 2"-wide banding so it would follow the curved profile. After applying the banding, trim the excess with a utility knife and ease the edges with a file.
The result is a smooth, continuous curved panel that complements the walnut frame.

Installing the Seat and Backrest with Rubber Bumpers
The seat and backrest are attached using a simple approach that also adds a little comfort.
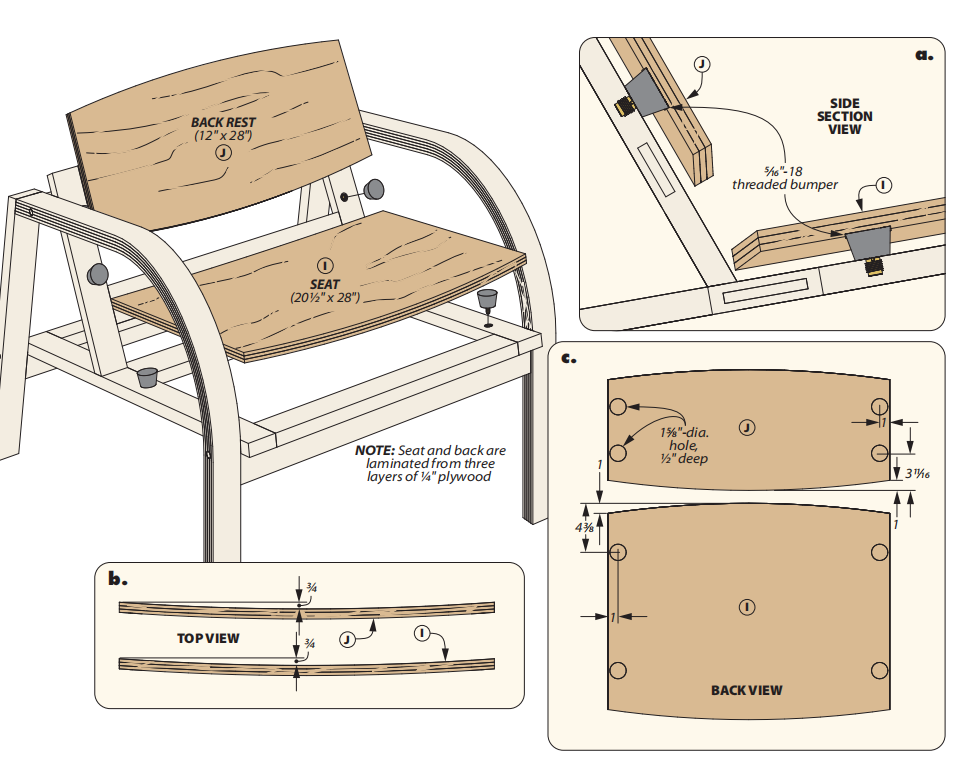
Large rubber-cushioned bumpers thread into the inserts installed in the chair's frames.
Matching recesses are drilled into the underside of the laminated seat and backrest. The panels then nest over the bumpers.
To drill the recesses accurately, I supported each curved panel with a small block that kept the drill bit square to the local surface.
Take care when setting the drilling depth so the point of the bit doesn't break through the visible face.
The bumpers cushion the panels and hold them in position without requiring glue or additional mounting hardware.
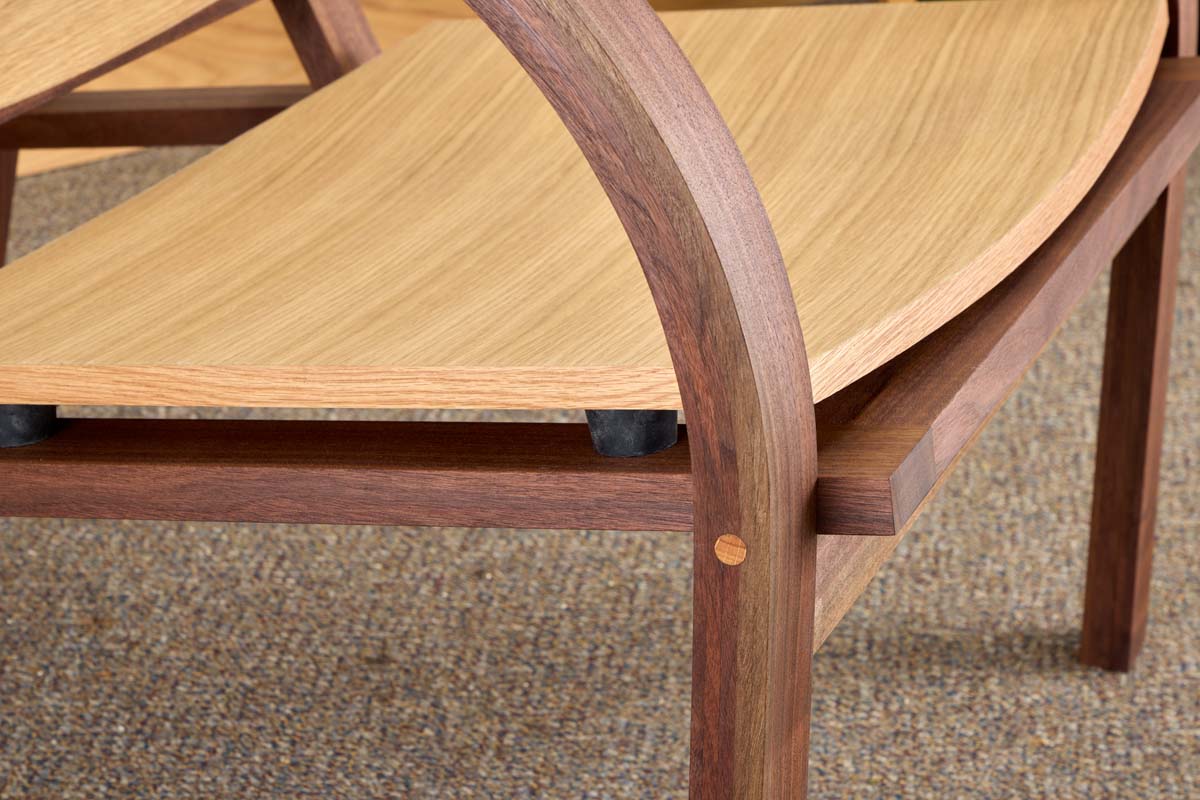
Large rubber bumpers support the curved seat and backrest. The matching screw plugs complement the chair's clean design.
Finishing the Walnut and Oak Lounge Chair
With the chair assembled, the final step is applying a finish that complements its contemporary design.
A thick, glossy finish would feel out of place on a chair with such understated lines.
Instead, I wiped on several coats of oil to bring out the warmth of the walnut and oak.
Once the oil finish had cured, I topped it with wax.
The result is a soft, natural appearance that emphasizes the grain and flowing curves without distracting from the chair's design.
A Woodworking Project That Puts Bent Lamination to Work
This curved-leg lounge chair is a great example of how a woodworking technique can drive the design of a project.
Bent lamination makes it possible to create the sweeping walnut legs and comfortable curved seat and backrest without carving them from thick stock.
At the same time, the chair incorporates plenty of traditional woodworking skills, including mortise-and-tenon joinery, precision fitting, frame construction, and careful assembly.
The finished chair combines those techniques into a contemporary piece of furniture that's as interesting to build as it is to use.
For woodworkers looking to expand their skills with bent lamination, this project provides an opportunity to put the technique to work in several different ways.
RELATED ARTICLE: How to Bend Wood with Bent Lamination: A Step by Step Guide