


Restoring an old hand plane is a great way to upgrade your shop tools while keeping costs down. This is one place where sweat equity pays off. You can find reasonably priced planes at local auctions, yard sales, or even online auctions. But after you find the model you want in good shape, you’ll often find it’s a challenge to get the best results with the original plane blade.

The solution to improving the plane’s performance is to swap out the original blade with a higher quality, after-market replacement. The reason for this is simple. The original blades on Stanley and most other manufacturer’s planes made in the early to mid-1900s were pretty thin (usually around 1⁄16" thick). These thin blades, coupled with equally thin chipbreakers were prone to chattering during the stroke and resulting in tearout on the workpiece.
A replacement set (blade and chipbreaker) along with your efforts to remove the rust, lap the sole, and recondition the old plane can result in a better-than-new tool that will last a lifetime.
To test the options, I tried out blades and chipbreakers in a reconditioned Stanley Bailey #3 . It’s a plane I reach for often in my shop.
PLANE BLADE MAKERS.
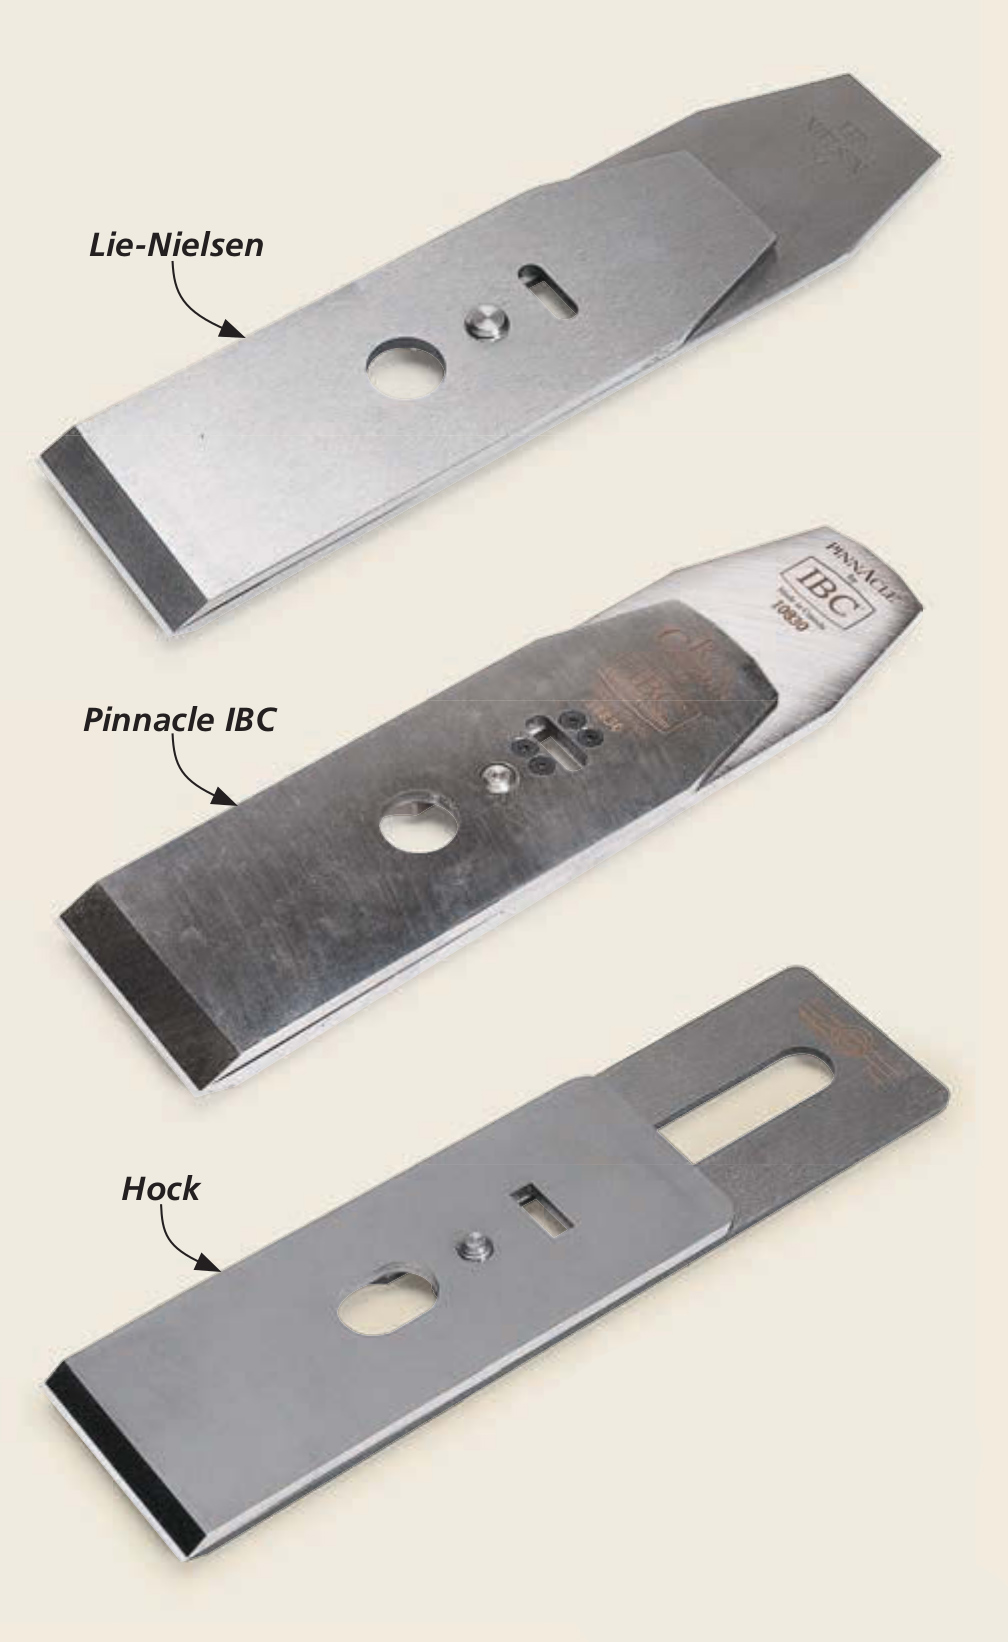
A quick survey of the market turned up replacement plane blades from Hock Tools , Pinnacle IBC , Ray Iles, and Lie-Nielsen Toolworks . All except Ray Iles offered a matching chipbreaker. Each of these manufacturers makes replacement blades in a range of sizes for the full line of Stanley bench planes.
I want to say at the outset that each of these blades was a big upgrade. All of them performed very well. There are some differences, though, that might influence your decision on which one is right for you.
STEEL. The first, and probably most important consideration is what type of steel you choose. Primarily, plane blades are available in either A-2 or high-carbon O-1 steels. Lie-Nielsen and Pinnacle IBC offer A-2 exclusively for their replacement blades. Ron Hock makes both O-1 and A-2 blades. Ray Iles plane blades are O-1.
While there are many manufacturing differences, the issue for the end user is this: A-2 is a bit harder to sharpen, but it seems to hold an edge a little better than O-1. Individual users’ opinions vary, and it’s also somewhat dependent on your method of sharpening. Some say that O-1 can be sharpened to a finer edge. Frankly, I find that both perform very well in a typical home workshop.
THICKNESS. No matter what steel you choose, all the replacement blades are thicker than the originals. This is a huge benefit, especially for those who are first learning about the proper hand planing techniques. The thicker blades are far less prone to chatter and are a little more forgiving of a less-than-perfect plane and setup.

The thickness of the blades varies among the manufacturers. In general, they run between .095" and .125" ( 1⁄8"). These replacement blades are also ground to a very precise standard. So all you need to do is hone the bevel.
There is one exception, however. If you buy the Ray Iles blade, you’ll see that it’s not perfectly flat. Don’t send it back, it’s actually designed to warp in the hardening process. This creates a slightly concave back. This concavity, like that of Japanese chisels and plane blades, makes flattening the back of the blade easier.
FITTING THE BLADE. Because the new blade and chipbreaker are thicker than the originals, you’ll need to adjust the plane to make room for them. Sometimes, this can be as simple as moving the frog back in the body of the plane. More often than not, however, you’ll have to widen the mouth.
You want the opening in the mouth between the blade and the front edge to be between 1⁄32" and 1⁄16". This will keep the shavings thin and prevent tearout. It’s important to note that you only want to remove metal from the front edge of the mouth.
To decide how far to open the mouth, you need to test fit the blade and “eyeball” the approximate position and mark it.

The photo above shows how I use a strip of masking tape to mark how far to open the mouth. You could also use a small square and a permanent marker to draw a reference line on the sole of the plane.
ADJUSTING THE MOUTH. Most of the older plane bodies are made of fairly soft iron. So when it comes to adjusting the mouth opening, you can do it easily with a file. The challenge is to keep the leading edge even and not to open up the mouth too far. It’s just a matter of using a gentle touch to slowly file away the metal. I use a mill file, which takes a little longer than a more aggressive file, but I’m happy to spend a few extra minutes to get this step right. Try to make long, continuous strokes and keep the file moving side-to-side as you go to maintain a square edge.
Now you can reassemble the plane. With just a few strokes, you’re sure to appreciate the improved performance.


