A square is one of the most basic tools in a woodworking shop, but that doesn't mean you only need one. Different squares are designed for different jobs, and matching the right one to the task can make layout, machine setup, and project assembly faster and more accurate.
I use squares for much more than drawing a 90° line. Depending on the type, a square can help me check the thickness of a board, set the height of a table saw blade, test a large cabinet for square, transfer an angle, check the setup of a machine, or lay out a full sheet of plywood.
You certainly don't need to buy every square at once. But understanding what each style does will help you choose the ones that make the most sense for the kind of woodworking you do.
1. Combination Square: The Everyday Woodworking Square

If I could have only one square in my shop, it would be a combination square. It's one of the most versatile layout and setup tools you can own, and I use mine for everything from marking square lines to checking the thickness of a workpiece.

The sliding head is what makes a combination square so useful. Lock it at a specific measurement and the square becomes a quick gauge. For example, if you're planing a board to 3/4" thick, set the square to 3/4" and place the blade across the edge of the board. You'll immediately see whether the surface is flush with your setting or if there's still material to remove.
Use a Combination Square to Set Blade Height
A combination square is also useful when setting up woodworking machines. To set a table saw blade to a specific height, adjust the square to the desired measurement and stand the rule vertically beside the blade with the head extending over it.
Slowly raise the saw blade until the highest point of the tooth just reaches the underside of the square's head. This gives you a quick physical reference without trying to read a ruler alongside the blade.
For everyday woodworking, this is the square I'd buy first.
2. Framing Square: Check Large Projects for Square

A framing square may look more at home on a construction site than in a furniture shop, but its size makes it useful for woodworking projects that are too large for a combination square.

I use one most often to check large cases and assemblies. The long legs provide much more reach, making it easier to see whether a cabinet or other large project is coming together at 90°.
There's more information built into a traditional framing square than you might expect. Depending on the square, its scales and tables can help with tasks such as calculating board feet. A framing square can even be used to help lay out circles and octagons.
You may not use those specialized features every day, but the size alone makes a framing square worthwhile when you start building larger projects.
3. Machinist Square: Check Tools & Small Assemblies

A machinist square is similar in purpose to a traditional try square, but I prefer the all-metal construction and permanently fixed blade for shop use. A wooden try square can move out of square over time, while a good machinist square provides a reliable reference for checking tools and project parts.
It's useful to have machinist squares in more than one size. A small one is handy for checking boxes, drawers, and other compact assemblies. Larger versions are useful when setting up machinery.

One example is checking a table saw miter gauge. Set the miter gauge to 90°, place the machinist square so its handle references the saw blade and its blade rests against the face of the miter gauge. If you don't see a gap between the square and the gauge, you know the setting is accurate.
Woodsmith Tip: When checking against a table saw blade, reference the body of the blade rather than a carbide tooth, and make the check with the saw unplugged.
4. Sliding Bevel Gauge: Transfer Any Angle

Technically, a sliding bevel gauge isn't a square in the traditional sense. But it belongs in this group because it handles angled layout jobs that the other tools can't.
Its biggest advantage is that you don't necessarily need to know the numerical measurement of an angle to reproduce it. Loosen the locking mechanism, place the handle against one surface, adjust the blade until it matches the adjoining angle, and lock it in place. You can then transfer that exact angle to another workpiece.
This is particularly useful when fitting a part to an existing project where the angle may not be a convenient number.

Set a Bevel Gauge to a Known Angle
When you do need a specific angle, use a protractor to set the bevel gauge. Place the handle along the baseline of the protractor, adjust the blade to the desired angle, and lock it in place.
You can then use the bevel gauge to lay out that angle on a workpiece or transfer it to a machine setup.
5. Drywall Square: Layout for Plywood & Sheet Goods

A drywall square is another construction tool that's surprisingly useful in a woodworking shop. Its biggest advantage is reach. When you're working with plywood or other sheet goods, a standard combination square simply isn't long enough to span a large panel.

A drywall square makes it easy to establish long layout lines across sheet goods. Some models are adjustable and incorporate a protractor, which gives you additional options when laying out angled cuts on large workpieces.
It's also useful when you need matching layout lines on multiple project parts. For example, place two cabinet sides next to one another and lay the drywall square across both pieces. You can then mark the locations of dadoes or shelves across both parts at the same time, helping ensure the layout matches.
Which Woodworking Square Should You Use?
Each of these tools overlaps with the others to some degree, but each also has a job where it really shines.
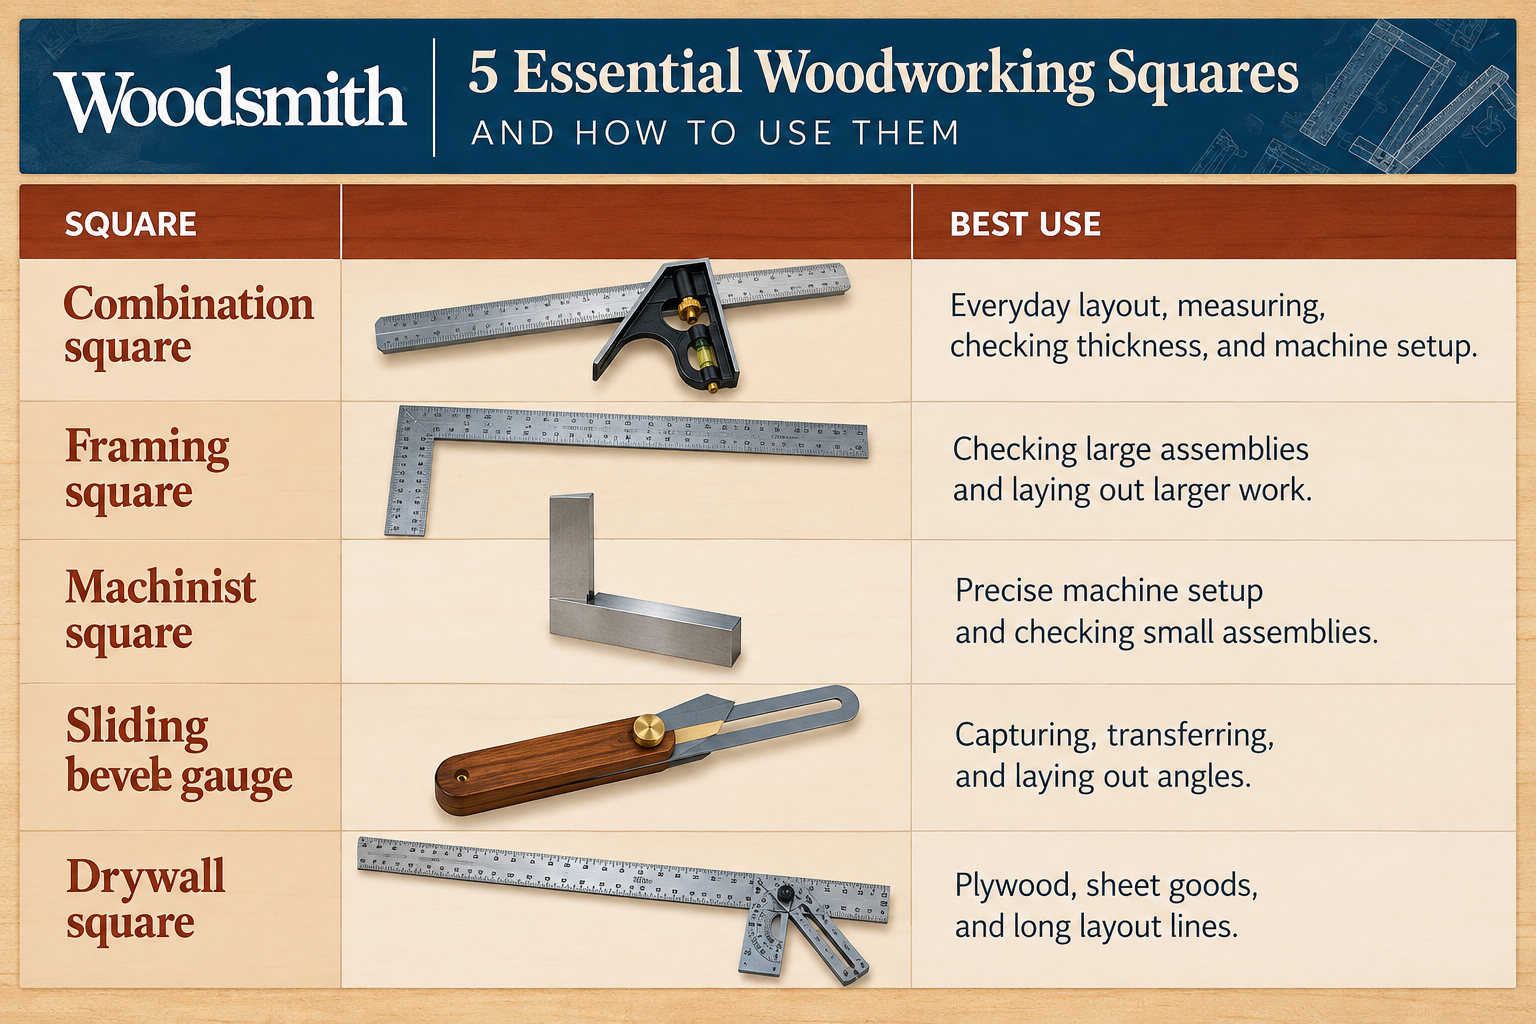
For someone building a woodworking tool kit from scratch, I'd start with a good 12" combination square. It's by far the most versatile of the group. From there, let the projects you build determine what comes next.
If you build cabinets and larger furniture, a framing or drywall square becomes much more useful. If you regularly tune and set up woodworking machinery, add a machinist square. And for angled joinery or projects with non-square parts, a sliding bevel gauge is difficult to beat.
Check Your Squares for Accuracy
No matter which type you're using, a square is only useful if it's actually square. It's worth periodically checking your most-used layout tools, particularly after one has been dropped or knocked off the bench.
For a 90° square, place the tool against a known straight edge and draw a line along the blade. Flip the square over, reference it against the same edge, and compare the blade to your original line. If the two don't agree, the square needs to be adjusted if possible or replaced.
It's a quick check, and it prevents a small error in a layout tool from finding its way into every part of a project.
Build a Better Measuring & Layout Tool Kit
Squares are only part of an accurate woodworking layout system. A well-rounded kit also includes a few basic measuring and marking tools for establishing dimensions, marking joinery, drawing curves, and working across larger project parts.
For a closer look at the tools I rely on most, see 7 Essential Woodworking Layout Tools for Accurate Projects →. It covers the combination square along with the tape measure, steel ruler, straightedge, marking knife, compass, and bevel gauge.
And if you're starting to expand beyond power tools, our Essential Hand Tools for Woodworking: A Beginner's Guide → is a good next stop for choosing your first chisels, planes, saws, and other traditional woodworking tools.