


Pegboard is one of the simplest ways to turn an empty shop wall into useful tool storage. But there's still one obvious limitation: once the wall is covered, you're out of space.
This 3-D pegboard rack takes a different approach. Instead of mounting a single sheet of pegboard flat against the wall, it uses pairs of angled panels that project into the shop.
The result is more usable pegboard surface without making the rack any wider. In the configuration shown here, the design provides over 40% more pegboard storage area.

How the 3-D Pegboard Rack Works
The idea is surprisingly simple.
Rather than attaching pegboard directly to the wall, build a series of triangular frames. Two pegboard panels attach to the angled front faces of each frame, creating a shallow point that projects away from the wall.

Because the two angled faces have a greater combined width than the wall space behind them, you gain additional tool-storage surface.
It's a little like folding a larger sheet of material so it fits into a narrower space.
The angled panels have another practical advantage: tools mounted on neighboring sections aren't all competing for space on the same flat plane.
Build the Triangular Frames
Each section starts with a triangular frame that supports the two pieces of pegboard.
A pair of cleats at the back of the frame provides a solid mounting surface for attaching the assembly to the shop wall.
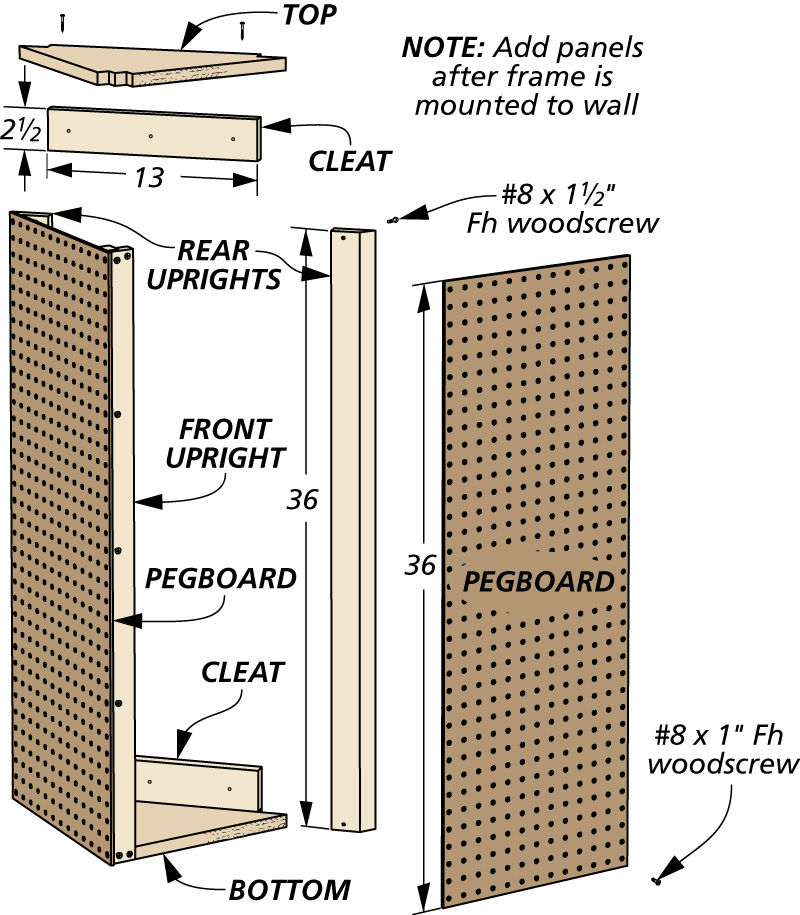
Uprights along with top and bottom panels tie the assembly together and add rigidity. Once the basic framework is assembled, the two pieces of pegboard screw to the angled faces.
There's even a little bonus storage built into the design: the top panel doubles as a small shelf for items that don't hang conveniently from pegboard hooks.
Mount the Frames Before Adding Pegboard
There's an easier order of operations when installing the rack.
First, position the completed frames against the wall and fasten them securely through the rear cleats.
Once the framework is mounted, screw the pegboard panels to the angled faces.
Doing things in this order leaves the mounting cleats accessible while you're fastening the rack to the wall. The pegboard can then cover the front of the structure after everything is securely installed.
Woodsmith Tip: Plan Your Tool Layout. Before loading the rack, think about which tools you use most frequently. Put everyday hand tools on the easiest-to-reach faces and reserve the outer or upper sections for tools you use less often.
Because the panels project from the wall, also check that long tools and handles won't interfere with tools stored on the neighboring face.
Get Over 40% More Pegboard Storage
The biggest advantage of this design is simple: more storage from the same amount of wall width.
The configuration shown adds over 40% more usable pegboard surface area compared with covering the same wall area with a conventional flat panel.
That makes the idea particularly useful in a small woodworking shop where wall space is already at a premium.
And the concept is scalable. Rather than thinking of the rack as one large project, you can build it from individual sections and size the overall installation to fit the wall space available in your shop.
Make Better Use of Limited Shop Space
Adding shop storage usually means finding somewhere to put another cabinet, rack, or shelf. This project takes a smarter approach by getting more storage from space you're already using.
A simple triangular frame turns a flat pegboard wall into a three-dimensional tool-storage system, increasing the available hanging surface while keeping tools visible and close at hand.
If your pegboard is already packed but your wall isn't getting any bigger, this rack offers a clever way to expand outward instead.
GET THE BOOK ON PEGBOARD → Ultimate Pegboard Projects
Build Custom Holders for Your Pegboard
Once you've created more pegboard space, put it to better use with shop-made holders. Angled racks can organize chisels, drill bits, router bits, wrenches, and pliers while using even less wall space.
BUILD CUSTOM PEGBOARD TOOL HOLDERS → Custom Pegboard Tool Holders That Save Wall Space


