


There are a few immutable facts of woodworking you can depend upon — sometimes you’ll measure twice and still get it wrong, your pencil is never where you left it, and you will always need more storage space in your shop. And while we can’t help you with the first two, the last item on that list is definitely an area where we can ease your pain a little bit.
Open wall shelving is one of the most basic and most flexible storage options available to you. There’s minimal materials needed, and everything on the shelves is clearly visible and easily accessible when you need it.
No more digging through drawers or inside cabinets to find your oft-used tools and equipment. As an added bonus, since they’re mounted to the wall, you have room underneath for large tools or even your workbench.
The shelves here are sturdy and infinitely customizable to your needs and available wall space. They’re also easy to build, with no special techniques or complex flourishes. This design should work with 16 or 24-inch stud spacing, but it’s worth your time to check your stud distance before building the whole thing. You might be surpised how often studs are positioned in unexpected ways.
The shelf frames are made of fir and the shelves are Baltic birch. Since this is a purely utilitarian project you could mix and match lumber and just paint it instead. Just make sure you pick something sturdy enough to support whatever you want to store.
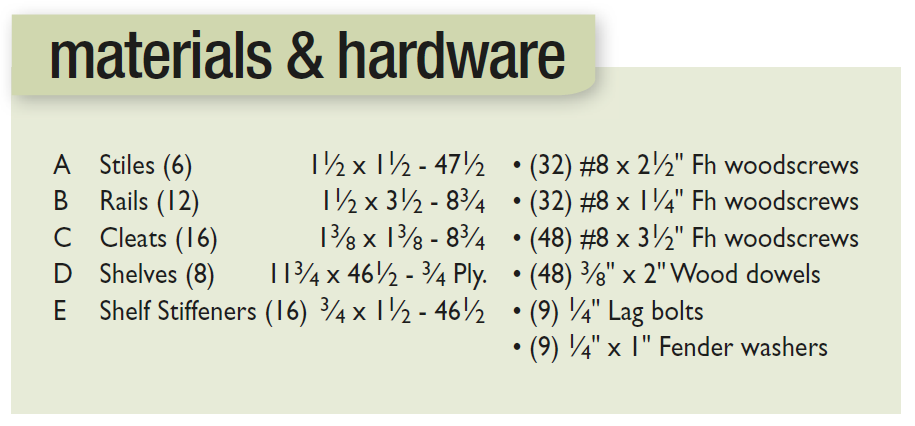
Shelf Construction
I promised this would be an easy project and I wasn’t kidding — you should be able to build this system in a day.
STILES & RAILS.
A stile normally refers to the vertical piece of a frame and panel door, and if you take a look at the side of the shelves, that’s almost what we’ve made. It’s a snap to rip the boards to the correct width on the table saw, then cut them to length on the miter saw. The chamfer on the top and bottom of the front stile isn’t necessary, but it does look nice. You can cut it on a table saw with a sled or with your miter saw.
The rails are next. Start with an over-long board — about 9’ this time, then rip it to width. Since you have twelve rails to make, take the time to set up a stop block on your miter saw. It only takes a few seconds and each board will be an identical length when you’re done.
The cleats are produced in a similar fashion to the rails. There’s sixteen of them though, so you’ll either need to start with a 12’ board, or more likely two 6’ boards. The same stop block from the rails can be used to cut the cleats as well.
UPRIGHT ASSEMBLY.
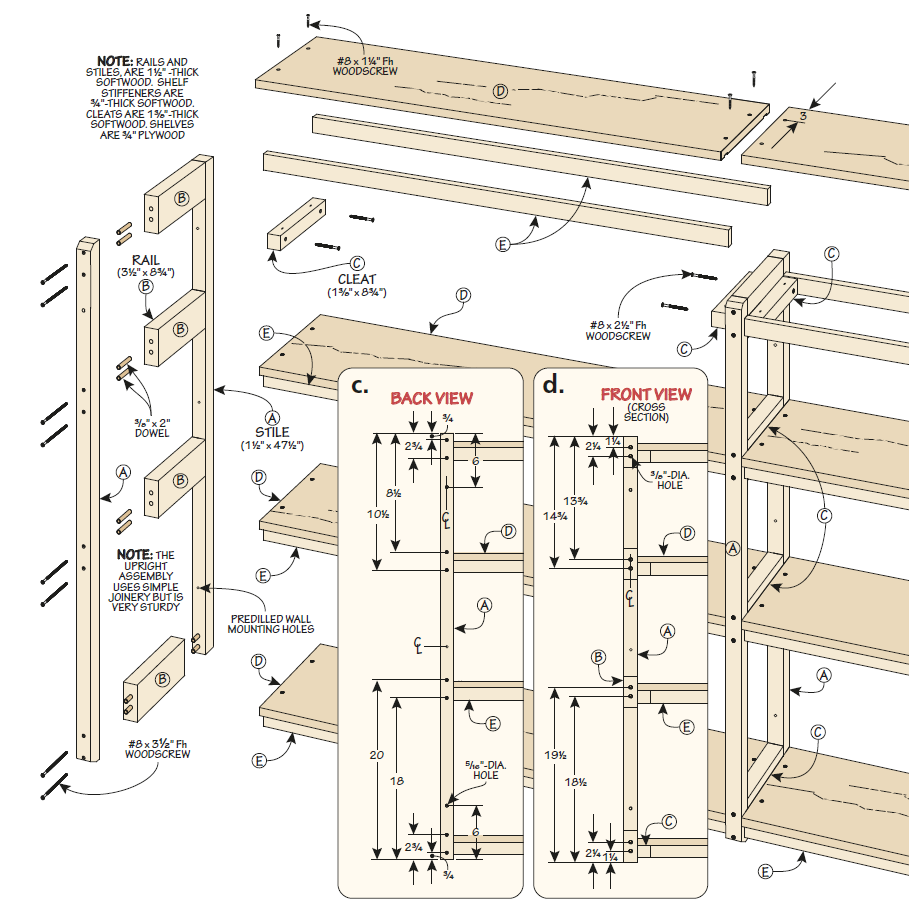
 There are quite a few holes to drill for the uprights. While a drill press is the easiest way to do this, a doweling jig is going to give you great results as well. You can see in Figure 1a that the dowels are between the screws you’ll add later. If your doweling jig has multiple holes that are an inch apart or so, you’ll be done in half the time.
The best piece of advice I can give you for drilling the holes is to use dowel centers instead of measuring the location for each and every hole. Drill the dowel holes on both ends of all your rails. Place the dowel centers into the holes on the rails. Line up the rail to its corresponding location on the stile (Figures 1c and 1d), then press them together, transferring the exact location of each dowel.
Label as you go so you know where each rail goes during assembly. With the locations transfered, drill the holes for the dowels in the stiles. Not only is this process more accurate in the end, it’s going to save you a ton of time. The last step before assembling the uprights is to drill three holes in each rear stile (Figure 1c).
These will be used later for mounting the shelf to the wall with lag bolts. To assemble the uprights, apply glue to the ends of the rails and on the dowels, then put everything together. The dowels should hold everything well enough for you to install the screws while the glue is still wet. If your uprights aren’t staying together, clamp them up and let the glue cure for a bit before continuing.
GLUE & SCREW.
Use a countersink drill bit to pre-drill all of the holes in the front and back stiles, then install the screws. Measure and mark the location of the cleats, then install with glue and screws.
SHELVES & STIFFENERS
All eight shelves can be cut from a single sheet of plywood. A table saw will work fine, but this is the sort of thing a track saw is made for. When breaking down large sheet goods, I use a sheet of highdensity, polyurethane foam board as
the base. I place the foam board on the floor and lay the plywood on top of it. Plywood is only nominally square, so I pick the best corner and make all of my measurements from there. Measure out the cut, then go to work with the track saw. The foam board works as a sacrificial surface and is almost infinitely reusable — once one side is chewed up, just flip it over and use the other.
SHELF STIFFENERS.
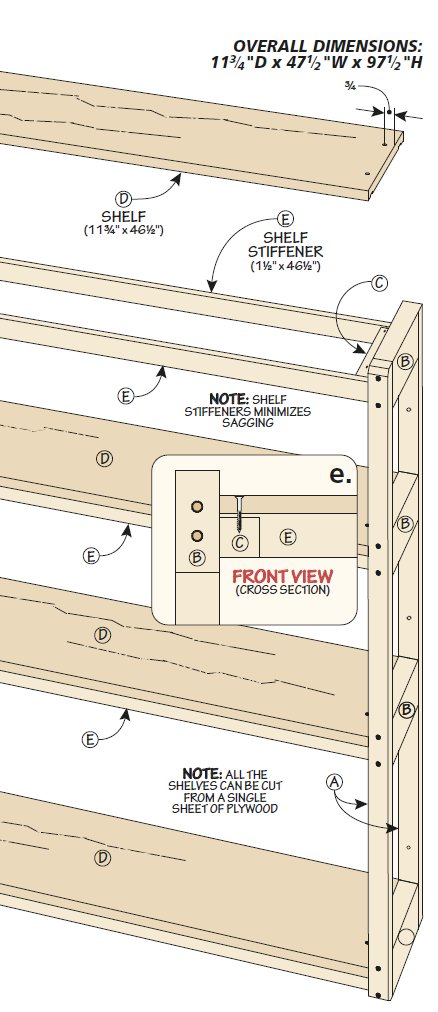
Regular old plywood would start to sag pretty quick over a span like this, so it needs to be reinforced. You can use plywood or hard-wood for the stiffeners, either will provide adequate support.
Use a dado stack in the table saw to cut two grooves equidistant from each edge of the shelves. The distance from the edge is less important than making sure the distance in between the grooves is wide enough that the cleats will fit between the stiffeners when putting everything together later, as seen in Figure 1b.
Plane your stiffeners to thickness and rip to width. Trust us that they’re large enough — one set we built is used to store gallon-sized cans of paint and finish. Glue the stiffeners into the grooves on the shelves.
Starting from the bottom, install the shelf, then drill pilot holes and add screws to secure it in place. Just a quick note here — the shelves themselves don’t offer a lot of shear support, mounting the shelf to the wall is what provides that support.
You’ll need to add lateral supports if you want to use the shelves freestanding. Spray lacquer dries fast and will get into all the nooks and crannies way easier than a brushed finish. Once the finish cures, the shelf mounts to the wall with lag bolts and fender washers.


