


How to Paint Geometric Patterns on Wood Using Painter's Tape
Not every woodworking project needs an elaborate finish. Sometimes a few coats of clear finish are all it takes to bring out the natural beauty of the wood. Other times, a splash of color can turn an ordinary project into something special.
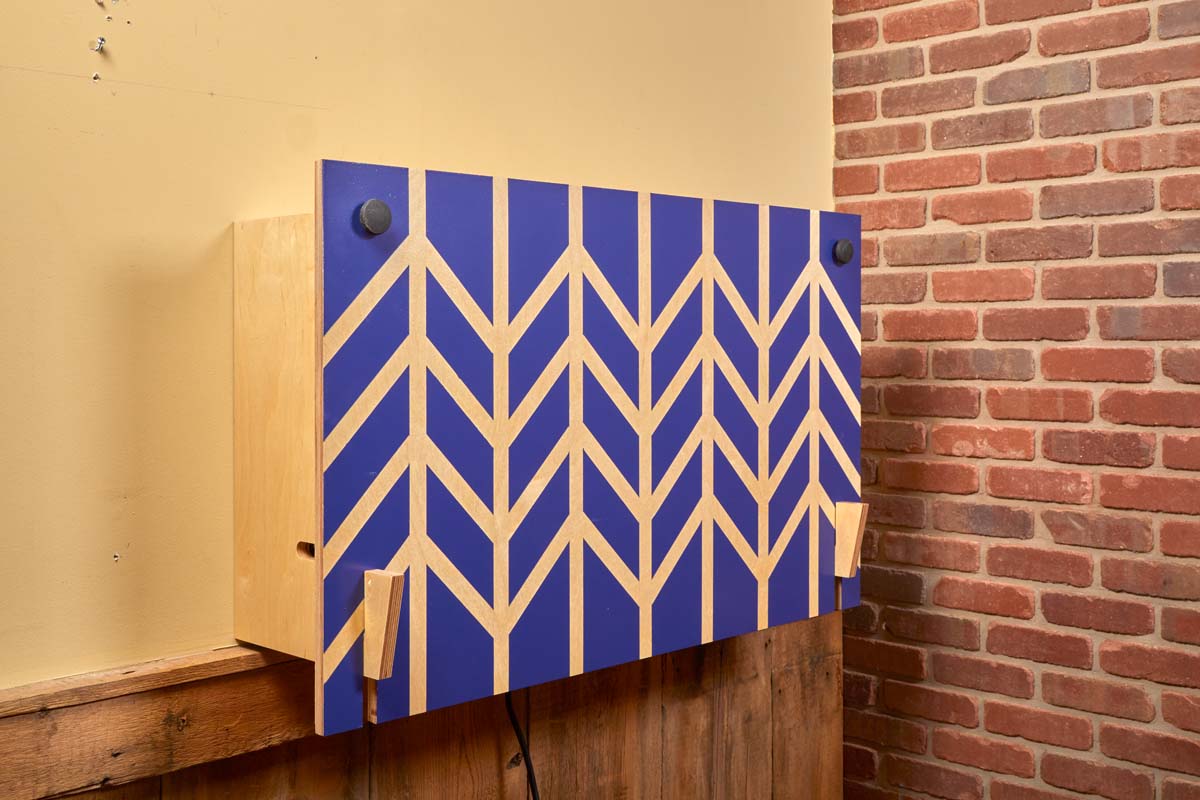
That's exactly what we did with our Drop-Down Shop Desk. The desk is made from Baltic birch plywood, a strong and versatile material that's perfect for shop furniture. But let's face it — a large, plain plywood panel doesn't offer much visual excitement.
Woodsmith designer Dillon Baker came up with a simple solution: a bold geometric pattern painted on the front of the desk.
The design reminds me of a stand of pine trees, but the beauty of this technique is that you're free to create any pattern you like.
And you don't need special stencils or expensive equipment. All it takes is painter's tape, a couple of rulers, a foam roller, and some paint.
Create a Custom Painted Pattern with Painter's Tape
The technique is similar to stenciling, but instead of using a reusable stencil, you apply strips of masking tape directly to the wood.
The tape covers the areas you want to leave unpainted. After applying paint to the exposed surface, you remove the tape to reveal the design.
This approach works especially well for geometric patterns made from straight lines, angles, and repeating shapes.
It's a great option for decorating plywood cabinet doors, drawer fronts, furniture panels, and other woodworking projects.
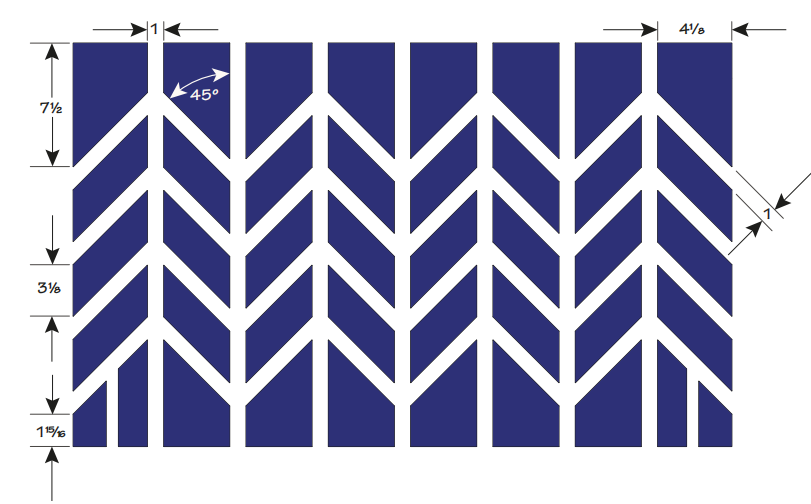
For the shop desk, Dillon created a repeating pattern of vertical lines and angled branches.
Step 1: Prepare the Wood for Painting
Good surface preparation is essential for clean paint lines.
Although plywood is typically sanded during manufacturing, I still like to give the surface a final sanding with a random-orbit sander or sanding block.
This removes minor imperfections and evens out the surface after construction.
For the Drop-Down Shop Desk, it's best to complete the routed slots and other machining operations before painting the panel.
Sand the Surface and Ease the Edges
Start by sanding the face of the plywood to create a smooth, consistent surface.
Then use a sanding block to lightly ease the sharp edges.
Breaking these edges helps prevent chipping and allows paint and finish to cover them more evenly.
Remove Dust Before Applying Tape
Vacuum the surface thoroughly and wipe away any remaining dust with a suitable clean cloth.
This is especially important because painter's tape adheres better to a clean surface.
Dust trapped beneath the tape can create tiny gaps that allow paint to bleed underneath.
Step 2: Lay Out the Geometric Pattern
With the surface prepared, it's time to lay out the design.
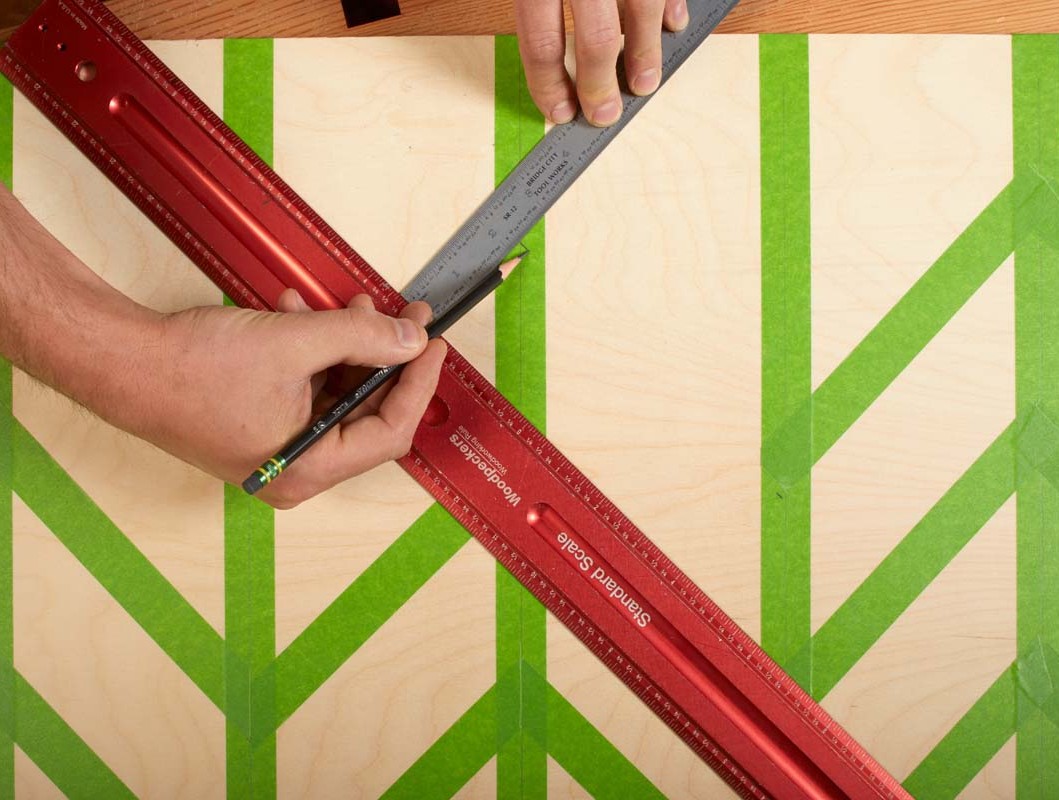
For this pattern, you'll need a sharp pencil and two long rulers.
Start by studying the layout drawing to determine the spacing and placement of the vertical lines.
These vertical strips form the tree trunks in Dillon's design.
Apply the Vertical Tape Strips
I used 1"-wide painter's tape for the vertical lines.
This is one place where it's worth buying quality tape. A good painter's tape helps prevent paint from creeping beneath the edges.
The green tape shown in the photos is FrogTape.
Apply the strips carefully, keeping them straight and following the spacing shown in the drawing.
Then use a J-roller to press the tape firmly against the plywood.
You don't need excessive pressure — just enough to establish good contact.
Mark the Angled Branches
Once the vertical strips are in place, draw a centerline down each one.
These centerlines serve as references for laying out the angled branches.
Clamp one long ruler at the desired angle.
Then place a second ruler against it to establish the parallel lines for the branches.
Slide the ruler along the surface, marking the locations for the additional strips of tape.
This simple method keeps the angled lines consistent throughout the pattern.
Step 3: Apply and Seal the Painter's Tape
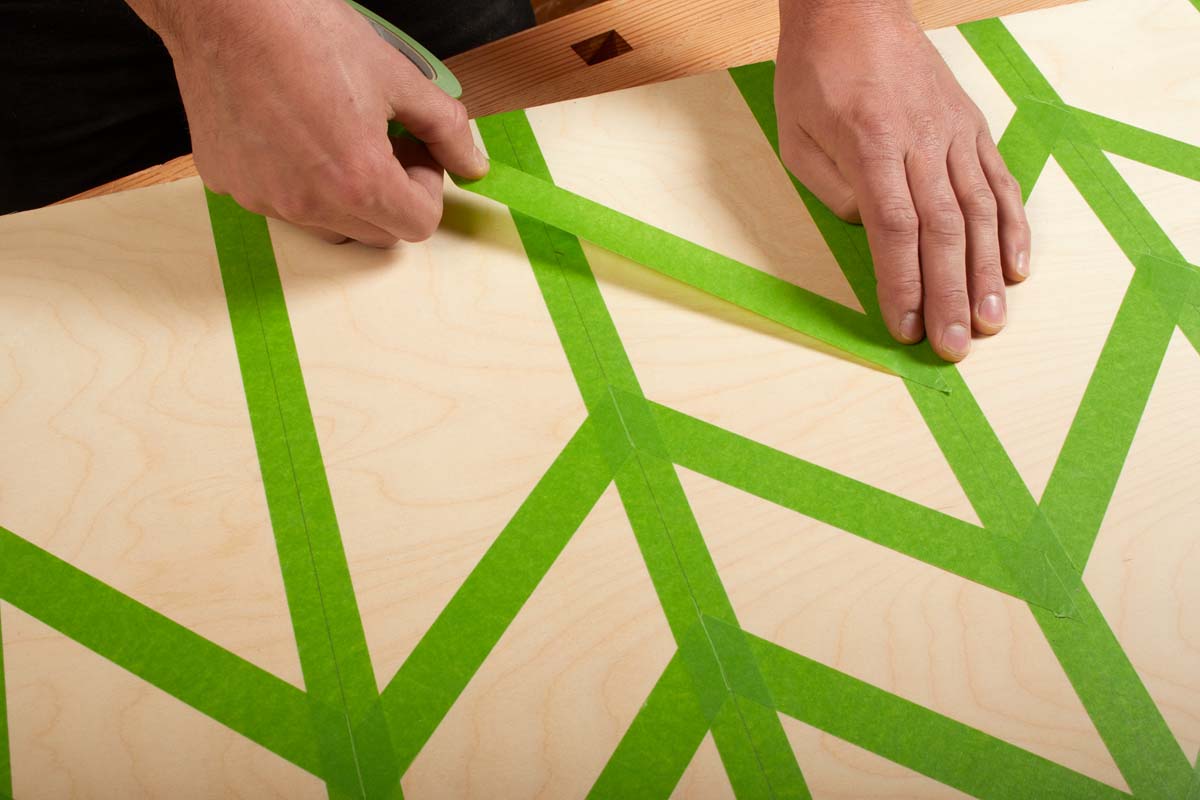
Now apply the tape along the angled layout lines.
The process is much the same as applying the vertical strips, with one important difference: The angled strips overlap the vertical tape.
These overlaps can create small gaps where paint may seep underneath.
Prevent Paint from Bleeding Under the Tape
After applying the angled strips, roll the tape down to ensure good contact.
Pay special attention to the overlapping areas.
Use a putty knife to press the seams firmly together and close any gaps.
A few extra minutes spent securing the tape can save you from having to touch up the pattern later.
Woodsmith Tip: Check Every Tape Edge. Before opening the paint, inspect the entire pattern. Look for loose edges, wrinkles, or raised seams. Those small imperfections are often where paint bleed begins.
Step 4: Apply Paint with a Foam Roller
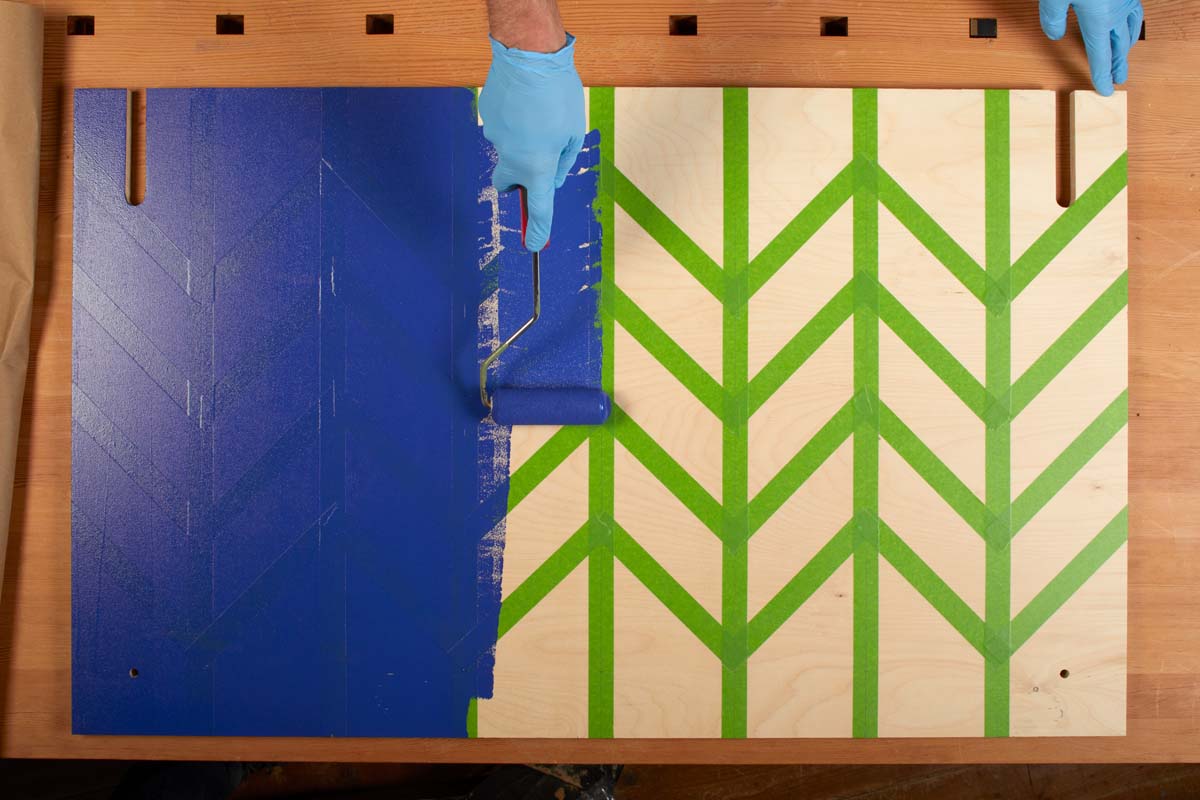
Once the tape is in place, step back and take a final look at the layout.
Make sure the pattern is consistent and all the tape edges are firmly attached.
Then you're ready to paint.
For this project, I used a small foam roller.
A foam roller applies paint quickly and evenly without leaving noticeable brush marks.
Use Light, Even Coats
Load the roller with paint, then roll off the excess before applying it to the plywood.
Work across the surface with light, even pressure.
Avoid pressing too hard or applying an excessively heavy coat. Too much paint can work its way beneath the tape, especially at the overlaps.
Once the paint is evenly distributed, leave it alone.
Repeatedly rolling over the same area can disturb the tape edges and create an uneven finish.
Step 5: Remove the Tape Carefully
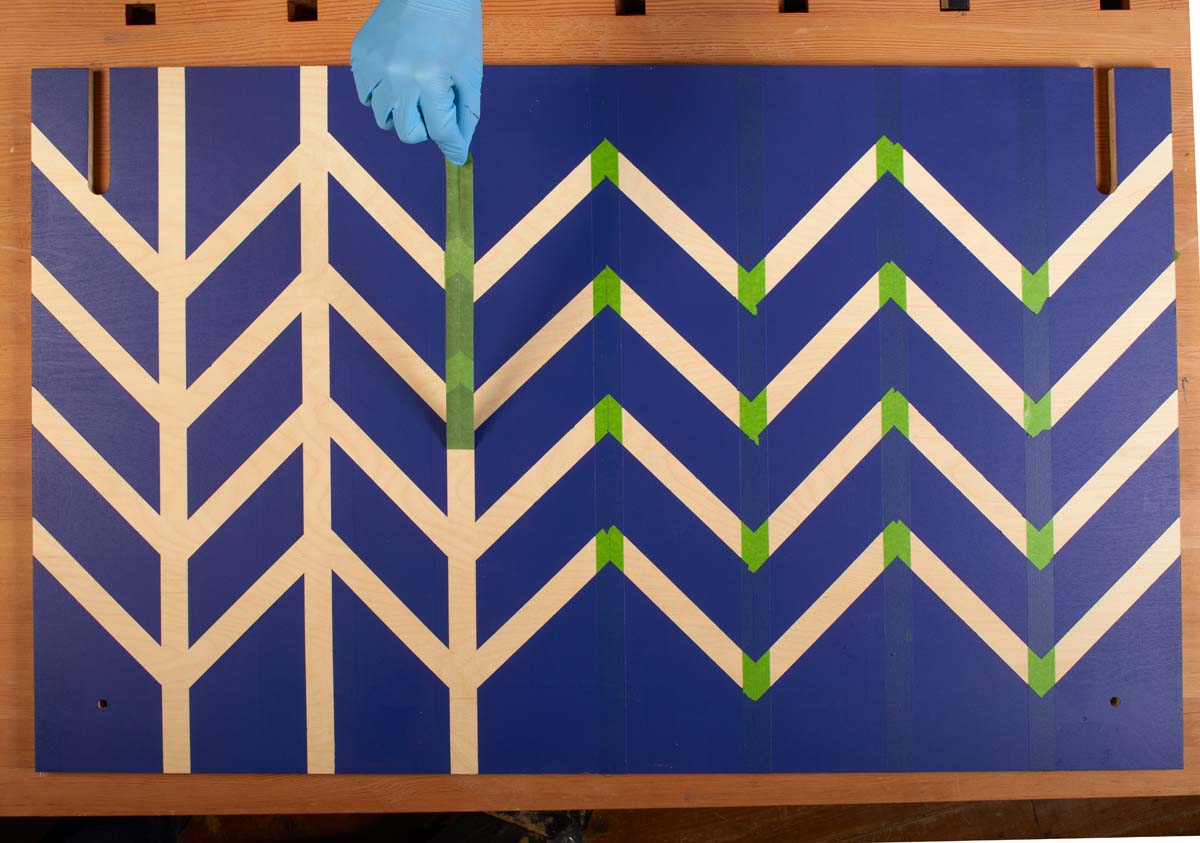
Removing the tape is the most satisfying part of the process.
As each strip comes away, the geometric pattern begins to emerge against the natural plywood background.
For the paint used on this project, I allowed approximately 30 to 45 minutes of drying time before removing the tape.
The paint had set up enough to release cleanly without being fully hardened.
The correct timing will vary with the type of paint, coat thickness, and shop conditions, so follow the paint and tape manufacturers' recommendations.
Peel Slowly for Clean Lines
Start at one end of a tape strip and peel it back slowly.
Pull the tape back along its length rather than lifting it abruptly away from the surface.
This reduces the chance of pulling up the fresh paint along the edges.
Continue until all the tape has been removed.
If everything went according to plan, you'll be left with crisp, clean lines and a striking geometric design.
Step 6: Protect the Painted Pattern with a Clear Finish
After removing the tape, allow the paint to dry thoroughly before applying a protective finish.
For the shop desk, I let the paint dry overnight and then applied a couple of coats of lacquer.
The lacquer protects the painted areas and the exposed plywood while giving the entire panel a consistent sheen.
Before applying a clear finish over paint, confirm that the two products are compatible and that the paint has dried or cured sufficiently.
Test the combination on a scrap piece if you're unsure.
Make the Pattern Your Own
One of the best things about this technique is how easily you can customize it.
Dillon's design creates a repeating pattern that resembles pine trees. But the same process can produce stripes, diamonds, chevrons, or any number of geometric shapes.
You can also experiment with different tape widths, paint colors, and spacing to create a completely different look.
And because the design is created with painter's tape rather than a permanent stencil, you're not limited to any particular pattern.
A little creativity can transform an ordinary plywood panel into a unique decorative feature.
Add Some Personality to Your Next Woodworking Project
Painting geometric patterns on wood is an easy way to give a project a custom appearance without complicated finishing techniques.
With careful layout, good painter's tape, and a foam roller, you can create clean, bold designs that look far more involved than they really are.
It's an especially good technique for shop furniture, where a splash of color can make an otherwise utilitarian project stand out.
And as the Drop-Down Shop Desk demonstrates, even a simple plywood panel can become a piece of shop art.
Build the Drop-Down Shop Desk
This geometric painting technique was developed for our Drop-Down Shop Desk, a wall-mounted workstation that gives you a convenient place to review plans, sketch ideas, and keep shop paperwork organized.
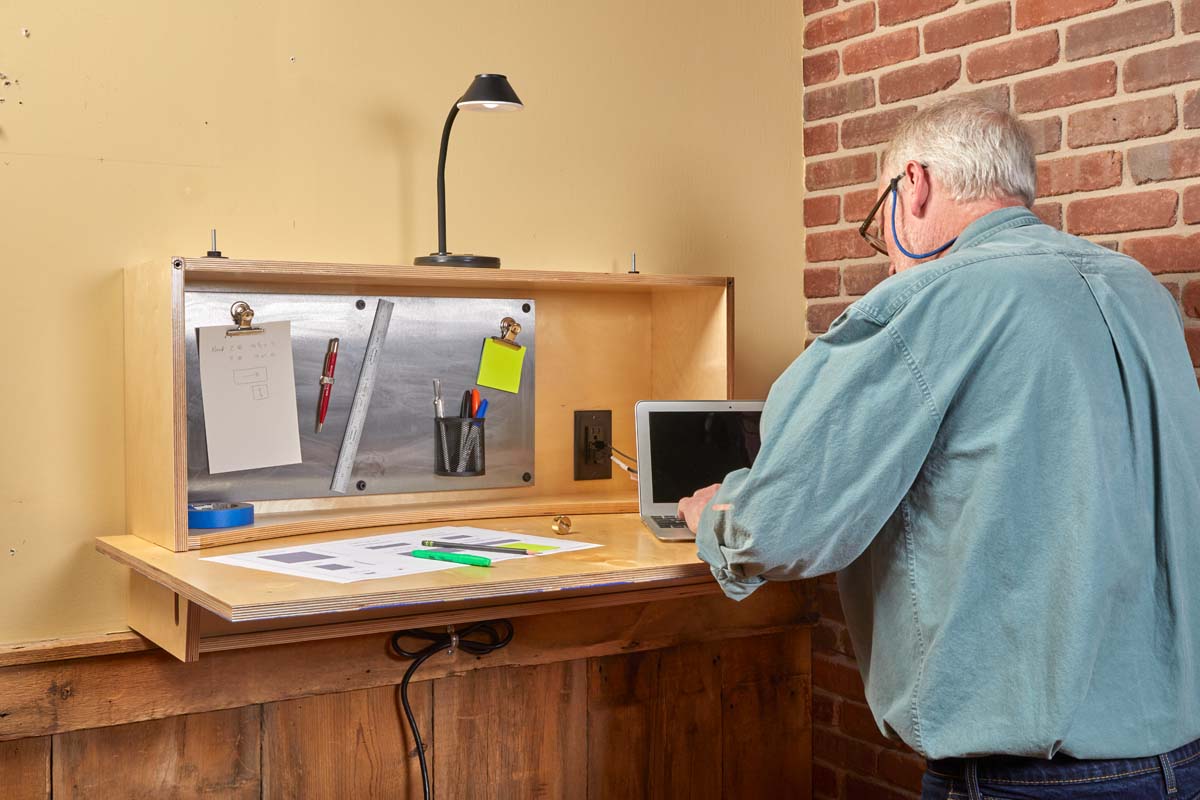
The desk features a spacious drop-down worksurface, built-in storage, a magnetic bulletin board, and USB charging — all in a compact design that keeps valuable workbench space free.
Want to build one for your own workshop? Explore the complete project article or get the detailed woodworking plans.
SEE HOW TO BUILD THE DROP-DOWN SHOP DESK → A Space-Saving Workstation with a Custom Painted Front
GET THE STEP-BY-STEP WOODWORKING PLANS → Build a Wall-Mounted Drop-Down Desk for Your Workshop


