


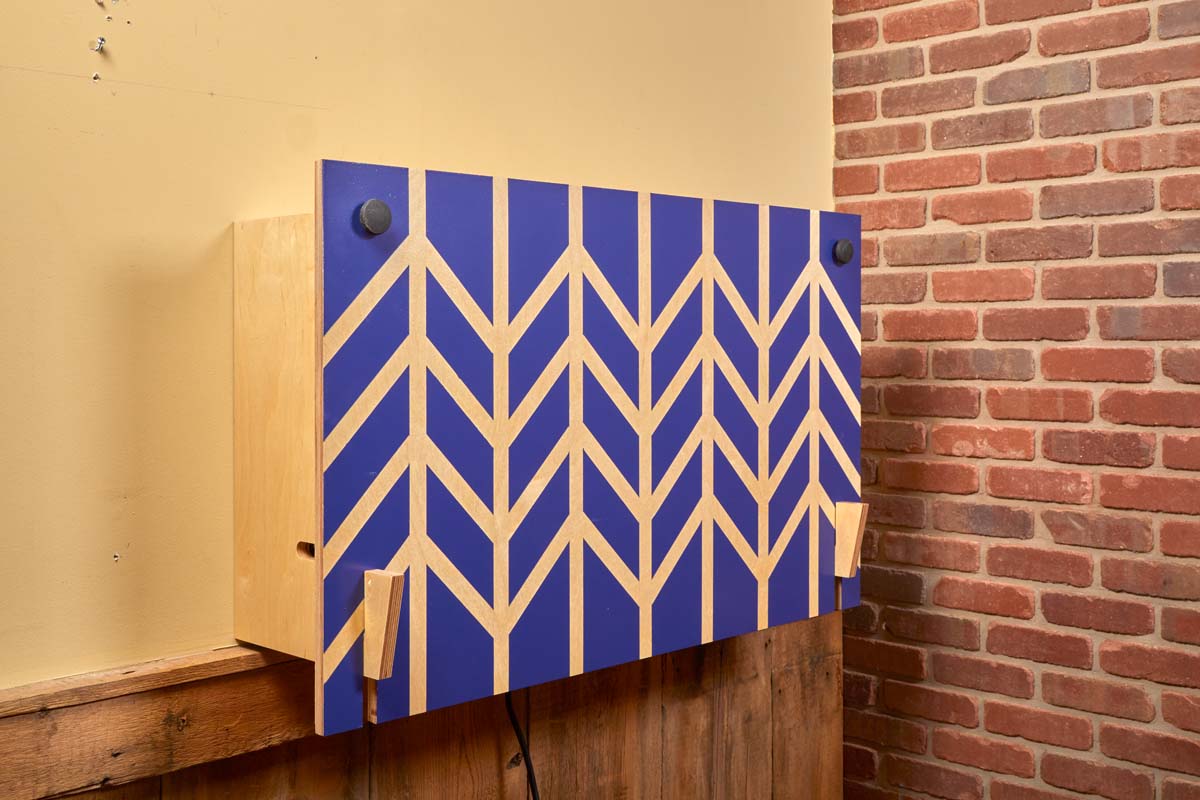
Build a Wall-Mounted Drop-Down Desk for Your Workshop
Every workshop needs a place to lay out plans, sketch a new project, or keep notes close at hand. The trouble is, those tasks usually end up taking over the workbench.
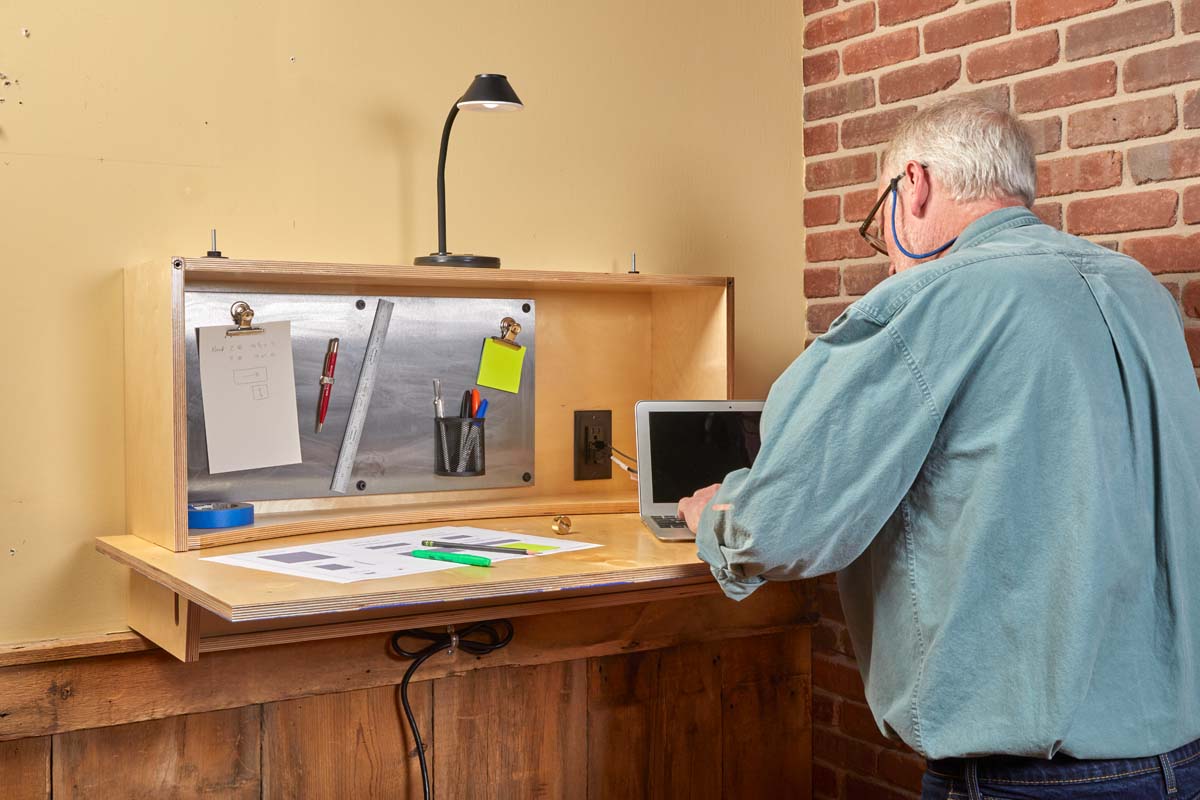
This wall-mounted drop-down desk solves that problem without sacrificing valuable floor space. When you need a worksurface, the front panel folds down to create a generous desk. When you're finished, it stores upright against the wall, leaving your shop open for woodworking.
The design takes inspiration from the compact furniture found aboard ships, where every inch of space has to serve a purpose. And like those traditional fold-away desks, this one offers a surprising amount of functionality in a small package.
Inside, you'll find a magnetic bulletin board, a convenient outlet with USB charging ports, and a shallow shelf for frequently used items. A separate lower compartment provides additional storage and a place to conceal a power strip.
Best of all, the construction relies on straightforward plywood joinery, pocket screws, and a few clever routed slots.
A Space-Saving Desk Designed for the Workshop
The standout feature of this project is the large drop-down worksurface.
Instead of using a conventional hinge-and-support arrangement, the desktop fits into routed slots in the sides of the cabinet. These slots allow the panel to be repositioned between its open and stored configurations.
When open, the desk provides a comfortable place to spread out drawings, make notes, or work on project layouts.
When closed, the decorative front panel gives the cabinet a finished appearance rather than leaving a plain sheet of plywood on the wall.
The cabinet itself also serves as an organizer, keeping notes, supplies, and charging accessories together in one convenient location.
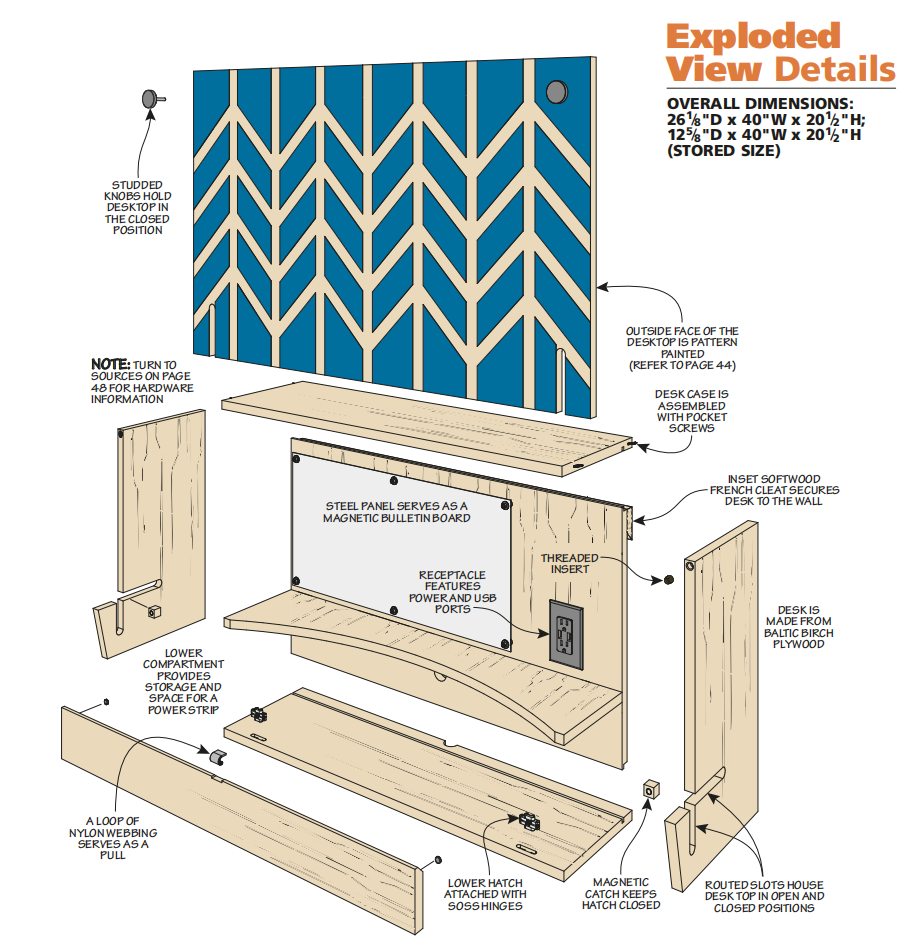
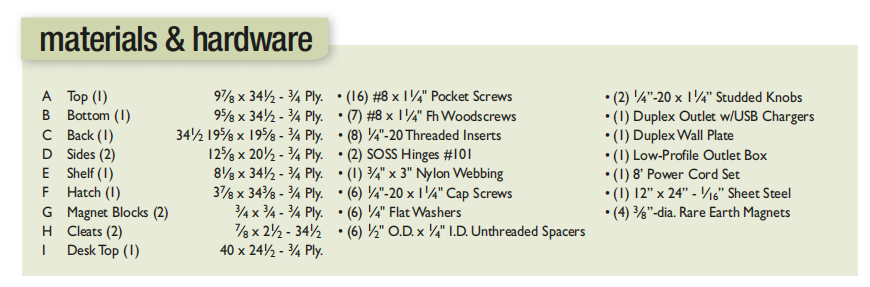
Build the Wall-Mounted Plywood Case
The main cabinet provides the structure for the desk and supports the drop-down worksurface.
To simplify construction, the entire case is made from 3/4" Baltic birch plywood. Its strength, stability, and consistent thickness make it a good choice for a project that relies on accurate grooves and slots.
Start with the top, bottom, and back panels.
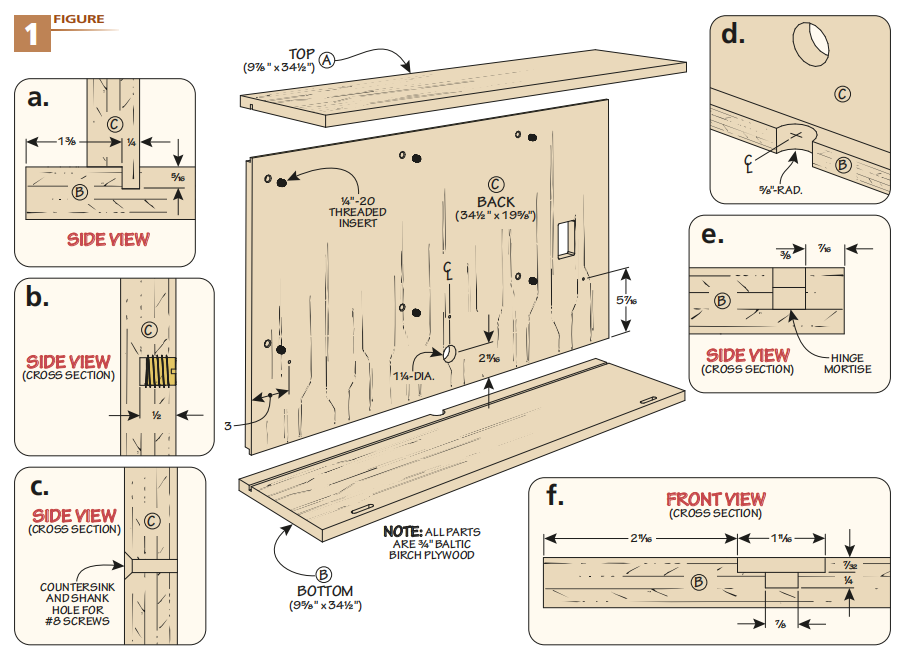
Cut Grooves for the Back Panel
The top and bottom panels have grooves that capture the back.
The back panel is rabbeted along its upper and lower edges to create tongues that fit into these grooves.
This arrangement makes assembly easier and provides a positive connection between the parts.
The back is also positioned to create a shallow cavity behind it. This space serves two purposes: It provides a path for electrical cords and makes room for the wall-mounting cleats.
Allow Space for Electrical Cords
The bottom panel includes a cutout along its rear edge for cord clearance.
Plan this opening before assembling the case, since it will be much easier to make while the panel is still separate.
Rout Mortises for the Concealed Hinges
The front edge of the bottom panel receives mortises for SOSS invisible hinges.
These hinges are used for the lower storage hatch and are concealed when the hatch is closed.
The hinges include a paper layout pattern, but I prefer making a reusable routing template.
A small plunge router equipped with a guide bushing makes it easier to produce the stepped mortises accurately.
Save the template after routing the cabinet. You'll use it again when making the hatch.
Prepare the Back Panel for Storage and Accessories
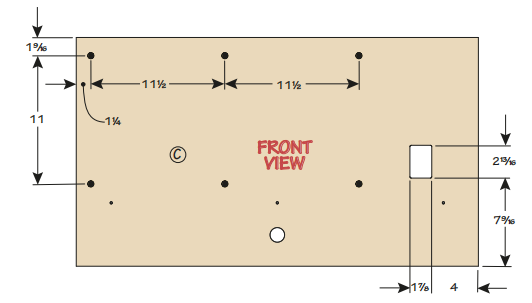
There's more going on with the back panel than simply closing up the cabinet.
In addition to the rabbets along the top and bottom edges, it needs several other details before assembly.
Drill pocket holes along the back face near both sides. These will be used to attach the case sides.
You'll also need screw holes for attaching the shallow interior shelf.
The magnetic bulletin board is mounted to threaded inserts installed in the back panel. Lay out and drill these holes before assembling the case.
Finally, make the opening for the electrical outlet.
Once these details are complete, glue the top, bottom, and back together.
Make the Sides with Routed Desktop Slots
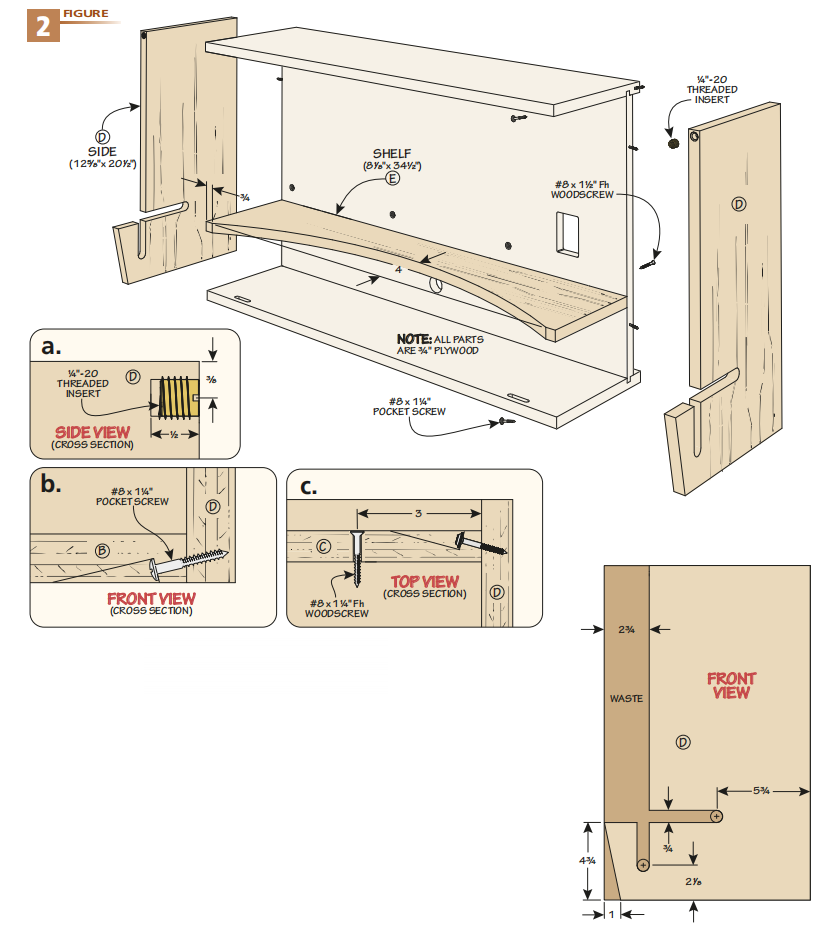
The sides are among the most important parts of the desk.
Besides enclosing the cabinet, they contain the slots that support the desktop in both the open and stored positions.
Each side has two routed slots, so careful layout is essential.
Shape the Cabinet Sides
Start by laying out the front relief and the routed slots on each side panel.
Cut away the front relief using a band saw or jigsaw.
If you use a jigsaw, you can clean up the cut with a router, straightedge, and flush-trim bit.
The lower front corner of each side is angled back to eliminate a sharp point.
Rout the Support Slots
Use a router with a straight bit to cut the slots.
Unlike a glued dado joint, these slots need a little clearance so the desktop can slide into place easily.
A regular 3/4" straight bit worked well with the Baltic birch plywood used for this project.
Clamp a straightedge to the workpiece to guide the router.
Woodsmith Tip: Rout Deep Slots in Multiple Passes. Don't try to cut the slots to full depth in one pass. That puts unnecessary stress on the router and bit. Instead, make at least three progressively deeper passes until you reach the finished depth.
Add Threaded Inserts for the Locking Knobs
Near the top of each side, install a threaded insert.
These inserts accept the studded knobs that secure the desktop when it's stored upright.
Carefully position the inserts so they line up with the corresponding holes you'll drill in the desktop later.
Assemble the Sides and Shelf
Attach the sides to the case with glue and pocket screws.
Align the sides flush with the bottom and the back edges of the top and bottom panels.
A shallow shelf inside the cabinet provides a place to store small items without interfering with the movable desktop.
The shelf has a gently curved front edge that softens the appearance of the case.
Attach it with glue and screws through the back, along with pocket screws driven from underneath into the sides.
Add the Lower Storage Compartment
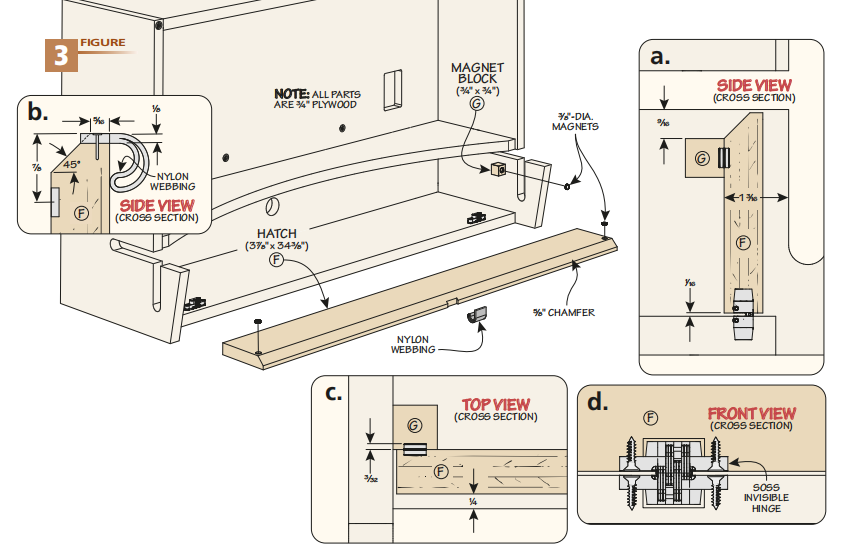
The lower portion of the cabinet provides an additional storage area.
It's a useful place for small accessories, charging cords, and a concealed power strip.
A hinged hatch closes off the compartment and gives the desk a clean appearance.
Make the Hatch
Cut the hatch to size, leaving an even reveal around its edges.
Chamfer the upper edge slightly to soften it.
For a simple pull, cut a shallow notch centered along the upper edge.
Then cut a short piece of nylon webbing, fold it into a loop, and secure its ends in the notch with small nails.
The result is a flexible pull that's easy to grab without adding a bulky handle.
Install the Invisible Hinges
Use the routing template you made earlier to cut the matching hinge mortises along the bottom edge of the hatch.
The SOSS hinges fit into these stepped mortises and disappear from view when the hatch is closed.
Secure the hinges with the appropriate screws.
Add Magnetic Catches
A pair of magnetic catches keeps the hatch closed.
Glue small mounting blocks inside the cabinet for the magnets.
Recess matching steel washers into the outer corners of the hatch.
When the hatch closes, the magnets engage the washers and hold the panel securely in place.
Mount the Desk with French Cleats
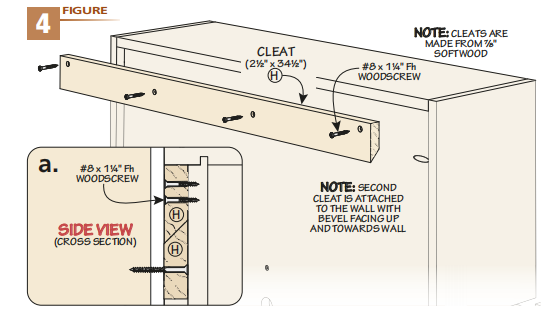
Because the desk is wall-mounted, it needs a strong and reliable attachment system.
A pair of interlocking French cleats provides an effective solution.
The beveled cleats support the cabinet while keeping the mounting hardware concealed behind it.
Start by milling the cleat blanks to fit the recessed cavity behind the cabinet.
Rip a matching bevel along one edge of each cleat.
Attach one cleat to the back of the desk using glue and screws.
The mating cleat is secured to the wall, with the bevel facing upward.
Fasten the wall cleat securely into structural framing using hardware appropriate for the wall construction and expected load.
When the desk is lowered onto the wall cleat, the two beveled edges interlock to support the cabinet.
Because the desktop projects outward during use, make sure the mounting arrangement is rated for the weight of the cabinet and the forces applied to the open worksurface. Provide any additional anchoring or restraint required by the project plans.
Make the Drop-Down Desktop
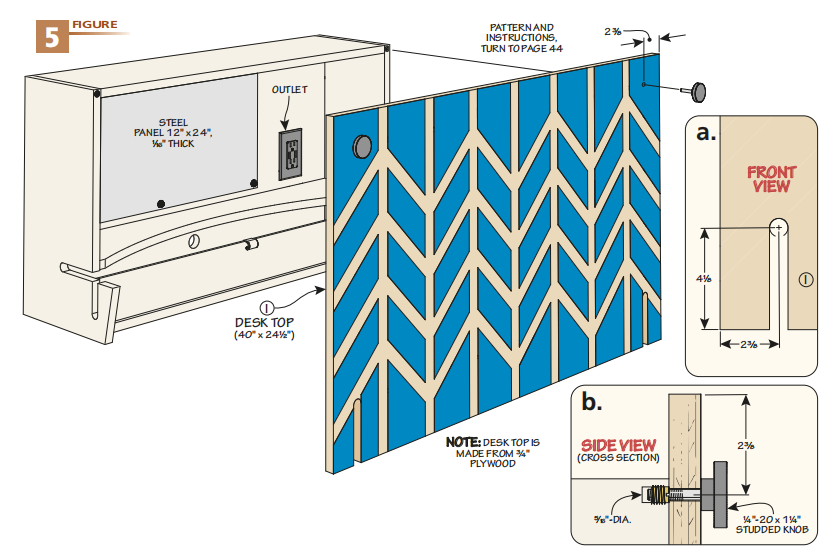
The desktop is the centerpiece of the project.
When open, it provides a spacious work area. When closed, it becomes the decorative front of the cabinet.
Cut the panel to its finished size, noting that it's both wider and taller than the cabinet.
This creates the desired overhang and helps conceal the case when the desk is stored.
Rout the Desktop Slots
The desktop has a set of slots along one edge that work with the matching slots in the cabinet sides.
These allow the panel to be positioned for use or storage.
The important detail here is getting the slot spacing right.
Rather than relying entirely on a fixed dimension, measure the spacing directly from your assembled cabinet.
Small differences in plywood thickness and case assembly can affect the final location.
Use those actual measurements to lay out the slots in the desktop.
As with the cabinet sides, rout the slots in several progressively deeper passes.
Drill Holes for the Locking Knobs
A pair of studded knobs secures the desktop in its upright position.
To locate the holes, mark the centerlines of the threaded inserts on the cabinet sides.
Set the desktop in its stored position and transfer the marks.
Drill the holes slightly larger than the knob studs to allow a little adjustment during assembly.
Test the fit to make sure the desktop can be positioned and secured without binding.
Add Built-In Charging and a Magnetic Bulletin Board
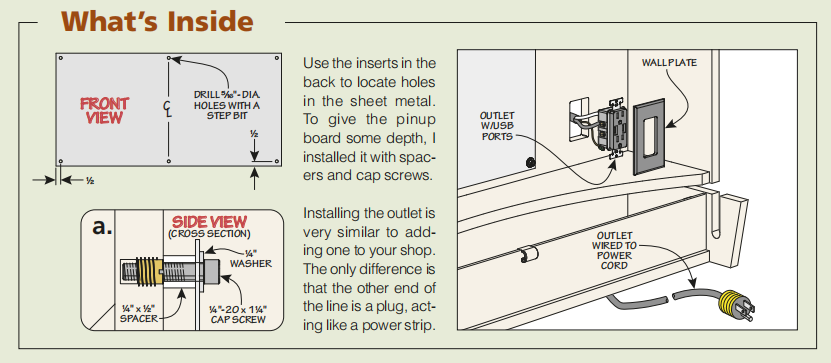
With the woodworking complete, it's time to add the details that make this desk especially useful in a shop.
Install the Electrical Outlet
The main compartment includes a duplex outlet with USB charging ports.
This provides a convenient location for charging a phone or other devices while working at the desk.
The cavity behind the back panel provides a route for the electrical cord.
Use a properly listed electrical assembly suitable for installation in furniture, with the required enclosure, strain relief, and cord protection. Follow applicable electrical codes and the manufacturer's instructions. Have a qualified electrician handle any permanent wiring or installation that requires one.
Make the Magnetic Bulletin Board
A sheet-steel panel mounted to the back of the cabinet creates a useful bulletin board.
You can use magnetic holders to keep project notes, small supplies, and reference information close at hand.
Cut the steel to size with tin snips, wearing gloves to protect your hands from the sharp edges.
Then file the edges to remove burrs and soften any sharp corners.
Mount the panel using the threaded inserts installed earlier.
Give the Desk a Decorative Painted Front
When the desk is closed, the outer face of the desktop becomes a prominent feature on the shop wall.
Rather than leaving it as plain plywood, this project uses a stenciled paint design.
Dillon Baker created a pattern that suggests a stand of pine trees, adding a little personality to an otherwise practical piece of shop furniture.
The design is made with masking tape and paint, so it doesn't require any special equipment.
You can follow the same approach or create a pattern that suits your own shop.
A painted front also gives you an opportunity to add a splash of color without changing the basic construction.
Choose the Right Mounting Height
A typical seated desk height is around 29", but this project doesn't have to follow that convention.
Since the cabinet mounts to the wall, you can position it at a height that works best for your shop.
Mount it at a comfortable seated height if you plan to use a stool or chair.
Or install it higher to create a standing workstation for reviewing plans and making quick notes.
Before mounting the desk, consider the height of the open worksurface, the available wall space, and the clearance needed to reposition the desktop.
A Practical Upgrade for Any Woodworking Shop
A dedicated desk might not seem like an essential workshop accessory. But once you have a place to keep plans, notes, and small supplies organized, it's hard to imagine working without one.
This wall-mounted drop-down desk provides a generous worksurface when you need it and keeps the floor clear when you don't.
The combination of plywood construction, built-in storage, charging ports, and a decorative front makes it both practical and attractive.
For a small shop — or any workshop where bench space is valuable — it's a project that earns its place on the wall.
Get the Complete Step-by-Step Woodworking Plans
Need a dedicated place to review plans, sketch ideas, or keep your shop paperwork organized? This wall-mounted Drop-Down Shop Desk gives you a spacious worksurface when you need it and stores neatly out of the way when you don't. With built-in storage, a magnetic bulletin board, USB charging, and a decorative front panel, it's a practical addition to any workshop.
Get the complete step-by-step woodworking plans, including detailed drawings, dimensions, a materials list, and construction instructions to build your own.
GET THE STEP-BY-STEP PLANS → Build Your Own Drop-Down Shop Desk
More Space-Saving Workshop Storage Ideas
A folding desk is just one way to create a more organized workshop without sacrificing floor space. Wall-mounted cabinets, fold-down workstations, and compact storage projects can help keep tools and supplies close at hand while leaving more room for woodworking.
Explore more practical shop storage and organization projects designed to make your workshop work better.
EXPLORE SHOP STORAGE PROJECTS → Make the Most of Every Inch of Your Shop


