



How to Cut Dadoes and Grooves with a Table Saw
Some woodworking joints get all the attention. Dovetails and box joints are great examples. But two of the most useful joints in the shop are also among the simplest: dadoes and grooves.
These basic cuts show up in everything from cabinets and bookcases to drawers, doors, and frame-and-panel assemblies. They strengthen joints, help keep parts aligned during assembly, and provide a reliable way to hold shelves, panels, and drawer bottoms.
And while cutting a dado or groove isn't especially complicated, getting the width, depth, and fit just right makes a big difference in the finished project.
Let's look at several ways to cut dadoes and grooves at the table saw, along with some techniques for making cleaner cuts and stronger joints.
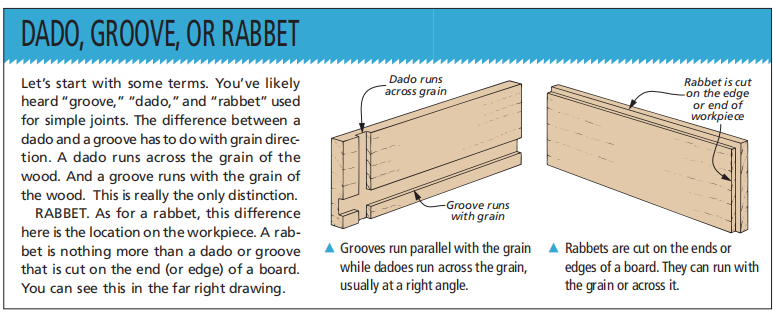
What's the Difference Between a Dado, Groove, and Rabbet?
Before getting started, it helps to understand the differences between these three common woodworking cuts.
A dado is a channel cut across the grain of a board. It's commonly used to hold shelves, dividers, and other parts that meet the face of a workpiece.
A groove is a channel cut parallel to the grain. Grooves are often used to hold plywood panels, drawer bottoms, or other components.
A rabbet is a recess cut along the edge or end of a board. Rabbets are frequently combined with dadoes and grooves to create stronger, interlocking joints.
Although the cuts are simple, each has advantages depending on how the parts fit together.
Cutting Centered Grooves with a Single Table Saw Blade

One of the most common uses for a groove is holding a panel in a frame-and-panel assembly.
For example, a narrow groove can capture a plywood panel while also working with stub tenons to join the rails and stiles.
The challenge is that nominal 1/4" plywood and hardboard are often slightly thinner than their stated dimensions.
That means a standard 1/4" dado setup may produce a groove that's too wide.
Fortunately, there's an easy solution using a regular table saw blade.
Make Two Passes for a Perfectly Centered Groove
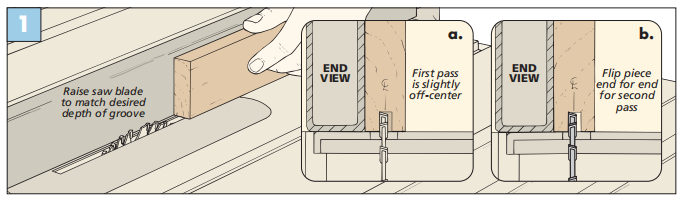
Start by setting the rip fence so the blade is approximately centered on the thickness of the workpiece.
Make the first pass over the blade.
Then turn the workpiece end-for-end, keeping the same face against the fence, and make a second pass.
The second cut widens the groove slightly while automatically centering it on the thickness of the stock.
Check the fit using a scrap of the actual plywood or panel material.
If the groove is still too narrow, move the rip fence away from the blade just a small amount and repeat the two-pass process.
Woodsmith Tip: Use the Actual Panel to Check the Fit. Plywood thickness varies, even among sheets sold under the same nominal size. Use a scrap from the panel you're installing to test the groove before cutting your project parts.
Cutting Wider Grooves with a Stacked Dado Set

Grooves are also useful in cabinet and case construction.
They do more than provide a place for one part to fit into another. The shoulders of the groove help keep the parts aligned and resist movement during assembly.
For wider grooves, I typically use a stacked dado blade set.
Set the Dado Blade to Match Your Material
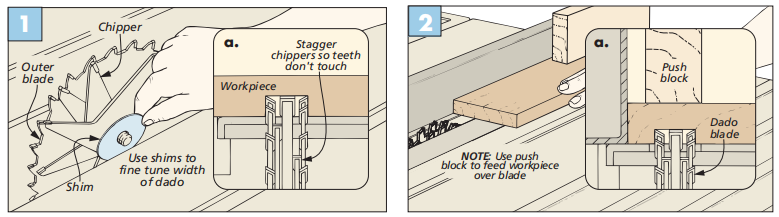
A stacked dado set consists of two outside blades with chipper blades installed between them.
By combining different chippers, you can adjust the overall cutting width.
When working with plywood, however, the exact thickness often falls between standard dado blade settings.
This is where dado shims come in handy.
Thin shims installed according to the dado set manufacturer's instructions allow you to fine-tune the cutting width for a snug fit.
Before cutting any project parts, make a few test cuts in scrap material.
The goal is a groove that accepts the mating piece without excessive force or noticeable looseness.
Guide the Workpiece with the Rip Fence
Cutting a groove with a dado set is much like ripping a board, except the blade doesn't cut all the way through the stock.
Use the rip fence to position and guide the workpiece.
Even though the dado blade is covered by the board during the cut, use a suitable push block to keep your hands away from the cutting area.
For wide or long workpieces, provide adequate infeed and outfeed support.
How to Cut Dado Joints for Shelves and Cabinets

A dado joint is especially useful when one board meets the face of another at a right angle.
A common example is a shelf installed between the sides of a bookcase.
The dado creates two shoulders that capture the end of the shelf, helping keep it aligned and resisting twisting or racking.
For most of these joints, I use a stacked dado blade adjusted to match the thickness of the mating workpiece.
Use a Miter Gauge for Cross-Grain Cuts

Unlike a groove, a dado runs across the grain of the workpiece.
That means you'll generally use a miter gauge or crosscut sled to guide the board across the blade.
Attach a long plywood auxiliary fence to the miter gauge. This supports the workpiece and helps prevent tearout as the dado blade exits the cut.
For repeated dado locations, use a stop block to position the workpiece consistently.
When referencing the rip fence, position the stop so the workpiece clears the fence before reaching the blade. This prevents the board from becoming trapped between the fence and the cutter.
Cut Matching Dadoes in Pairs
When building cabinets or bookcases, you may need matching dadoes in two side panels.
A simple way to keep the layout consistent is to cut corresponding dadoes using the same setup.
If the dado locations are symmetrical, you can turn the workpieces end-for-end to cut matching locations before changing the stop setting.
This reduces layout errors and helps ensure the parts line up during assembly.
Preventing Tearout When Cutting Dadoes
Because dadoes run across the grain, they're more likely to produce chipped or splintered edges than grooves.
This is particularly noticeable when cutting plywood.
There are several ways to improve the quality of the cut.
Add a Backer Board
An auxiliary fence attached to the miter gauge provides support behind the workpiece.
As the dado blade exits the cut, the backer helps prevent the wood fibers from breaking away.
Use a Sharp Dado Blade
Some dado sets have outside blades designed to score the edges of the cut before the chipper blades remove the waste.
This helps produce cleaner shoulders.
Even with a good dado set, however, a dull blade or difficult plywood veneer can cause splintering.
Adjust the Feed Rate
A slower, steady feed rate can help reduce splintering in some materials.
Avoid forcing the workpiece through the blade, but don't move so slowly that the cut begins to burn.
Try Masking Tape
If you're still getting splintering along the edges, apply masking tape over the area where the dado will be cut.
The tape helps support the surface fibers during the cut.
It's a simple trick that can make a noticeable difference when working with plywood.
Using Tongue and Dado Joints for Drawers

Drawer joints have to withstand repeated opening and closing, often under a substantial load.
While simple butt joints are easy to make, they don't provide much mechanical resistance to the pulling forces on a drawer front.
A tongue and dado joint offers a stronger alternative.
In this joint, narrow dadoes are cut near the ends of the drawer sides. Matching tongues on the drawer front and back fit into those dadoes.
The interlocking parts help resist the forces placed on the drawer during use.
This method is especially useful for drawers that have a separate false front.
Step 1: Cut the Dadoes in the Drawer Sides
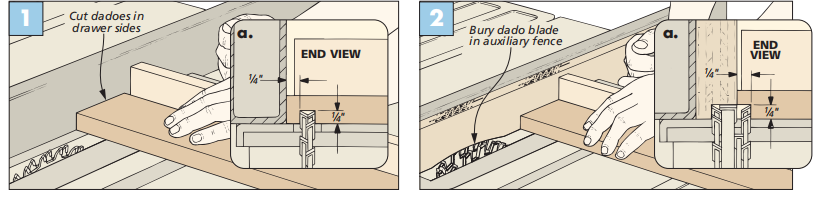
Use a dado blade to cut the narrow dadoes near the ends of each drawer side.
A miter gauge supports the workpiece during the cross-grain cut, while a properly positioned stop establishes the dado location.
Cut matching dadoes in both drawer sides before changing the setup.
Step 2: Form the Tongues on the Front and Back
Next, cut rabbets on the ends of the drawer front and back to form tongues.
An auxiliary fence attached to the rip fence allows you to partially bury the dado blade when making these cuts.
The goal is to size the tongues so they fit snugly into the dadoes in the drawer sides.
Make test cuts and adjust the setup until the joint comes together without excessive force.
Cutting a Locking Rabbet Joint for Drawers

Another useful drawer joint is the locking rabbet.
It's similar to the tongue and dado joint but provides additional interlocking surfaces and glue area.
This joint is a good choice when the drawer front will be visible rather than covered by a separate false front.
The basic process begins by cutting dadoes in the drawer sides, just as you would for a tongue and dado joint.
The difference is how the drawer front and back are prepared.
Form the Centered Tongue
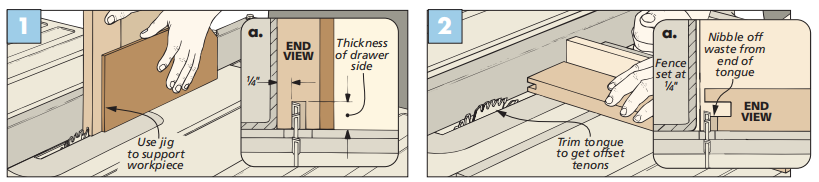
Cut a centered dado across the end of the drawer front and back.
This operation is made in two passes, turning the workpiece around between cuts to center the dado.
A support jig holds the workpiece upright and securely against the fence during the operation.
The resulting profile forms a tongue that fits into the dadoes in the drawer sides.
Trim the Inner Tongue
The final step is to remove the waste from the inner tongue.
This can be done by nibbling away the material in a few passes over the dado blade.
When the joint is assembled, the drawer sides should be flush with the ends of the drawer front and back.
The result is a strong, interlocking joint that's attractive and relatively easy to make with a carefully adjusted table saw setup.
Getting a Better Fit with Dadoes and Grooves
Whether you're cutting a narrow groove for a plywood panel or a wide dado for a cabinet shelf, the same basic principles apply.
Start with an accurate setup. Use sharp blades, make test cuts, and size the joint to the actual thickness of the mating material.
Pay attention to grain direction and support the workpiece properly to prevent tearout.
And when making a series of matching cuts, use stops and repeatable setups to keep everything aligned.
Dadoes and grooves may be simple woodworking joints, but learning to cut them accurately makes almost every project easier to build.
Explore More Woodworking Joinery Techniques
Dadoes and grooves are just the beginning. From simple butt joints to stronger mechanical connections, choosing the right joinery method can make a big difference in how a project comes together.
Explore four practical woodworking joinery options and learn where each one works best.
EXPLORE WOOD JOINERY TECHNIQUES → 4 Easy Options for Wood Joinery


