Mortise and tenon joinery was used long before woodworkers had access to reliable glues. Instead, they had to rely on different methods of locking a tenon tightly into its mortise. One of the most common ways to fix a mortise and tenon joint was to use a wood pin.

The technique is simple in concept. The drawing below illustrates how it works. First, you drill a hole through the assembled joint. Then, a round wood pin is installed through both faces of the mortised piece and the tenon, locking the joint firmly together.
WHY TODAY?
Although today it’s easy to simply assemble a mortise and tenon with glue, a pinned joint can be just as strong, and may even offer a couple of advantages. For example, a wide tenon assembled with only pins allows wood movement in the joint and may hold up better in the long term.
But aside from any structural benefits, I like to pin the tenons in some projects simply for the sake of appearance. The visible ends of the pins add an interesting detail to an otherwise flat, plain surface. And they leave no doubt as to what type of joinery is holding the assembly together.
Pinning a mortise and tenon joint is pretty straightforward. But as with every woodworking technique, a bit of know-how and a few tips can make the job easier and more successful. A step-by-step look at the process will give you a good, basic understanding.
STARTING POINT. To begin, the mortise and the tenon are made as usual. All the extra steps come at the end when you assemble the joint. If the joint is going to be glued, I do this first and then pin the joint once the glue has dried.
THE LAYOUT. The first step is to decide which diameter pin to use. Matching the size of the pin to the strength requirements of the joint is important if the joint is not glued. But if the joint is glued as well as pinned, proportion is usually my top consideration.
You want to keep the diameter of the pins in scale to the workpieces. For small to moderate size doors with light, narrow frames, 1 ⁄ 4 "- or ⁄ 16 "-dia. pins look good. For a large door or a table frame, a 3 ⁄ 8 "-dia. pin is more appropriate. In heavy, load bearing construction, such as a workbench, pins up to 3 ⁄ 4 " in diameter may be used.
LOCATING THE PINS. The same two considerations — strength and appearance — apply when deciding where to locate the pins on the outside face of the mortised piece. The drawings on the opposite page illustrate some general guidelines.
The goal is to lock the tenon into the mortise. To do this, the pin has to have sufficient “bite.” This means it shouldn’t pass through the tenon too close to the end or either edge. Whenever possible, I center the pin across the width of the tenon and keep it at least 1 ⁄ 2 " from the end.
Likewise, the pin shouldn’t be positioned too near the edge of the mortised piece. This increases the chances of the mortised piece splitting under stress. A good rule of thumb is to position it no closer than 1 ⁄ 2 " from the joint line.
When a tenon is about 3" or more in width, I generally install two pins through the joint. In this case, you may want to stagger or offset the pins from one another, as in detail ‘b’ on the opposite page. This reduces the chance of the mortised piece splitting along the line of the pins and also creates a more interesting appearance.
STOPPED OR THROUGH HOLES. Once the locations for the pins are laid out, drilling the holes is the next task. The holes can be either stopped or through depending on the project.
When assembling a frame, for example a door, I prefer to use a through hole. It’s simply easier to drill the hole and install the pin.
The rail-to-leg joint of a table frame is pinned in a stopped hole. Since the leg is usually much thicker than the apron, you can still get plenty of bite for the pin on the inside face of the mortise.
DRILLING THE HOLES.
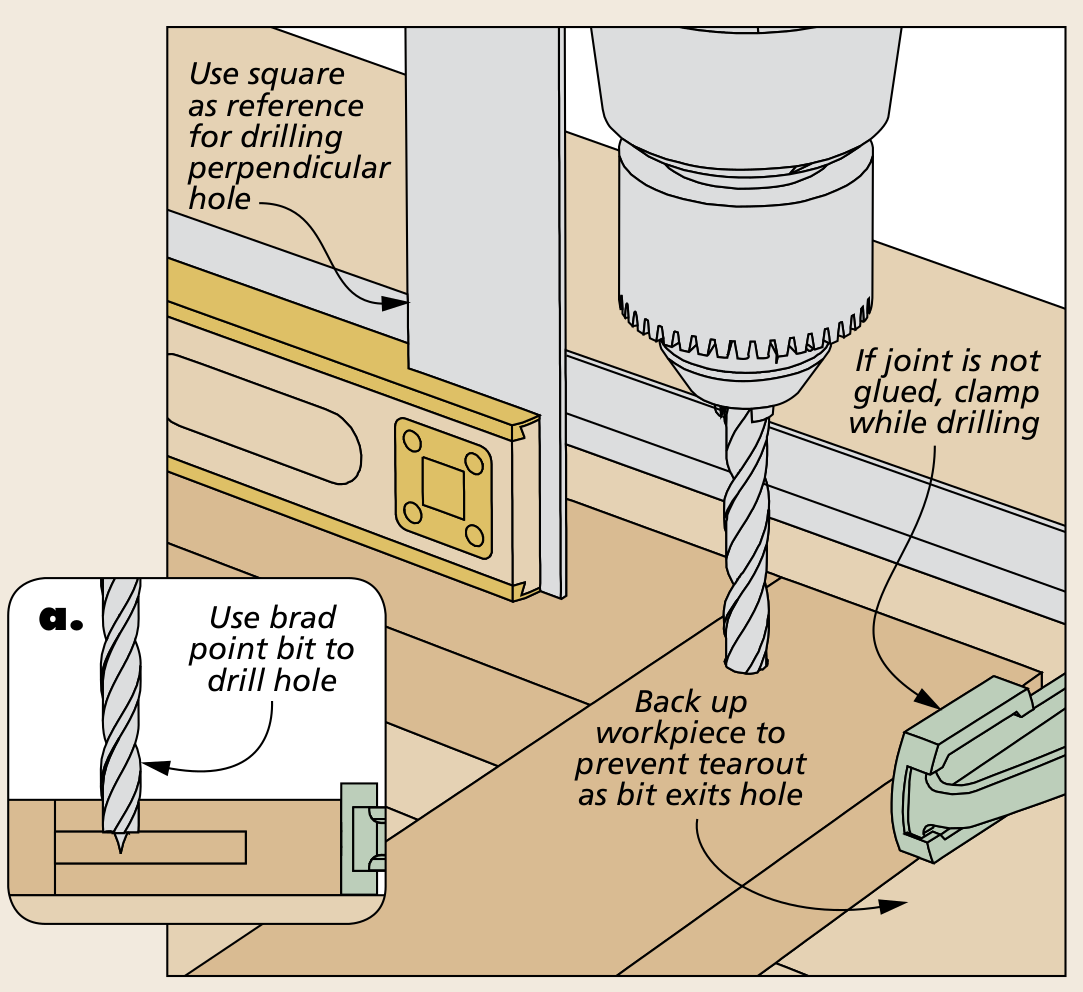
The exposed ends of the pins will become a focal point, so you want the holes for the pins to be clean and accurately sized. A hand-held drill with a brad point installed is the best tool for this job. And if the joint hasn’t been glued up, you’ll have to clamp it before drilling the holes, as shown in the drawing at right.
You can try to drill a perpendicular hole simply by eye. But I like to use an upright square for reference. And when drilling a through hole, you always want to use solid backup to prevent tearout as the bit exits the workpiece.
THE PINS. Once the holes are completed, you need pins to fill them. Here, the key is a good fit to the holes — not too tight or too loose.
The pins can be the same type of wood as the frame or a contrasting type. The end grain of the pin will always provide some degree of contrast with the surrounding wood, so I generally use pins from the same wood type.
If a dowel rod of the right size and wood is handy, it’s easy to cut pieces to length for the pins. A good alternative is to make the pins using a shop-made draw plate, as shown in the box below. This allows you to custom size the pins for a perfect fit and make them out of any type of wood you have available.
The length of the pins should be at least 1 ⁄ 2 " more than the thickness of the assembly. You want plenty of extra length to work with when installing and trimming the pins.
Finally, before setting the pin, the leading end should be chamfered. This allows you to get it started in the hole easier and it will pass through with less resistance. You can do this quickly with a sanding block, a file, or even a block plane.
How-To: Make Snug-Fitting Pins

Pin Blank. Start by ripping a length of square pin stock that’s sized slightly larger than the diameter of the pins you need.

The Corners. Choose an initial hole in the draw plate that will knock off the corners and then drive a short blank through it.

Final Size. The final pass is through a hole matching the diameter of the pins. The blank will be a little rough, but round.
adding THE PINS
With the holes drilled and the pins made, you’re ready to insert them. If the pins are a tight fit, gluing them in place isn’t a must, but it’s a good idea. The glue fills any gaps and ensures a clean, crisp look once the pin is trimmed. I put glue at the top of the hole, as well as around the leading end of the pin. This way, as the pin is driven home, glue is forced in both directions.
The assembly should be solidly supported above the benchtop, as shown in the left drawing below. You’ll need clearance for the pin as it passes through the back side.
Once you start the pin into the hole, pound it clear through as quickly as possible. You don’t want to give the pin a chance to lock up halfway through the hole.

TRIMMING THE PINS. Now all that’s left is to trim the pin flush to the surfaces. This is the part of the process that will show, so the key here is to take extra care.
Once the glue is dry, I start by cutting off the pin slightly above the surface with a hand saw. Placing a thin shim between the surface and the saw is a smart precaution against scratches. And saw gently so the pin doesn’t break off before it’s cut completely through.
Finally, use a sharp chisel to pare the remaining “stump” flush with the surface. Holding the chisel bevel up and resting flat on the surface, score around the entire pin. Then use light paring cuts from all sides to remove the waste. Take care to avoid marring the surface with the corners of the chisel.
After a little finish sanding, you’re done. You’ll have a joint guaranteed to never fail but always draw attention. And if you want to go the extra mile on your joinery, check out the box below.
How-To: Drawbore
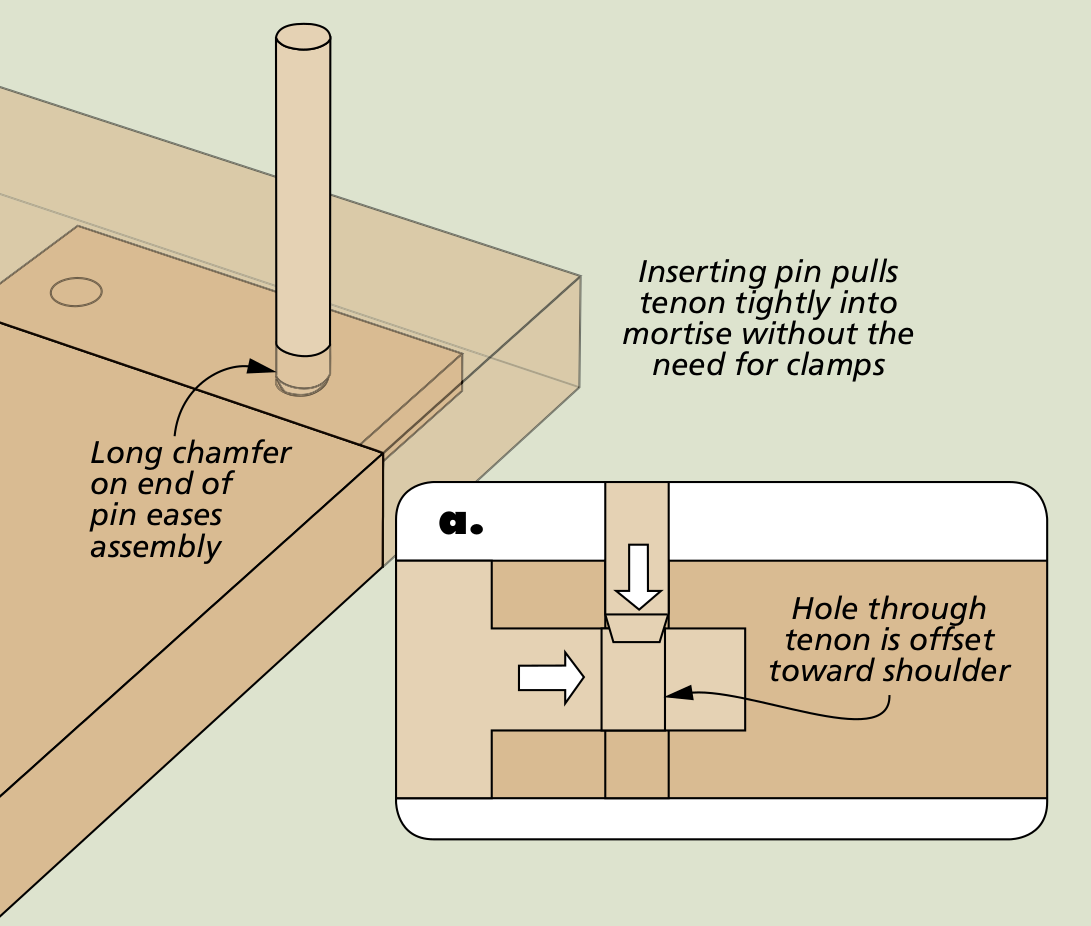
Drawboring is a variation on a pinned mortise and tenon in which the pin is used to pull or “draw” the joint together without the need for clamps. The way this works is shown in the drawings below and at right. The hole through the tenon is drilled separately and is slightly offset toward the shoulder. When the pin is driven through the joint, this offset causes the tenon to be pulled snugly into the mortise. Drawboring results in a very strong and tight joint and is a good option in situations where clamping would be difficult or impractical.

Mortise Holes. The pin holes through the mortise are laid out and then drilled at the drill press.

Mark Tenon Holes. Next, assemble the joint and use the drill bit to transfer the hole locations to the tenon.

Offset Holes. With a square and an awl, mark the tenon for holes that are offset 1 ⁄ 32 " toward the shoulder.

Drill Tenon Holes. Now use the offset marks to drill the holes through the tenon at the drill press.