Adding a decorative band of inlay to a simple project is a great way to transform it from ho-hum to spectacular. Of course, you can buy commercially made banding, but I prefer to make my own using scraps of exotic or figured woods. It’s a great way to use up those small cutoffs from other projects. Although it may seem complicated, making this banding is just a matter of following a simple, step-by-step process.
OVERVIEW. In a nutshell, making banding starts by gluing up thin layers of contrasting wood to create a sandwiched blank. Then, you cut the blank into short blocks, rearrange them, and glue them back together to create a pattern. Finally, you rip thin strips from the edge of this patterned blank to create the decorative banding.

START WITH THE DESIGN. As with any project, you need to begin with a plan. I created the banding shown below (and throughout this article) to use on a picture frame.
FIND THE RIGHT STOCK. The first stop is your cutoff bin to find some interesting pieces of stock. You’ll get the best results by combining contrasting woods. (For example, I started by combining holly and Macassar ebony.) But you’ll also need to be mindful of how the finished product will look with the project. Once you’ve found the right combination, you’re ready to get busy. No matter what wood you choose, the first step is to plane your stock to the correct thickness.
 THICKNESSING.
I designed this banding to fit into a shallow, 1 ⁄ 2 "-wide routed channel. To make sure you end up with a perfect fitting band, you’ll need to pay close attention to the thicknesses of the individual layers in the sandwich. Since the combined thickness of those
layers determines the width of the band, I use a caliper to make frequent measurements as I plane them. I planed the ebony to 1 ⁄ 8 " and the holly to 1 ⁄ 4 ". Later, you’ll add two 1 ⁄ 16 "-thick layers of ebony to bring the total width of the band to 1 ⁄ 2 ".
THICKNESSING.
I designed this banding to fit into a shallow, 1 ⁄ 2 "-wide routed channel. To make sure you end up with a perfect fitting band, you’ll need to pay close attention to the thicknesses of the individual layers in the sandwich. Since the combined thickness of those
layers determines the width of the band, I use a caliper to make frequent measurements as I plane them. I planed the ebony to 1 ⁄ 8 " and the holly to 1 ⁄ 4 ". Later, you’ll add two 1 ⁄ 16 "-thick layers of ebony to bring the total width of the band to 1 ⁄ 2 ".
I use a drum sander to sand stock for these very thin strips. But you can do it by hand as well.
Another important consideration is the grain orientation of the blanks. You’ll want the finished band to display face or edge grain, not end grain. The drawing at below shows the correct grain direction.
 GLUEUP.
After planing or sanding the blanks to the final thickness, it’s time to glue up the initial sandwich. As you can see in the photo below, I used hardwood cauls to make sure the clamping pressure was evenly distributed. Any gaps in the joint will be visible in the assembled banding, so it’s worth taking precautions to ensure a tight joint.
GLUEUP.
After planing or sanding the blanks to the final thickness, it’s time to glue up the initial sandwich. As you can see in the photo below, I used hardwood cauls to make sure the clamping pressure was evenly distributed. Any gaps in the joint will be visible in the assembled banding, so it’s worth taking precautions to ensure a tight joint.
 CLEANUP.
After the glue dries, you can use a block plane or scraper to clean up the squeezeout from one edge. Then rip the opposite edge parallel on the table saw and square up both ends. Now you have the basic component of the banding — a clean, square blank.
CLEANUP.
After the glue dries, you can use a block plane or scraper to clean up the squeezeout from one edge. Then rip the opposite edge parallel on the table saw and square up both ends. Now you have the basic component of the banding — a clean, square blank.
 CROSSCUTTING.
The next step is to crosscut the blank into small blocks. For this, I used the sled shown in the main photo. The sled has an adjustable stop to ensure accuracy (see the box below for a plan). I also installed a 7 1 ⁄ 4 "-dia. circular saw blade in my table saw. It has a thinner ( 1 ⁄ 16 ") kerf, so there’s less waste.
CROSSCUTTING.
The next step is to crosscut the blank into small blocks. For this, I used the sled shown in the main photo. The sled has an adjustable stop to ensure accuracy (see the box below for a plan). I also installed a 7 1 ⁄ 4 "-dia. circular saw blade in my table saw. It has a thinner ( 1 ⁄ 16 ") kerf, so there’s less waste.
How-To: Make a Precision Crosscut Sled
A crosscut sled is a must for making this style of banding. Fortunately, it doesn’t have to be anything too complicated. The sled shown at right is simply an 1/8 " hardboard base with hardwood front and back supports and a runner to fit in the miter gauge slot. The supports hold the sled together as you cut through the base.
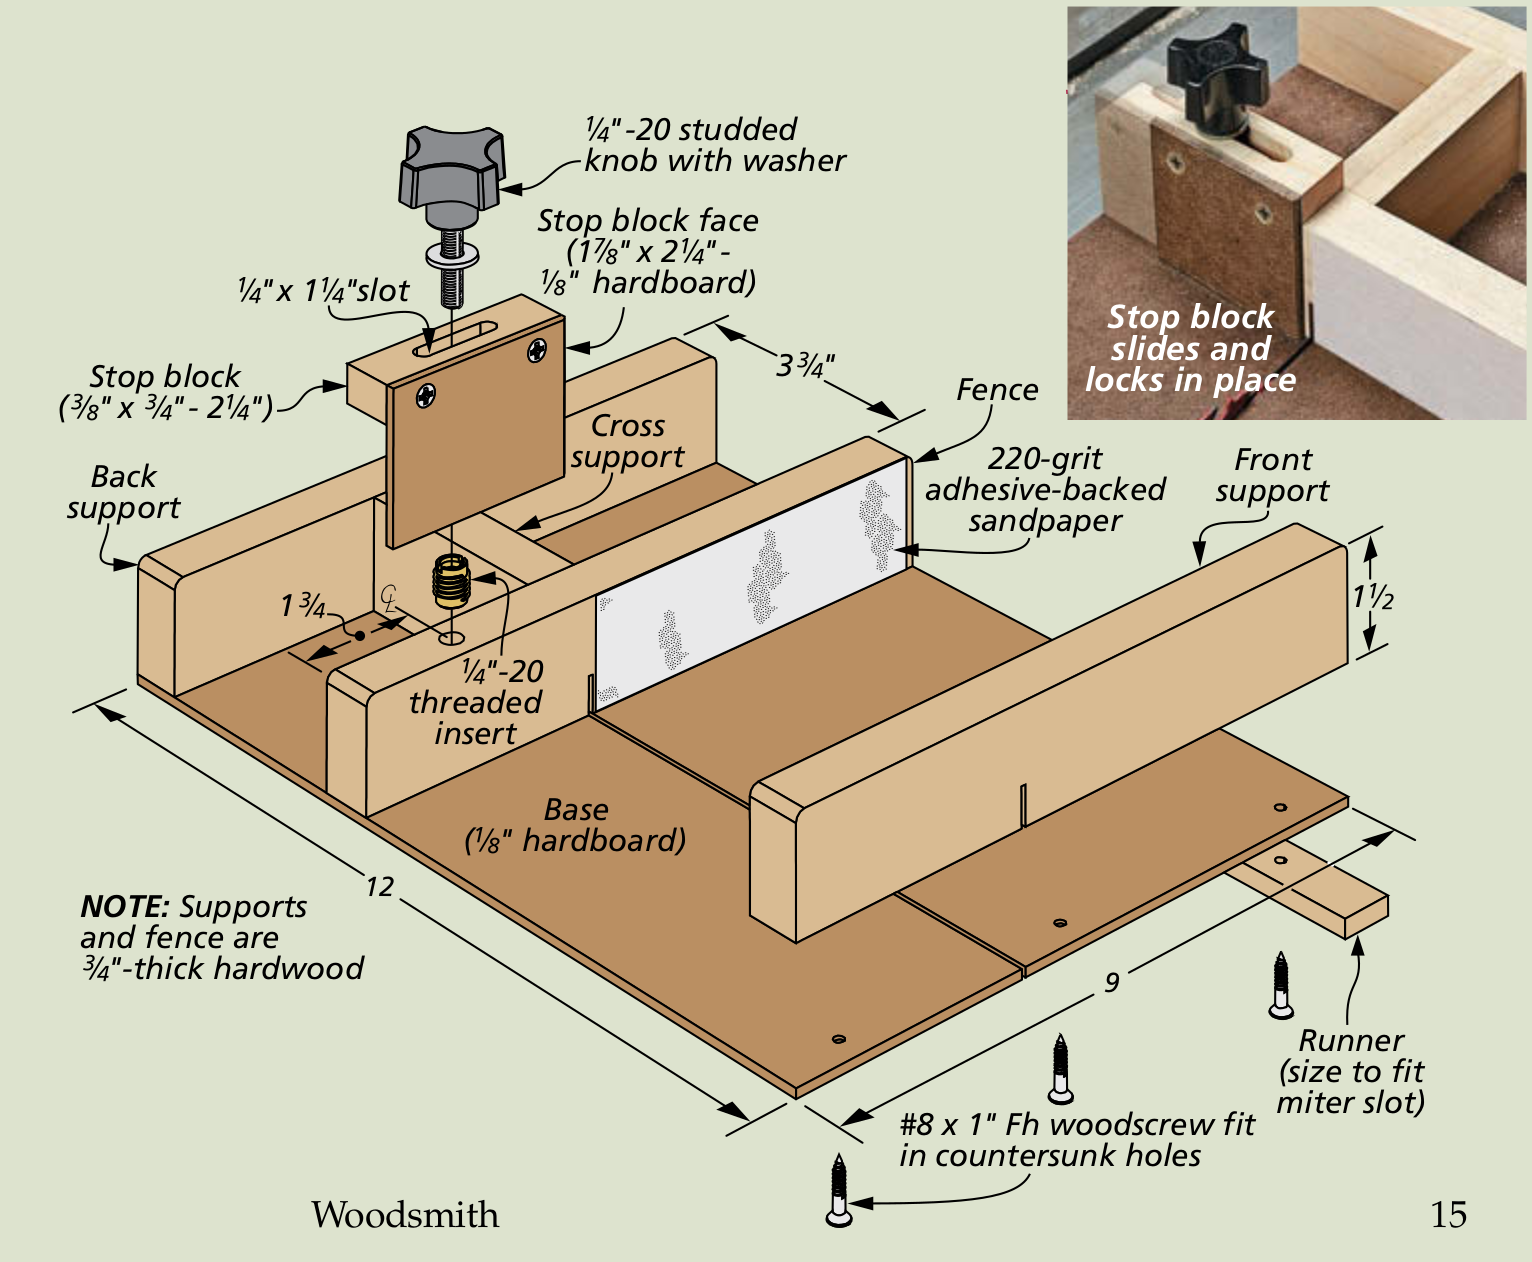
In the center, a hardwood fence with an adjustable stop block allows you to make very accurate crosscuts. Behind the fence, I added a cross support which doubles as a blade guard to keep your fingers safe.
The stop block slides on the fence and is locked in place with a studded knob that screws into a threaded insert in the fence. I also added adhesive-backed 220-grit sandpaper to the fence to help prevent the block from shifting. It all works together to guarantee a square cut.
Assembling the BANDING BLOCK
With the blocks cut to length, you’re ready to move on to assembling them to form the pattern. To do this, I used a flat piece of melamine with a strip of hardwood edging attached. The melamine is reliably flat and glue won’t stick to it very well, so it’s a good choice for this task. The hardwood edging provides a straight reference edge when putting together the blocks to form the pattern.


PATTERN. You’ll also notice in the photos that I started and ended the banding pattern with a wide block on each end. This will give you greater flexibility when it comes to trimming or mitering the finished banding to fit your project. You’ll want a symmetrical fit where two pieces meet in the corners.

I use a strip of masking tape (sticky side up) on the assembly board to hold the stack together. This way, all you need to do is alternate the wide and narrow strips, flipping them and sticking them to the tape to form the staggered design, as shown in the top photo.
GLUEUP. Gluing up the pattern of blocks can be a bit of a challenge because of their small size and scant available glue surface. It’s important to spread the glue evenly across the surface to make sure you don’t end up with gaps in the finished banding. I find that a thin scrap of plastic makes the perfect tool for spreading glue into the crevices (middle photo).

When you’ve covered all the blocks, lay the blank on a flat surface and gently press down to squeeze out the excess glue (the tape will hold everything together). After wiping away the squeezeout, loosely clamp the blank as shown in the photo above. Add light pressure (until a little more glue squeezes out) and leave it clamped for about 30 minutes. This is plenty of time for the glue to set up before moving on to the next step.
ADD THE BORDERS. After removing any glue squeezeout, you’re ready to add the top and bottom borders to the assembly. The 1 ⁄ 16 "-thick borders help define the banding when you install the strips in your project. Once again, I started by taping the edges of the pieces together and applying an even coat of glue.
Using the hardwood cauls as before, you can clamp the blank and add plenty of pressure. This time, I let the blank cure for a full 24 hours before moving on to the final two steps.
CLEAN UP THE BLANK. When the glue dries, you’ll need to clean up the blank again, just as you did earlier, by jointing one edge and ripping the other parallel. Once you’ve squared the blank, you’re ready to cut it into strips of banding.
CUTTING THE BANDING.
As before, I prefer to use the thin-kerf circular saw blade to minimize the waste when ripping the banding strips. And for these cuts, you’ll also need to make a zero-clearance insert for your table saw. If there is a gap between the blade and the opening of the insert, the thin strip can be pulled under as it passes through the blade.

The thickness of the bands can vary, depending on your project. For the picture frame, I wanted the banding to sit slightly proud of the surface. So I cut the strips 3 ⁄ 16 " thick. This way, I could rout a 1 ⁄ 8 "-deep channel and still have the banding sit above the edge.
I positioned the fence 3 ⁄ 16 " from the blade and cut all the strips between the blade and the rip fence to ensure they were all the same thickness. As you can see in the photo above, I also made a sacrificial push block which not only controlled the workpiece, but kept my fingers safely away from the blade.
Now it’s just a matter of ripping the blank into strips. After that, sand them lightly to remove any saw marks. Then, you’re ready to add them to your project.
This technique can be applied to many different designs. The box below shows just a few possibilities. Once you get the hang of the process, you’ll find lots of applications for inlay banding.
Options: Other Banding Styles
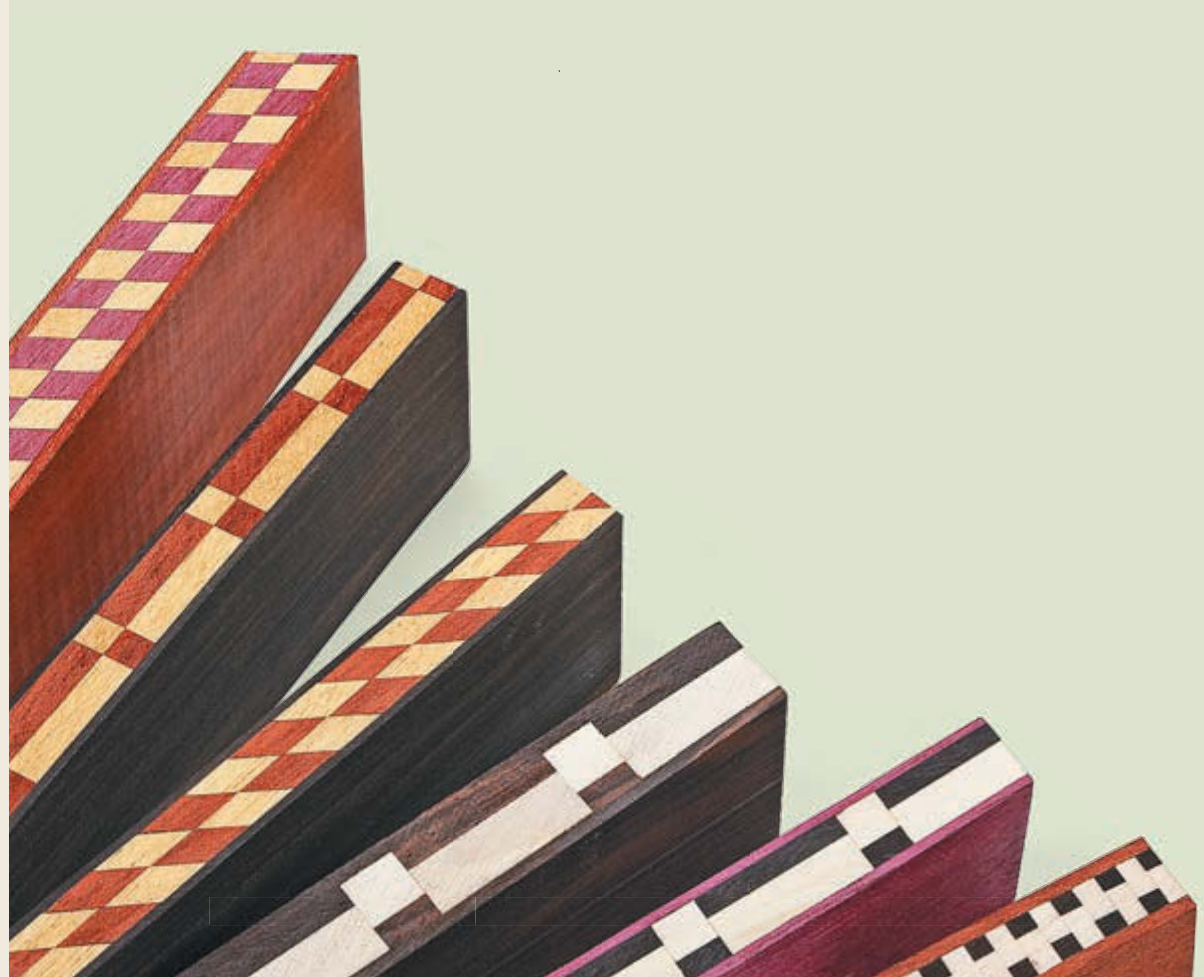
The banding shown in this article is just one of many styles you can make. The photos here show several other options. The good news is, they all rely on the same techniques for cutting, gluing, and assembling.
Of course, the easiest changes to make are the species of wood you use and the sizes of the blocks. In the photos here I used purpleheart, padauk, yellowheart, wenge, maple, mahogany, ebony, and holly. But whatever you find in your scrap box will work.
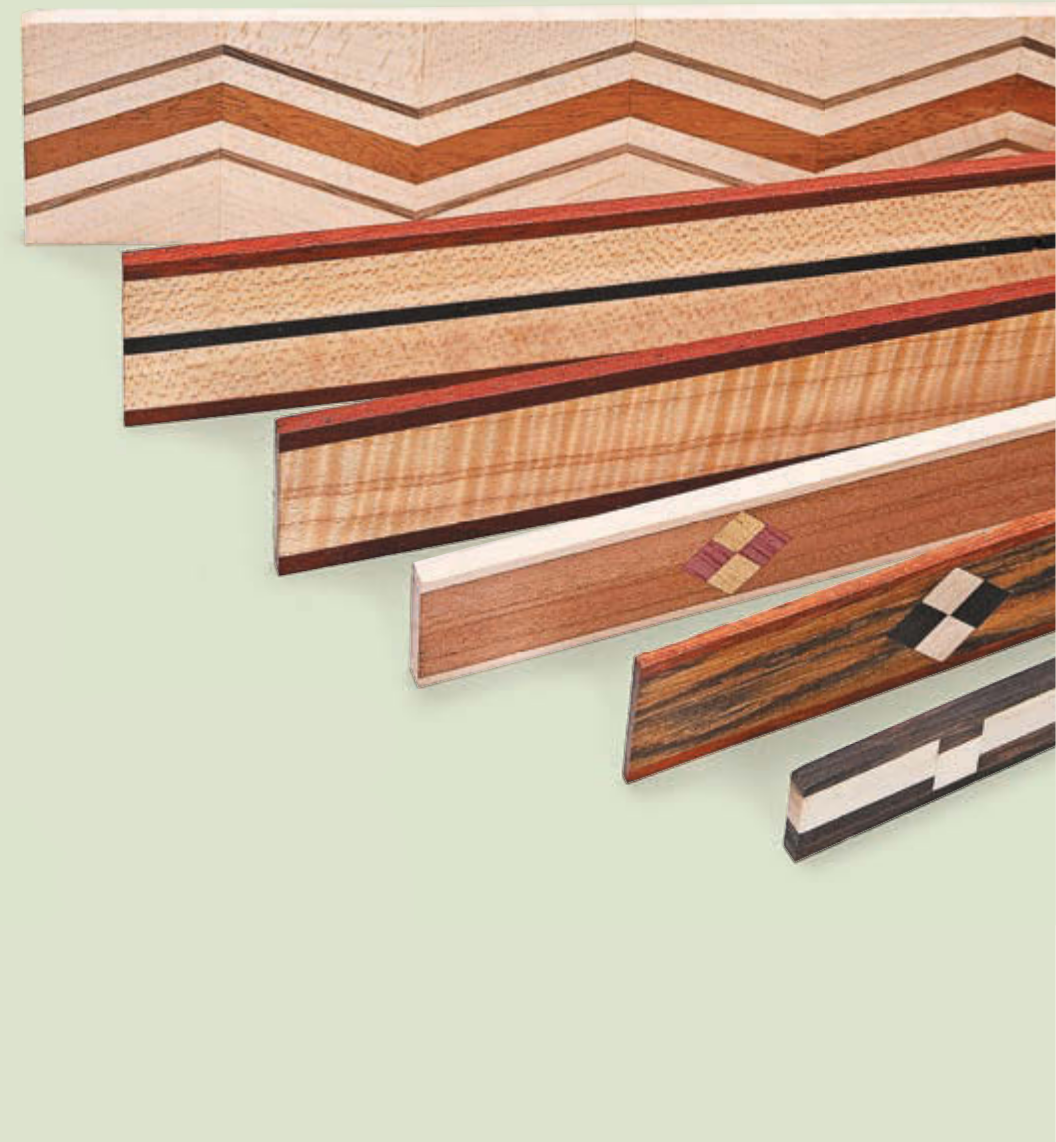
You can also get drastically different results simply by changing the thickness and width of the individual components.
For even greater variety, you might want to try cutting the blocks or the glued-up blank at an angle. This makes assembling the pieces a little more challenging. The glue will make them prone to shifting under clamping pressure. But the results can provide an amazing addition to your projects.