


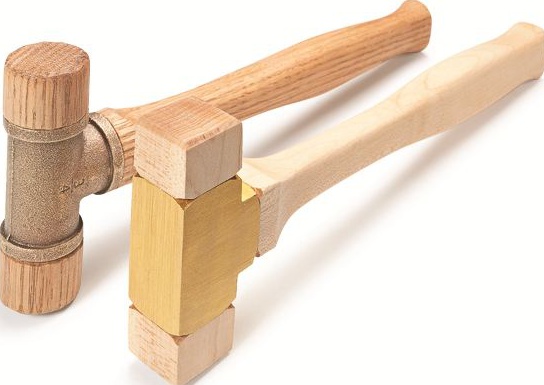
Build a Shop-Made Brass Mallet from a Pipe Fitting
Sometimes the best ideas for shop-made woodworking tools come from unexpected places. In this case, a trip down the plumbing aisle provided the inspiration for a handy little mallet.
While looking through the brass fittings at the hardware store, I realized that a brass pipe tee would make a great starting point for a woodworking mallet.
The fitting provides a solid center section, while a few pieces of hardwood form the striking heads and handle.
But the clever part of this project is how the wooden pieces attach to the fitting. Instead of gluing everything together, I used the threads inside the brass fitting to create a removable connection.
The result is a unique DIY brass mallet with wooden heads that can be replaced when they become worn or damaged.
Start with a Brass Plumbing Tee
The main component of the mallet is an ordinary brass tee fitting from the plumbing department.
I found two styles that work for this project: a round cast fitting and a square machined fitting.
Either style can provide the foundation for the mallet.
The two opposing openings hold the wooden striking heads, while the third opening accepts the handle.
This arrangement creates a compact mallet that's easy to customize with different head shapes and handle designs.
Turn the Brass Fitting into a Thread Cutter
The biggest challenge is finding a reliable way to attach the wooden heads and handle.
Epoxy would provide a permanent connection, but I wanted the wooden parts to be removable.
That way, I could replace a damaged head or change the handle without rebuilding the entire mallet.
The solution was to use the brass fitting to cut threads directly into the wood.
File Cutting Notches in the Threads
To turn the fitting into a simple threading tool, I used a three-square file to cut notches across the internal threads.
These notches create small cutting edges.
As a wooden tenon is turned into the fitting, the sharpened edges cut into the wood fibers and form matching threads.
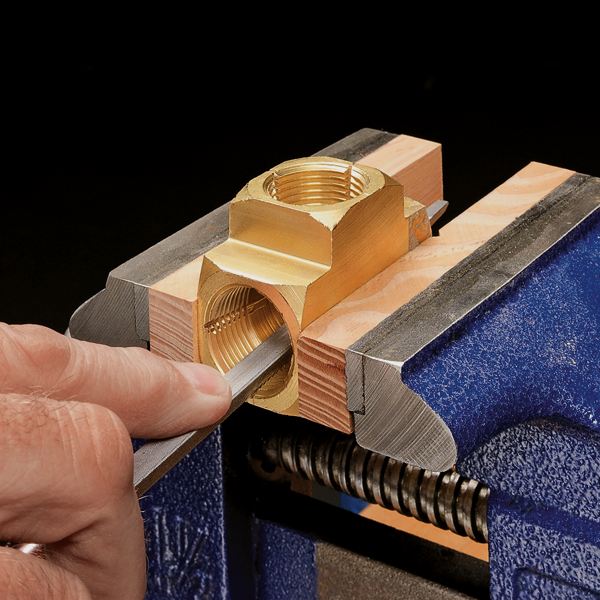
The key is to create enough cutting action for the wood to engage the threads without removing excessive material from the fitting.
Deburr the notches carefully and avoid leaving sharp metal edges exposed where they'll be handled.
Shape the Wooden Heads and Handle
With the brass fitting prepared, it's time to make the wooden parts.
Start with extra-long hardwood blanks for the two mallet heads and the handle.
Leaving the blanks long makes them easier to work with and allows you to shape them after they're installed.
Cut a Square Tenon
Form a slightly undersized square tenon on the end of each blank.
Then use a chisel to trim the corners, as shown in the construction drawing.
This creates a tenon that can enter the brass fitting while leaving enough material for the internal threads to engage.
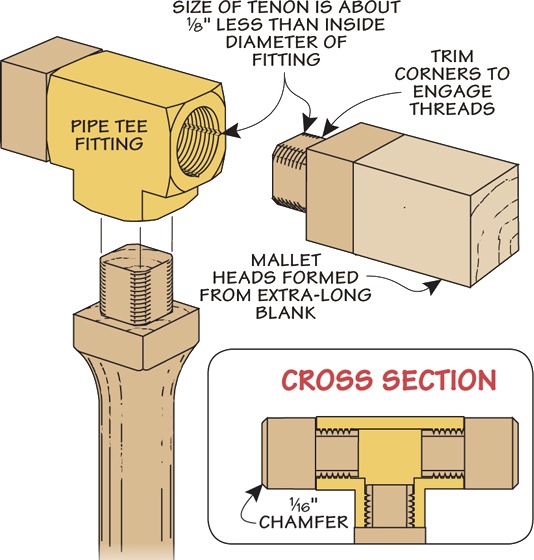
Thread the Wooden Parts into the Fitting
Carefully turn the tenon into the prepared brass fitting.
The notches in the internal threads cut matching threads into the wood as the blank advances.
Work gradually to avoid splitting the wood or damaging the newly formed threads.
The goal is a snug mechanical connection that holds the part securely but still allows it to be removed when necessary.
Repeat the process for both striking heads and the handle.
Trim and Shape the Mallet
Once the wooden parts are installed, you can trim them to length and shape the mallet to suit your preferences.
Round over the handle for a comfortable grip and shape the wooden heads to create suitable striking faces.
Because the heads are threaded into the brass fitting, they can be removed and replaced when they become worn.
Before using the mallet, check that the handle and heads are firmly seated. Inspect the wood for splits or loose threads, and avoid using the mallet if any component has become damaged or insecure.
A Handy Shop-Made Woodworking Tool
This little mallet is a good example of turning an ordinary hardware-store item into a useful woodworking accessory.
The brass plumbing fitting provides the foundation, while the wooden heads and handle give you plenty of opportunities to customize the tool.
And because the wooden parts are threaded into the fitting rather than permanently glued, they're easy to replace when necessary.
It's a satisfying shop project that combines a little metalworking with traditional woodworking techniques — and leaves you with a unique mallet for your tool collection.
Build Your Own Shop Mallet
A brass plumbing fitting makes a clever foundation for a shop-made mallet, but you can also build a traditional woodworking mallet entirely from hardwood.

In our Build Your Own Shop Mallet project, we'll show you how to turn a few pieces of scrap hardwood into a durable, comfortable hand tool. It's a satisfying woodworking project that's perfect for joinery, assembly, and everyday work at the bench.
BUILD YOUR OWN WOODEN MALLET → Another Handy Mallet You Can Make from Scrap Wood


