



Better Template Routing: Bits, Templates & Techniques
Template routing is one of those woodworking skills that opens up all kinds of possibilities once you learn it. It's a reliable way to create identical parts, shape complicated curves, and clean up edges that would be difficult to cut accurately with a saw alone.
The concept is simple: Create an accurate template, then use a bearing-guided router bit to transfer that shape to your workpiece.
But getting consistently smooth results involves more than running a router along a template. The bit you choose, the material and thickness of the template, and the way you approach the cut all make a difference.
That's especially true when working with curved furniture parts, plywood, or hardwood with changing grain direction.
With a few upgrades to your bits, templates, and routing technique, you can produce cleaner edges, reduce tearout, and spend less time sanding.
Why Template Routing Works So Well
The biggest advantage of template routing is consistency.
Once you've made an accurate template, you can reproduce the same shape again and again. That's particularly useful when building furniture with matching legs, curved rails, or other repeated components.
But there's another advantage that's easy to overlook.
Making a template gives you an opportunity to refine the shape before cutting into your project material. You can adjust a curve, correct an angle, or smooth an irregular edge without risking an expensive piece of hardwood.
The process also breaks the work into manageable steps. First, create the template. Then rough-cut the parts. Finally, use the router to bring everything to the finished shape.
Each step builds on the one before it.
Choose the Right Router Bit for Template Routing
The router bit is the working end of the process, and its design has a major influence on the finished surface.
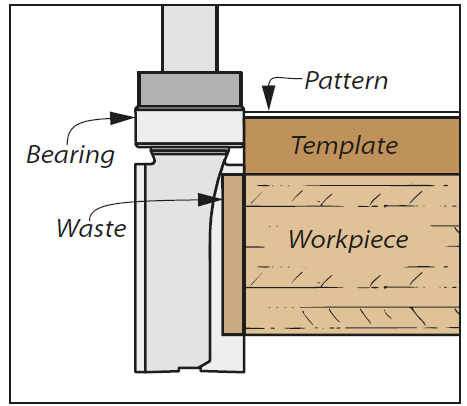
All bearing-guided trimming bits work on the same basic principle: A bearing follows the edge of the template while the cutting flutes remove the waste from the workpiece.
However, the location of the bearing and the design of the cutting edges determine how the bit is used and how smoothly it cuts.
Standard Pattern and Flush-Trim Bits

Three common types of bits handle most template-routing tasks.
Pattern bits have a guide bearing near the shank, above the cutting edges. They're useful when the template is positioned above the workpiece while using a handheld router. Plunge-cutting versions can also be used for recessed details, such as mortises and pockets.
Flush-trim bits have the bearing at the tip, below the cutting edges. With a handheld router, the template is positioned beneath the workpiece so the bearing can follow it.
Double-bearing flush-trim bits have a bearing at each end of the cutting flutes. This allows you to position the template on either side of the workpiece.
That last option becomes especially useful when working with curved parts. You can flip the workpiece and template assembly to approach difficult grain from a different direction.
Angled-Flute Bits for Cleaner Cuts
Standard trimming bits typically have straight carbide cutting edges. They work well for many tasks, but they can sometimes leave noticeable ripples or rough areas on the routed edge.
An upgrade is a trimming bit with angled cutting flutes.

Instead of striking the wood fibers squarely, the angled cutting edges produce more of a shearing action.
The Woodline bits shown here use opposing flute angles. The flutes near the shank cut downward, while those near the tip cut upward.
This arrangement helps reduce chipout on both faces of the workpiece.
It's particularly useful when trimming plywood, veneered panels, and other materials where a clean edge is important.
Spiral Flush-Trim Bits for Smooth Edges
For even smoother results, consider a spiral trimming bit.

Spiral cutting edges engage the wood gradually, producing a shearing cut that can leave a remarkably smooth surface.
The Woodpeckers Ultra-Shear bits shown here are machined from solid carbide. This construction allows for more complex cutting geometry than conventional straight-flute bits.
Some spiral bits also use a compression-cutting design, combining upcut and downcut flutes to help reduce tearout on both faces of a workpiece.
For compression cutting to work as intended, the material needs to engage the appropriate portions of the cutting flutes.
These bits can be especially useful for hardwood end grain, plywood, and MDF.
Certain solid-carbide pattern bits are also designed for plunge cutting, making them useful for deeper mortises and pockets.
Woodsmith Tip: Match the Bit to the Material. A standard carbide-tipped trimming bit is often all you need for routine template routing. But when you're working with figured hardwood, veneered plywood, or visible edges that need to be especially smooth, an angled-flute or spiral bit can be worth the investment.
Make a Template Worth Following
A sharp router bit won't compensate for a poorly made template.
Every bump, flat spot, or irregular curve along the template edge can be transferred directly to the workpiece.
And if you're making several matching parts, that flaw can be repeated on every one.
That's why it's worth spending a little extra time getting the template right.

Start by laying out the desired shape accurately. Rough-cut the template just outside the layout line, then refine the edge with sanding blocks, files, rasps, or other shaping tools.
Pay particular attention to curves and transitions between straight and curved sections.
The smoother and more accurate the template, the less cleanup you'll have to do on the finished parts.
Choose the Best Material for Router Templates
A template doesn't need to be fancy or expensive.
In fact, inexpensive materials are often ideal because they're easy to shape and replace if you make a mistake.
Two of the best choices are hardboard and MDF.
Both are smooth, relatively stable sheet materials that can be shaped without worrying about grain direction or splintering.
Hardboard Templates
For years, 1/4"-thick hardboard has been a favorite material for shop-made templates.
It's inexpensive, easy to cut, and readily shaped with common woodworking tools.
It's also useful for all kinds of jigs and fixtures.
The main drawback is thickness.
Some router bits have a noticeable gap between the bearing and the cutting edges. With a thin template, this can make it difficult to position the bearing securely against the template while still allowing the cutting edges to reach the workpiece.
One solution is to laminate two pieces of hardboard together to create a thicker template.
Why 1/2" MDF Is a Good Upgrade

For many template-routing jobs, 1/2"-thick MDF is an excellent choice.
It's inexpensive, flat, and easy to shape. The light-colored surface also makes layout lines easy to see.
The additional thickness provides a wider surface for the guide bearing to follow.
That's especially helpful when using bits with a gap between the bearing and cutting edges.
MDF is also easy to refine. You can use drill bits to establish inside curves, then files, rasps, and sandpaper to bring the template to its finished shape.
Woodsmith Tip: Check the Bearing Contact. Before routing a project part, set the bit height and make sure the bearing contacts the template securely. The bearing should ride against the template throughout the cut without contacting the workpiece or slipping above or below the template edge.
Make Your Templates Last Longer
MDF and hardboard are relatively soft materials, but they can still make durable templates.
In normal use, the bearing may burnish the template edge without significantly changing its shape.
If you're making a template that will see repeated use, there's an easy way to toughen the edges.
Apply a thin coat of thin- or medium-viscosity cyanoacrylate (CA) glue to the finished template edge.
The glue penetrates the fibers and hardens the surface.
Allow it to cure completely, then inspect the edge for any glue buildup that could affect the profile.
This simple treatment can help extend the life of frequently used templates.
Template Routing Isn't Just for Curves
Curved furniture parts are probably the most familiar application for template routing, but the technique is useful for much more.
You can also use templates to create:
- Straight and angled edges
- Slots and handholds
- Recessed openings
- Matching furniture components
- Irregular profiles
- Repeated decorative details

For example, a handhold opening can be rough-cut with a jigsaw and then cleaned up with a bearing-guided router bit.
The template establishes the final shape, while the router produces a smooth, consistent edge.
This approach can be especially helpful when the finished opening needs to match another part or when you're making several identical pieces.
Rough-Cut Before You Rout
Once the template is finished, it's time to prepare the workpieces.
Start by tracing the template's outline onto each part.
Then remove most of the waste before moving to the router.
A band saw is my preferred tool for this step, although a jigsaw or hand saw works as well.
The goal is to leave about 1/16" of waste outside the final profile, where practical.
This reduces the amount of material the router bit has to remove.
There are several advantages:
- Less cutting pressure on the bit
- Reduced chance of tearout
- Easier control during routing
- Less strain on the router
- A smoother finished edge
The closer you can rough-cut to the template without cutting into the finished profile, the easier the final routing operation becomes.
Woodsmith Tip: Let the Router Do the Finishing. Think of template routing as a final shaping operation rather than a way to remove large amounts of material. A band saw or jigsaw is better suited to removing most of the waste. The router excels at bringing the remaining material precisely to the template.
Reduce Tearout by Working with the Grain
One of the biggest challenges in template routing is dealing with changing grain direction.
On a curved furniture part, the grain may run in several directions along the edge.
A cut that produces a smooth surface in one area may cause tearout farther along the curve.
The solution is to plan the routing operation around the grain whenever possible.
A double-bearing flush-trim bit is particularly useful here.
Because it has bearings at both ends of the cutting flutes, you can flip the workpiece and template assembly over and use the opposite bearing.
This allows you to approach the grain from a different side of the workpiece while maintaining a conventional, controlled feed direction.
Avoid climb cutting simply to follow the grain. On difficult areas, lighter passes and a suitable shearing bit are safer ways to reduce tearout.
Use Thicker Templates for Full-Depth Cuts
Sometimes the thickness of the template is just as important as its shape.

A thicker template gives you more flexibility when positioning the router bit.
It allows the bearing to ride securely against the template while the cutting edges reach the full thickness of the workpiece.
This can be particularly helpful when routing thicker stock or using bits with a gap between the bearing and the cutting edges.
Instead of struggling with bit height or leaving a narrow strip of waste, a thicker template can make the setup more straightforward.
Double-Sided Templates Improve Control
For some projects, it's worth taking template routing one step further.
A two-sided template captures the workpiece between matching template pieces.

This arrangement provides several advantages.
First, it helps hold and support the workpiece during routing.
Second, it allows the assembly to be flipped over when needed.
Combined with a double-bearing flush-trim bit, this makes it easier to work with changing grain direction.
It's a useful approach for curved furniture components and other parts where the finished edges need to be smooth and consistent.
Better Template Routing at a Glance

Better Results Come from Better Preparation
The real strength of template routing is its ability to produce consistent, repeatable results.
But those results depend on the steps leading up to the final cut.
Start with a sharp bit suited to the material. Make an accurate template with enough thickness to support the guide bearing. Remove most of the waste before routing, and pay attention to grain direction as you work.
For more demanding projects, upgrading to a spiral bit or using a double-sided template can make the process even more reliable.
Once you have a few of these techniques in your woodworking toolbox, you'll find yourself using templates for far more than matching curved parts.
Choose the Right Router Pattern Bit
Pattern bits come in a wide range of diameters, cutting lengths, and flute designs. Learn how to choose the right bit for template routing, dadoes, grooves, mortises, and other joinery tasks.
EXPLORE ROUTER PATTERN BITS → Get Better Results with the Right Cutting Edge
Learn the Basics of Template Routing
New to template routing? Start with the fundamentals. Learn how to create a master template, rough-cut your workpieces, and use bearing-guided router bits to make identical curved and irregular parts.
LEARN TEMPLATE ROUTING → Make Accurate, Identical Woodworking Parts


