

A large crown molding is the perfect way to top off a case project. All it takes is a few common router bits.
A crown or cornice molding serves as the exclamation point at the top of a large case piece. And without it, the case would look unfinished.
The challenge becomes how to make this large molding. Most often, I rely on my router table to provide the moldings for a project. But as you can imagine, I’m limited by the size of the router bits available and the size of the piece I can safely handle. However, this logistical problem doesn’t need to stop you from making “fancy” crown moldings.
The solution is to make the elements of the molding separately and then glue them together into a finished, “built-up” crown. This simplifies the process, and the result is virtually indistinguishable from a one-piece molding. (This technique also works well for other types of moldings.)
A WELL-DESIGNED MOLDING.
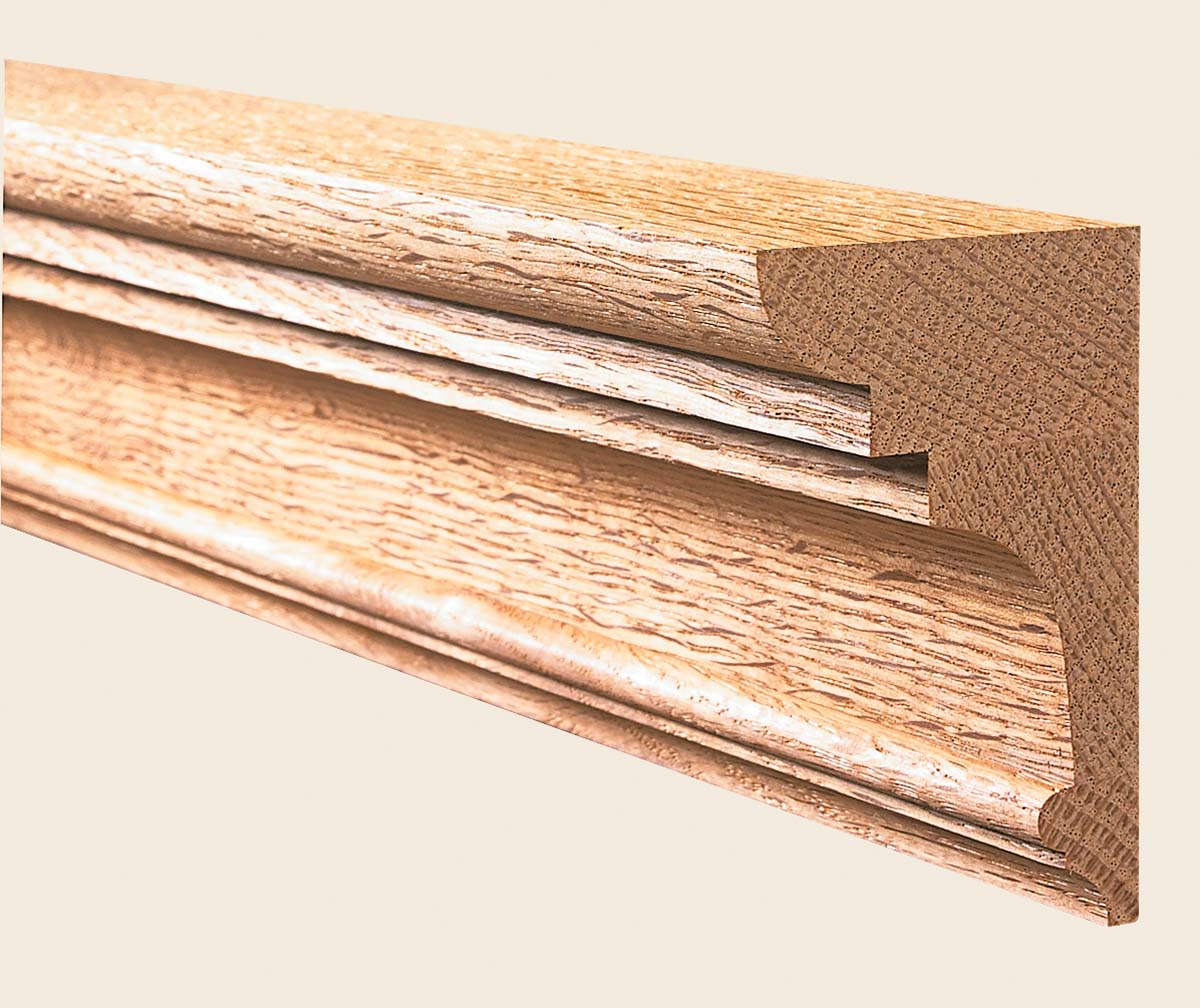 |
| The crown molding was shaped in three sections, but from the face it looks like a single piece. |
Most moldings use a combination of a few basic profiles. These are the cove, quarter-round, bead, ogee, and flats (fillets) shown in the drawing at right. And all of these profiles are easily made with common router bits. The trick is to put them together in an arrangement that creates a pleasing, well-proportioned molding.
So before making a molding, you need to design it. And here I like to follow a few simple guidelines. First, as a general rule, a large molding looks better when the height is greater than the depth. This draws your eye up and down to add a sense of height and lightness to the case. The molding in the photo at left is a good example.
My second rule is to keep the molding from becoming too busy. I like each profile, large or small, to stand out and at the same time blend together. If the individual profiles are small and closely packed, the molding becomes a “blur.” Here’s where fillets can help by separating the profiles so they remain distinct.
Finally, I always keep proportion in mind. You want all the elements of the molding to be in scale to one another and the assembled crown molding should be a good fit to the scale of the project.
DESIGN ON PAPER.
 The first thing to do is design the molding on paper using the router bit profiles as your patterns. Making a full-scale drawing allows you to get the size and proportions right. And you can see how the individual pieces can be assembled to make the molding.
The molding shown on the oppo-site page follows all the rules and makes a good example of how to “build” a crown molding. As you can see, it’s made in three sections. First comes a small, “bead and cove” profile that ties it to the cabinet and makes a smooth transition. Then, a large, simple cove section is used to add height and depth. The cap, separated from the cove by fillets, is simply a roundover that ends sharply to punctuate the crown.
MATCH YOUR WOOD.
Before talking technique, I should mention a word about wood selection. The idea is to make the molding appear as if it were all one piece. So you want to pay attention to the color and grain match of the individual pieces.
Whenever possible, it’s a good plan to cut all the sections from one board. If necessary, you can use the pieces in different orientations — edge grain, or face grain. The routed profiles do a good job of hiding any change in grain direction.
MAKING THE CROWN
Once you’ve designed the molding, the work is pretty routine. To make the crown molding shown, I started with the large cove section.
 The drawing shows the process. The profile is cut with a 5⁄8"-rad. cove bit. Elongating the cut creates the illusion of a larger radius. This is simply a matter of cutting the cove to full width, then raising the bit to extend the cut into the workpiece. The bottom section actually ends up being flat, but the upper rounded section of the cove is what catches your eye.
To do the work safely, I started with a wide piece of 1"-thick stock. This leaves you with plenty of surface riding against the fence as the cove cut is extended. When completed, the cove section is cut to height on the table saw.
A BEAD AND COVE.
Next comes the small bead and cove piece that sits below the large cove. The bead stands proud of the bottom edge of the large cove to add depth.
Again, this small molding is made on the edge of an oversized piece of stock. The two middle drawings at right show the two steps involved. First, I cut the bead first with a single pass across a beading bit. (You could also use a 1⁄8" roundover bit to cut the bead in two halves.) When cutting the bead, you’ll also create the short fillet below that separates the bead and cove.
The cove is routed with a 1⁄2"-dia. core box bit. Just make sure to leave at least a 1⁄16" fillet separating the profiles. Then I ripped the molding free, leaving it a little extra-wide to make the final assembly easier.
A SIMPLE ROUNDOVER.
The top “cap” is routed on a wide piece with a 1⁄2" roundover bit. You want the arc of the roundover to end sharply. This gives you a crisp end point at the top of the molding, as shown in the lower drawing at right. It also leaves a wide fillet along the lower edge of the piece that — when combined with the cove section below — adds a “stairstep” detail.
ASSEMBLY.
 Once all the pieces are made, the goal of the assembly is two-fold — the molded edges should be aligned properly, and you want the glue joints to be tight. The best way to get this done is to glue up only two pieces at a time.
The keys to the glueup are plenty of clamps, cauls to distribute the clamping pressure, and a minimum amount of glue. There will be very little stress on the glue joint, so strength isn’t a big concern. I spread the glue sparingly, keeping it to the back edge of the joint and then let it tack up for a minute. Then align the molded edges (don’t worry about the back face) and clamp the pieces, making sure they stay in place.
Once the glueup is complete, the back face can be trimmed flush at the table saw or jointer. And once it’s installed on your project, only you will know the secret of your “pieced” crown molding.


