


Build a Stowable Woodworking Assembly Table
Having a dedicated assembly table can make a big difference in a woodworking shop. A large, flat surface gives you room to lay out parts, position clamps, apply glue, and assemble projects without constantly moving things around.
The problem is finding enough space for another large piece of shop equipment.
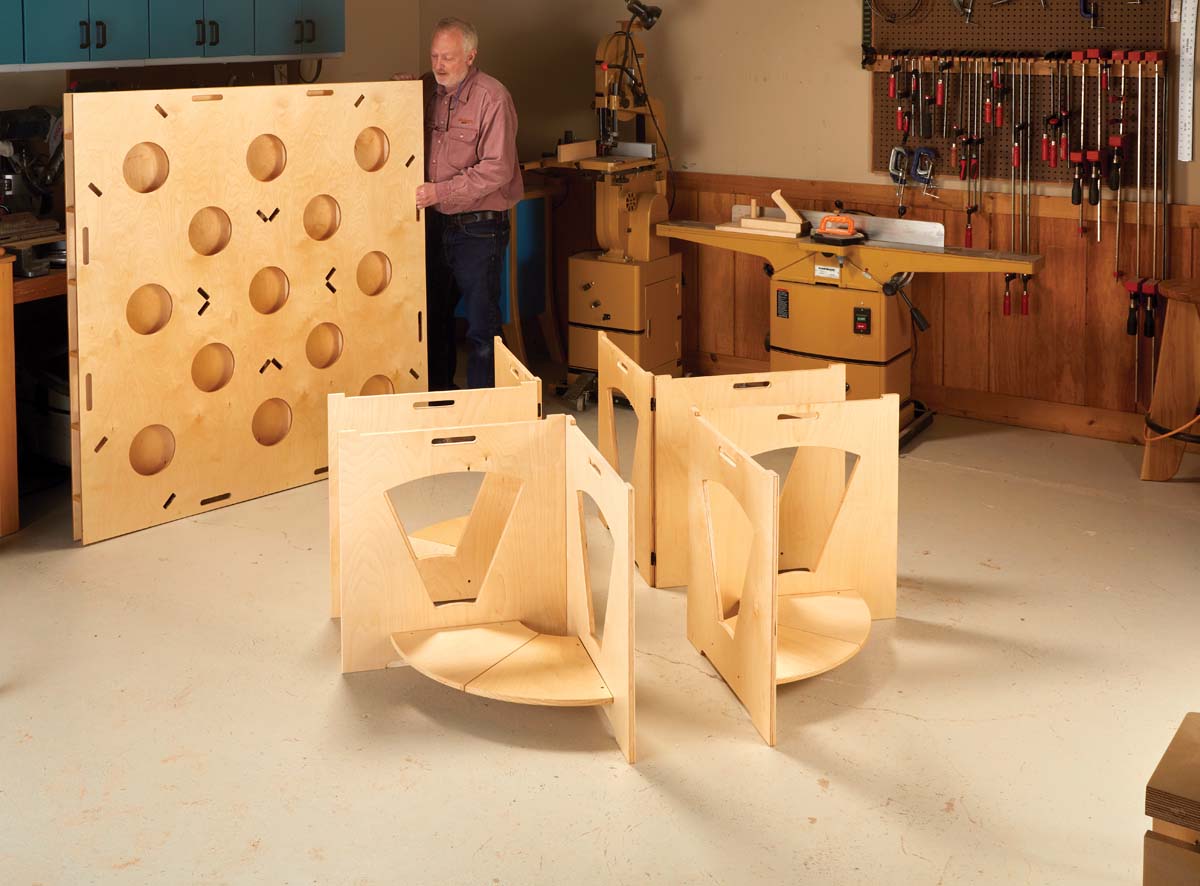
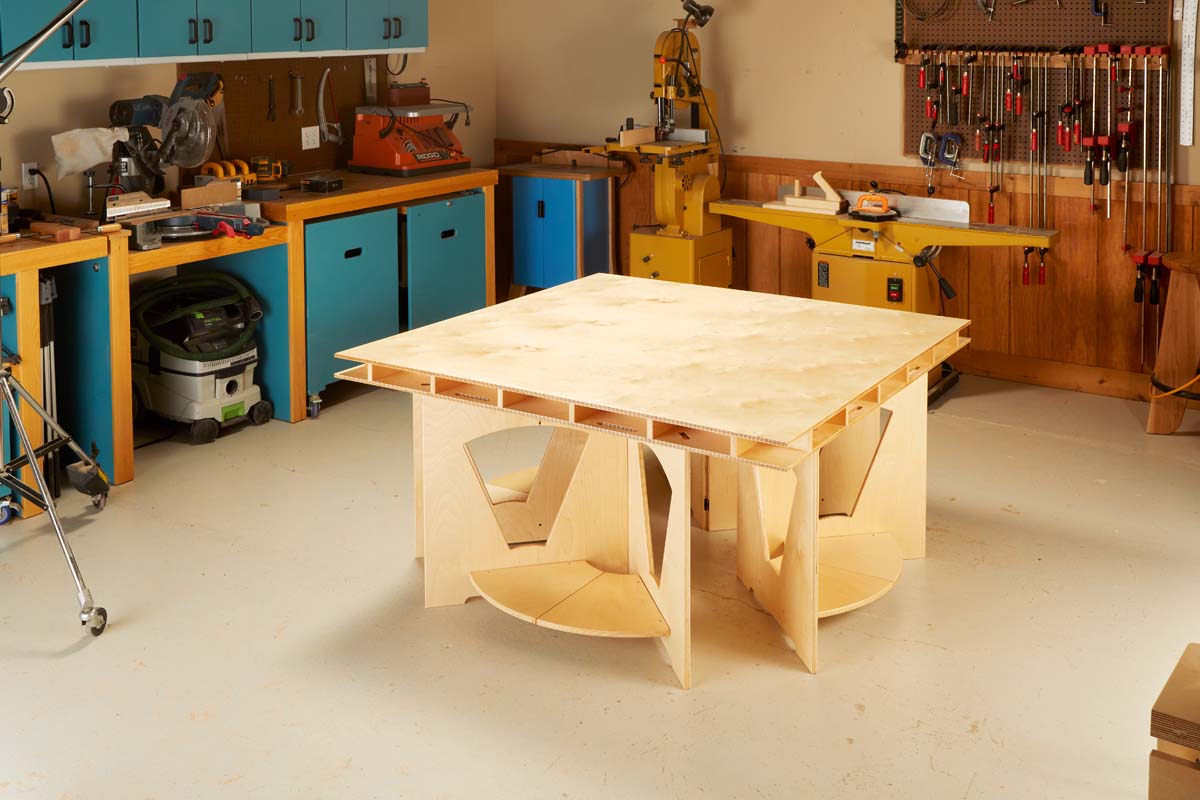
This stowable woodworking assembly table offers the best of both worlds. It provides a generous worksurface built around a full sheet of Baltic birch plywood, yet the base can be disassembled and folded for compact storage.
The design combines a rigid torsion-box top with four folding base assemblies. When everything is put together, the table provides a stable platform for glue-ups and project assembly. When you need the floor space back, the top lifts off and the base folds away.
A Large Assembly Table That Stores Away
One of the biggest advantages of this table is its size.
The top uses a full sheet of Baltic birch plywood for the worksurface, providing plenty of room for larger woodworking projects.
Instead of balancing a cabinet or furniture assembly on the edge of your workbench, you have a dedicated surface with room for parts, clamps, and tools.
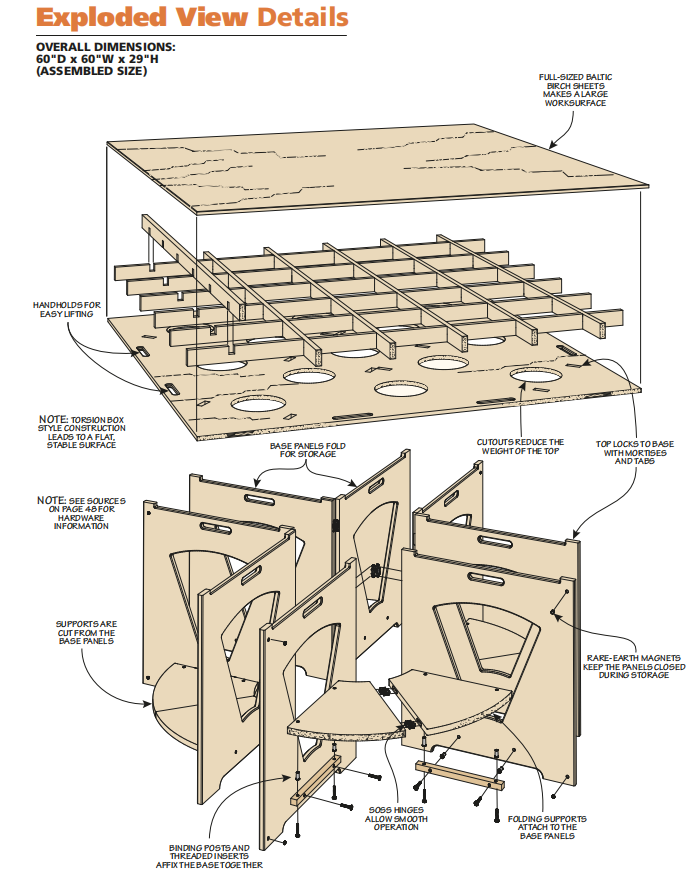
The tabletop uses torsion-box construction to resist bending and help maintain a flat surface. Its layered construction also provides clamping options around the perimeter.
Supporting the top are four separate base assemblies that lock together during use.
The base panels feature tabs that fit into matching mortises in the underside of the tabletop. This helps locate the top and keeps the components registered during assembly.
Build the Folding Assembly Table Base
The base is what makes this project different from a conventional shop table.
Rather than using a permanent cabinet or fixed legs, the table relies on four folding base assemblies.
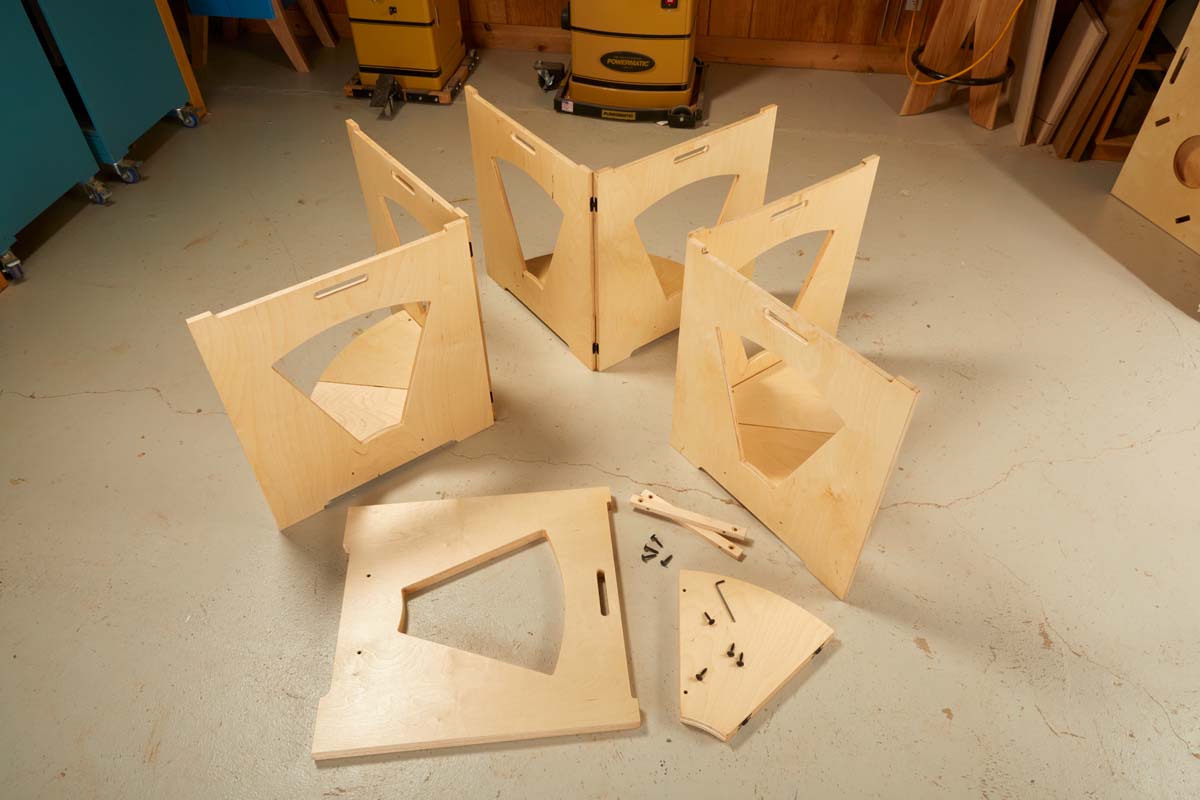
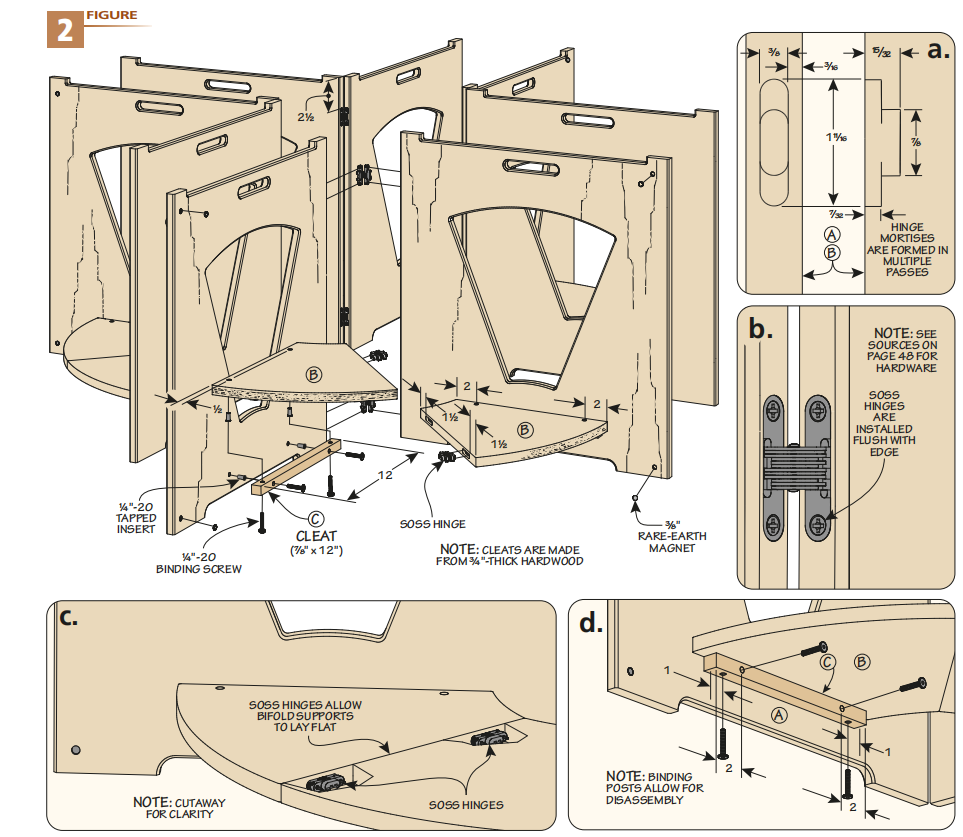
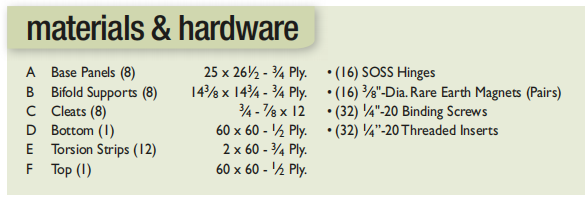
Each assembly consists of a main base panel and a pair of bifold supports. Concealed SOSS hinges allow the components to fold, while removable binding posts and hardwood cleats secure the supports during use.
The result is a sturdy base that can be broken down into relatively flat components for storage.
Start with a Master Template
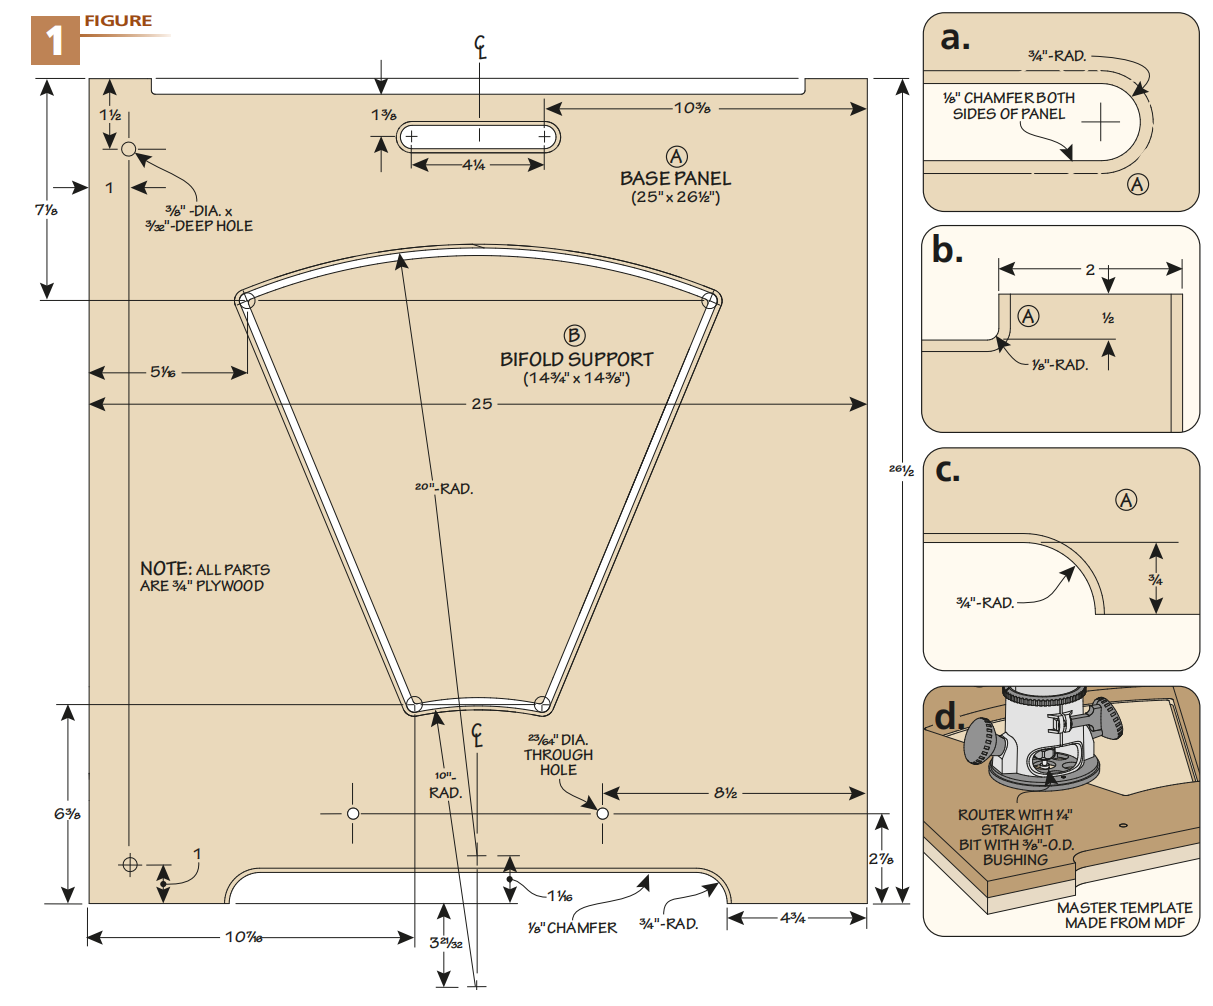
Because the base includes several matching parts, an MDF master template is a good place to start.
The template establishes the shape of the base panels, including the upper and lower notches, handhold, and center opening.
Using one carefully made template helps ensure that all four base assemblies fit together consistently.
The large opening in each panel serves two purposes. It reduces weight, making the components easier to handle, and the material removed from the opening can be used to create the matching bifold support.
This makes efficient use of the plywood while keeping the construction straightforward.
Cut and Rout the Base Panels
After cutting the base panels to size, remove most of the waste from the notches and center openings with a jigsaw.
Then attach the master template using strong double-sided tape.
A router equipped with a pattern bit can clean up the outside edges and notches. For the center opening, use a straight bit and guide bushing to follow the template.
Make the cuts in multiple shallow passes rather than attempting to remove the full thickness of the plywood at once.
The original construction uses approximately ¼"-deep passes when routing the center openings.
Before removing the template, mark and drill the required holes.
Once the panels are shaped, ease the edges with a roundover bit. This makes the parts more comfortable to handle when setting up or storing the table.
Add Hinges and Magnetic Storage
The folding mechanism uses concealed SOSS hinges.
Each base assembly requires four hinges: Two connect the main base panels, and two connect the bifold supports.
Accurate hinge mortises are important for smooth folding action.
A practical approach is to use the hinge manufacturer's paper pattern to make routing templates for the shallow and deep portions of the mortises.
Rare-earth magnets installed in counterbores on the inside faces help hold the folded panels closed during storage.
Assemble the Folding Base with Binding Posts
The bifold supports connect to the main base panels through hardwood cleats and binding posts.
These fasteners provide a secure connection during use while allowing the components to be separated when it's time to put the table away.
The cleats are drilled to accept the binding posts, and matching holes are made in the supports.
Threaded inserts provide the mating threads for the fasteners.
A small chamfer around each hole helps the inserts start cleanly.
When assembled, the four base units create a stable foundation for the large tabletop.
When storage space is needed, an Allen wrench is all that's required to remove the binding posts and cleats so the supports can fold flat.
Build a Flat Torsion-Box Assembly Table Top
A large assembly table is only useful if the worksurface remains flat.
That's why this design uses torsion-box construction.
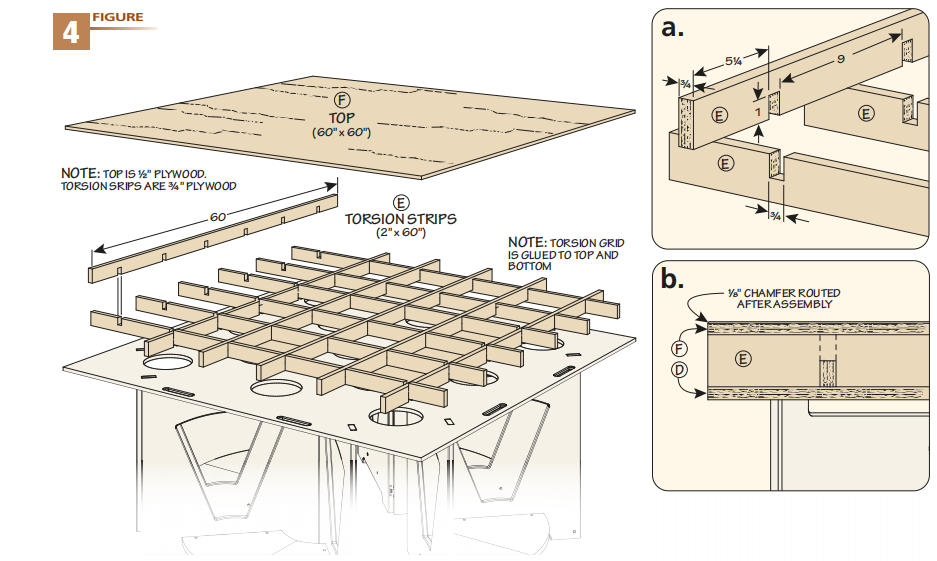
The top consists of three layers: A lower plywood skin, an internal grid of interlocking strips, and an upper plywood skin that forms the worksurface.
Once glued together, the grid and skins create a rigid structure that resists bending without requiring a solid, heavy slab.
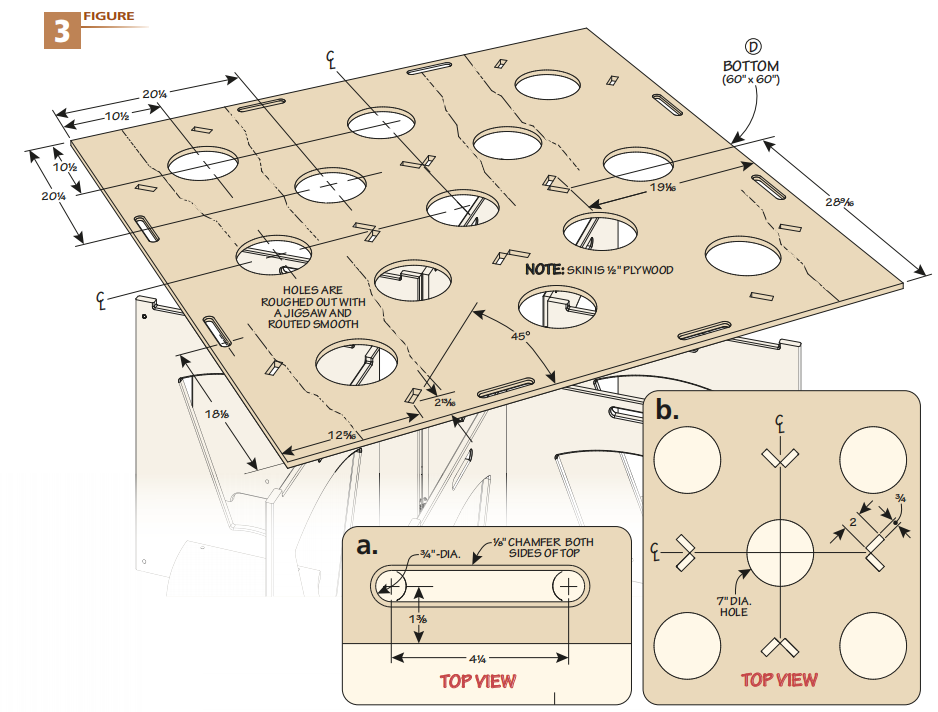
Prepare the Lower Plywood Skin
The lower skin includes several large circular openings.
These reduce the weight of the tabletop, making it easier to lift off the base when the table needs to be stored.
To create the openings, start with an MDF template.
Remove most of the waste with a jigsaw, then use a router and template to clean up the edges.
The underside also includes a series of mortises that receive the tabs on top of the base panels.
Rout the Mortises for the Base
The mortises in the underside of the tabletop are an important part of the design.
They register the top on the four base assemblies and help prevent the components from shifting out of position.
Careful layout is essential because the mortises must align with the tabs on the base panels.
Use a large framing square to establish the layout, then mark the starting and stopping points for each mortise.
Remove most of the waste with a jigsaw and clean up the openings with a router and template.
The mortises can be made slightly larger than the tabs to provide the clearance needed for easy assembly.
Handholds in the lower skin make it easier to lift and remove the top.
Make the Interlocking Torsion-Box Grid
The internal framework consists of plywood strips joined with half-lap notches.
When assembled, the strips form a rigid grid that supports the upper and lower skins.
Start by milling all the strips to the same width.
Then use a dado blade to cut the half-lap notches.
The dado width should match the actual thickness of the plywood so the strips fit together snugly.
A miter gauge with a long auxiliary fence and stop block makes it easier to cut the notches consistently.
By cutting matching notches from both ends of the strips, you can keep the spacing uniform throughout the grid.
Glue Up the Torsion-Box Top
With the three layers prepared, you're ready to assemble the tabletop.
Start by placing the lower skin on the base assemblies for support.
Apply glue to the half-lap joints and assemble the torsion-box grid.
Once the grid is complete, apply glue along its lower edges and position it on the lower skin.
Work from the center outward, checking that the grid stays properly aligned.
Weights can help hold the center of the assembly in place while clamps secure the perimeter. Small pin nails can also help prevent the components from shifting during glue-up.
Finally, apply glue to the upper edges of the grid and install the top skin.
For the best results, assemble the torsion box on a verified flat surface and distribute clamping pressure evenly. This helps prevent twisting or distortion while the glue cures.
Choose a Durable Worksurface
A shop assembly table sees plenty of wear from clamps, glue, tools, and project parts.
The tabletop can be finished with several coats of lacquer, as shown in this project.
Another option is to add plastic laminate for a durable, easy-to-clean surface.
Whichever finish you choose, allow it to cure fully before putting the table into service.
Set Up and Store the Assembly Table
Once the tabletop is complete, the assembly table is ready to use.
Open the four folding base assemblies and install the hardwood cleats and binding posts.
Position the bases, then lower the tabletop so the mortises engage the tabs on the base panels.
Before starting a glue-up, check that all fasteners are secure, the top is fully seated, and the table stands firmly without rocking.
When you're finished, simply reverse the process.
Lift the tabletop off the base, remove the binding posts and cleats, and fold the base panels and bifold supports.
The components can then be stored alongside the tabletop until they're needed again.
A Practical Assembly Table for Any Workshop
A dedicated assembly table makes glue-ups and furniture construction easier, but it doesn't have to occupy valuable floor space all the time.
This stowable design combines a large, flat torsion-box worksurface with a folding base that can be taken apart for storage.
It's a useful solution for woodworkers who need a generous assembly area but don't have room for another permanent workstation.
And once you've experienced the convenience of a large, flat assembly table, you may find yourself leaving it set up more often than you expected.
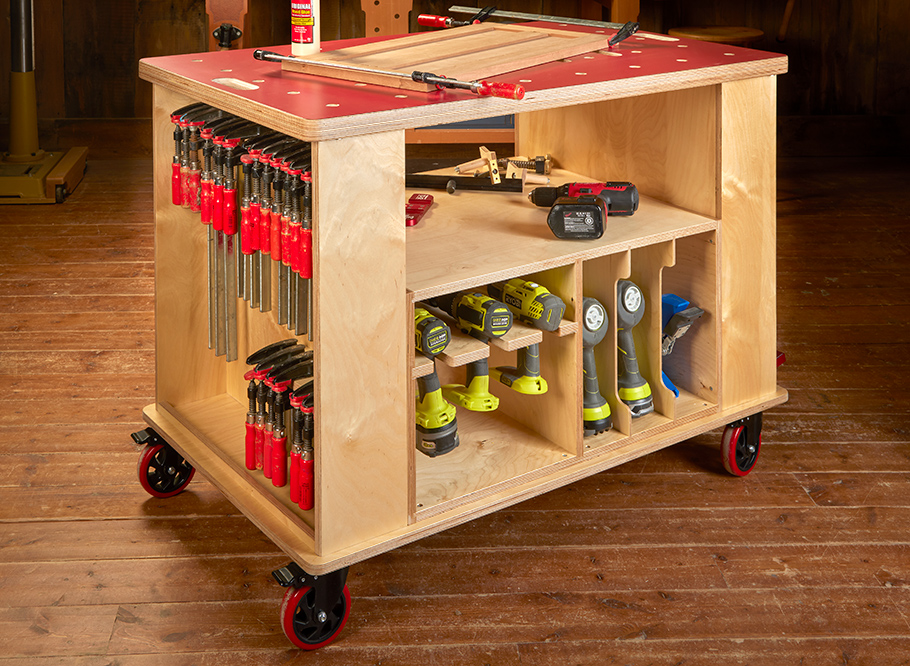
Build a Mobile Assembly Cart
Need a versatile workstation that can move wherever the work takes you? A mobile assembly cart provides a convenient surface for assembling projects, organizing tools, and handling glue-ups. It's another practical way to make better use of your workshop space.
EXPLORE THE ASSEMBLY CART PLANS → More Flexibility for Glue-Ups and Project Assembly